
Bathroom Waterproofing & Moisture Protection
Return to category.
Go to categoryShampoo recesses, often known as shower niches, are one of the most beautiful and practical details in a modern bathroom. Instead of plastic shelves, rusting metal cases or bottles on the shower floor, a clean built-in spot is created inside the wall, in the same style as the tiles. The image is neater, more architectural and more functional in everyday use.
But the recess is also one of the most misunderstood parts of the shower. Many see it as a simple "hole in the wall with tiles". It is actually a small structure within the wet zone, with backs, sides, horizontal shelf, internal corners, joints, cuts and surfaces where water can stay longer than a simple vertical wall. That is, exactly the kind of detail that can cause a problem if not properly sealed.
The most dangerous spot in a recess is not always what it seems. The owner sees the finished tile, the clean grout and the nice finish. What he doesn't see is if there is continuous waterproofing behind the tiles, if the inside corners are reinforced, if the bottom shelf has a slight outward slope, if the cuts around the frame are properly sealed, and if the substrate really withstands daily contact with water.
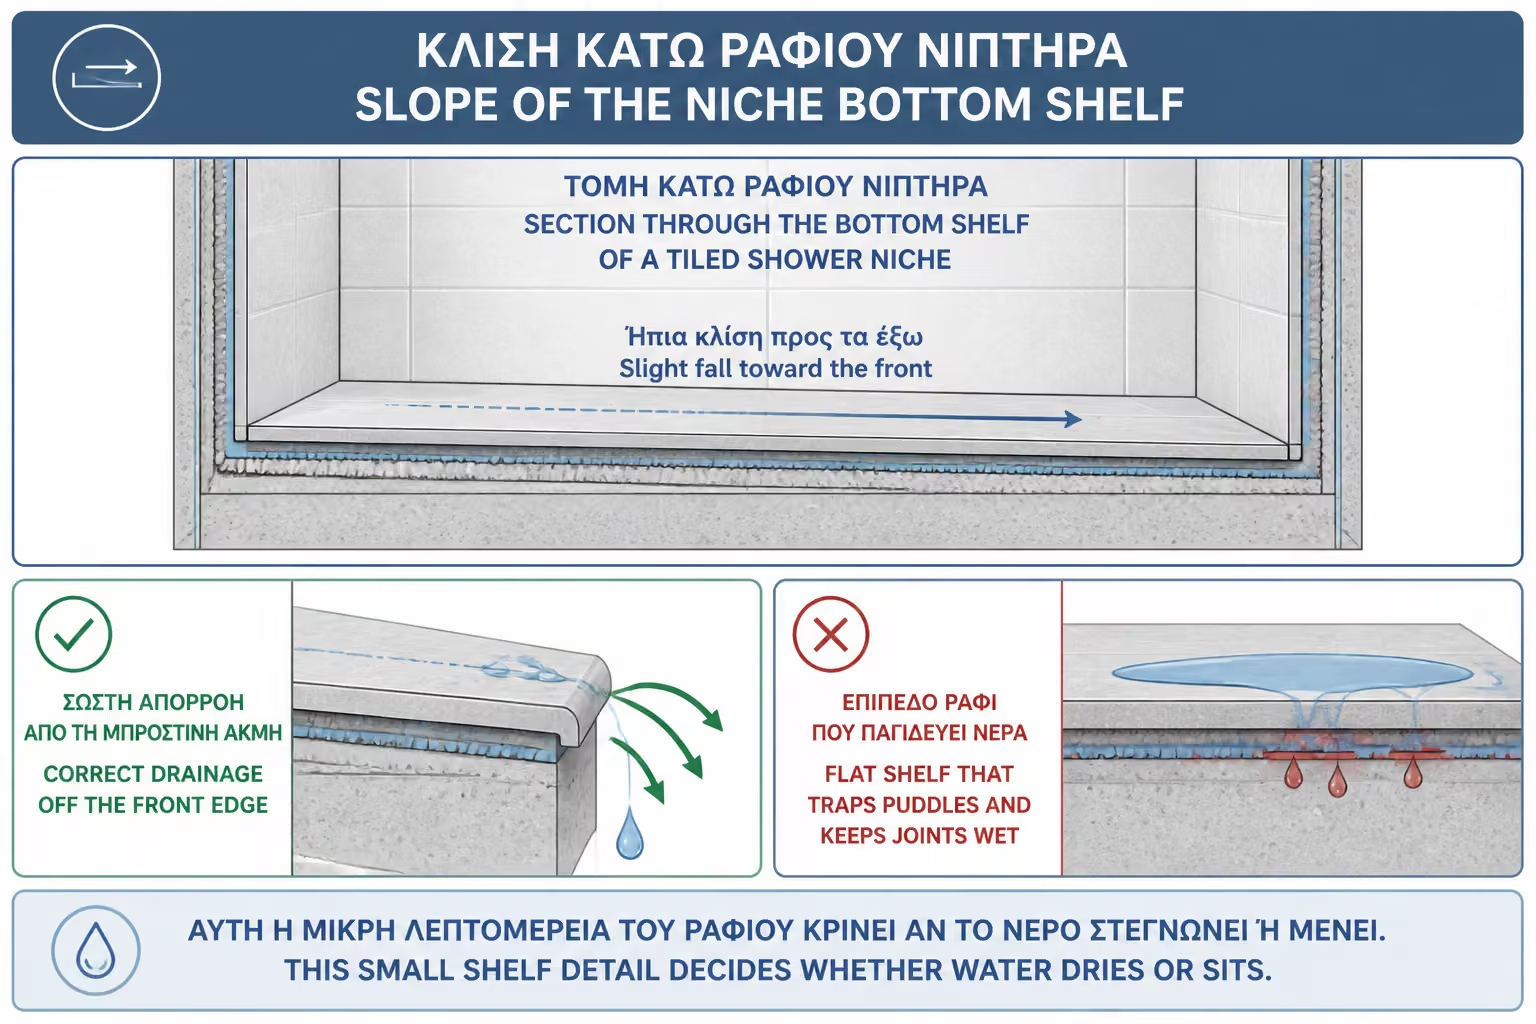
The biggest pitfall is stagnant water on the shelves. A recess may look great, but if the bottom of it is horizontal or, even worse, has a slight inward slope, water stays there after every shower. It may seem like a small amount, but it is repeated every day in the same spot. Over time, joints are strained, cleaners stay longer on the surface and moisture finds weak points.
The goal, then, is not just to make a pretty recess. It is to make a recess that works as part of the overall sealing system of the shower. It must have the right position, the right substrate, the right slope, complete waterproofing and details that are not based only on grout or silicone. This guide explains what needs to be done before the tiles are installed, what mistakes are most common and what the owner should ask the repair shop for.
The shampoo recess is a built-in compartment inside the shower wall, designed to accommodate shampoos, shower gels and small everyday items. It can be small, for two-three bottles, or larger, with an internal shelf and a more pronounced architectural character. It can be covered with the same wall tile, with a different decorative tile, with marble, artificial stone or a ready-made system.
The problem is that the recess creates a "break" in the wall. Where there would normally be a continuous vertical surface, a space is opened up with internal corners and horizontal surfaces. Technically, this means more places where moisture can linger, more material joints and more potential for failure.
In a simple shower wall, the water flows downwards. In an alcove, water can drip onto the bottom shelf, get behind the bottles, collect in the back corners and slowly dry out. If the recess is not designed correctly, it becomes a small "basin" inside the wall.
This is why the recess should not be decided casually when tile-setting is already starting. It has to be planned in advance, together with the position of the mixer, the height of the shower head, the direction of the water, the wall structure, and the waterproofing system.
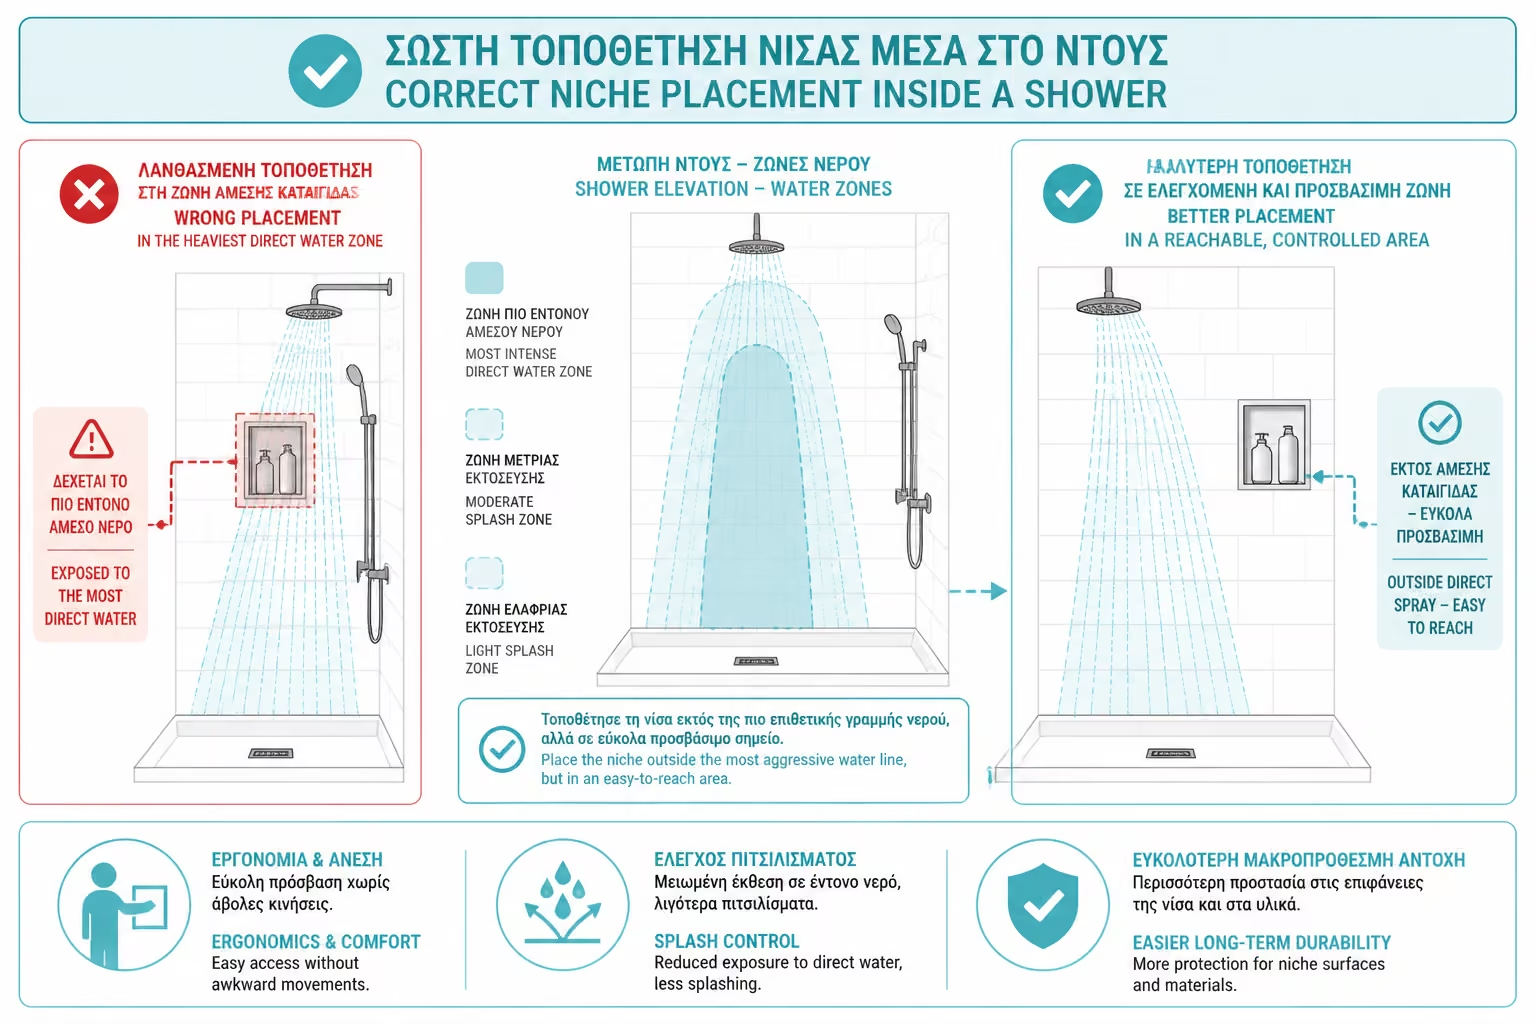
The location of the recess affects both practicality and sealing. A recess located right in the main water flow will receive much more stress than one located on a side wall. This does not mean that it is forbidden to place it on the main wall of the shower, but it must be taken into account that there the water will hit it more often.
Ideally, the recess is placed in a place that is easily accessible, but not where the water is constantly falling at full volume. In walk-in showers, a side wall or a point slightly further from the direct beam of the shower is often chosen. This reduces the amount of water that accumulates on the shelves and the construction works with less strain.
What is inside the wall should also be checked. In old bathrooms, behind the point that seems ideal there may be plumbing pipes, drainage, electrical lines or there is a structural element that should not be tampered with. We do not open a recess "where it is aesthetically convenient" without control. Especially in apartments, the walls may be thin, shared or border a bedroom, hallway or other property.
A common mistake is for the owner to ask for a large horizontal recess because they saw it in a photo, without sufficient wall thickness or without having checked the masonry. The result can be sloppy construction, a weak substrate, or a recess that ends up protruding instead of fitting in properly.
Before we talk about waterproofing, we need to talk about the substrate. The recess must have a firm, suitable and durable base. If built over loose plaster, rough-cut bricks, plain plasterboard without a wet space specification or an unstable surface, the best waterproofing will not be properly supported.
In built recesses, the opening must be clearly formed. The sides must be solid, without loose parts, without gaps and without rough fillings. In dry building systems, materials suitable for wet areas, such as cement boards or special structural panels, should be used, not simple solutions that cannot withstand moisture.
A recess is a point with many interior angles. If the substrate is not flat, the corners turn out crooked, the tiles are difficult to cut and the waterproofing does not fit properly. The final result may look "saved" with glue and grout, but technically have weak points.
A practical example: a recess is opened in an old brick wall and the sides are left with irregular gaps. If these are simply filled in hastily and a sealant is passed over the surface, the surface is not reliable. First, the substrate must be stabilized, clean surfaces must be created, and then the waterproofing system must be applied.
If there's one spot to check in every shampoo nook, it's the bottom shelf. This should not be completely horizontal. It needs a slight slope outwards, i.e. towards the side of the shower, so that the water does not stay inside the recess.
This slope does not have to be large. A subtle slop, around 1%–2%, is usually enough for the water to flow out without the shelf appearing to "tilt". The important thing is that there is no reverse slope towards the back of the recess. If water collects in the back corner, the joint, silicone and waterproofing will be stressed there every day.
In many failures, the problem is not that no seal got in at all. It is that the water stayed in the same place every day. Waterproofing can protect the substrate, but should not be used as an excuse for poor geometry. The less water stagnates, the less strain the entire system receives.
Special care is needed when the lower shelf is made of marble, granite or a single piece of artificial stone. The surface may look perfect, but if placed completely horizontally or with a slight inward slope, it will hold water behind the bottles. The same applies when the recess is lined with small tiles: the joints should not create small "tanks".
Standing water on the shelves of an alcove is not just a matter of cleanliness. It is constant technical strain. Water spends more time on joints, corners and where tiles meet different surfaces. Along with soaps, salts and cleaners, it creates an environment that wears out materials faster.
In a simple vertical tile, water drains downwards. In the recess, water can stay behind a bottle for hours. If the bathroom is not well ventilated, the spot dries even more slowly. Over time, the joints darken, scale builds up and the surface begins to look old, even if the bathroom is new.
But the most serious thing is that the water presses the most sensitive points: the inner corners. There the waterproofing must be continuous and reinforced. If there is a small failure, the water will find it. And because the recess is inside the wall, moisture can pass through the masonry without being immediately noticeable.
That's why it's not technically correct to say that an indentation will "never have a problem". The correct wording is that with a correct slope, complete waterproofing and good application, the risk of moisture entering the masonry is drastically reduced. Prevention is in the detail, not a blanket promise.
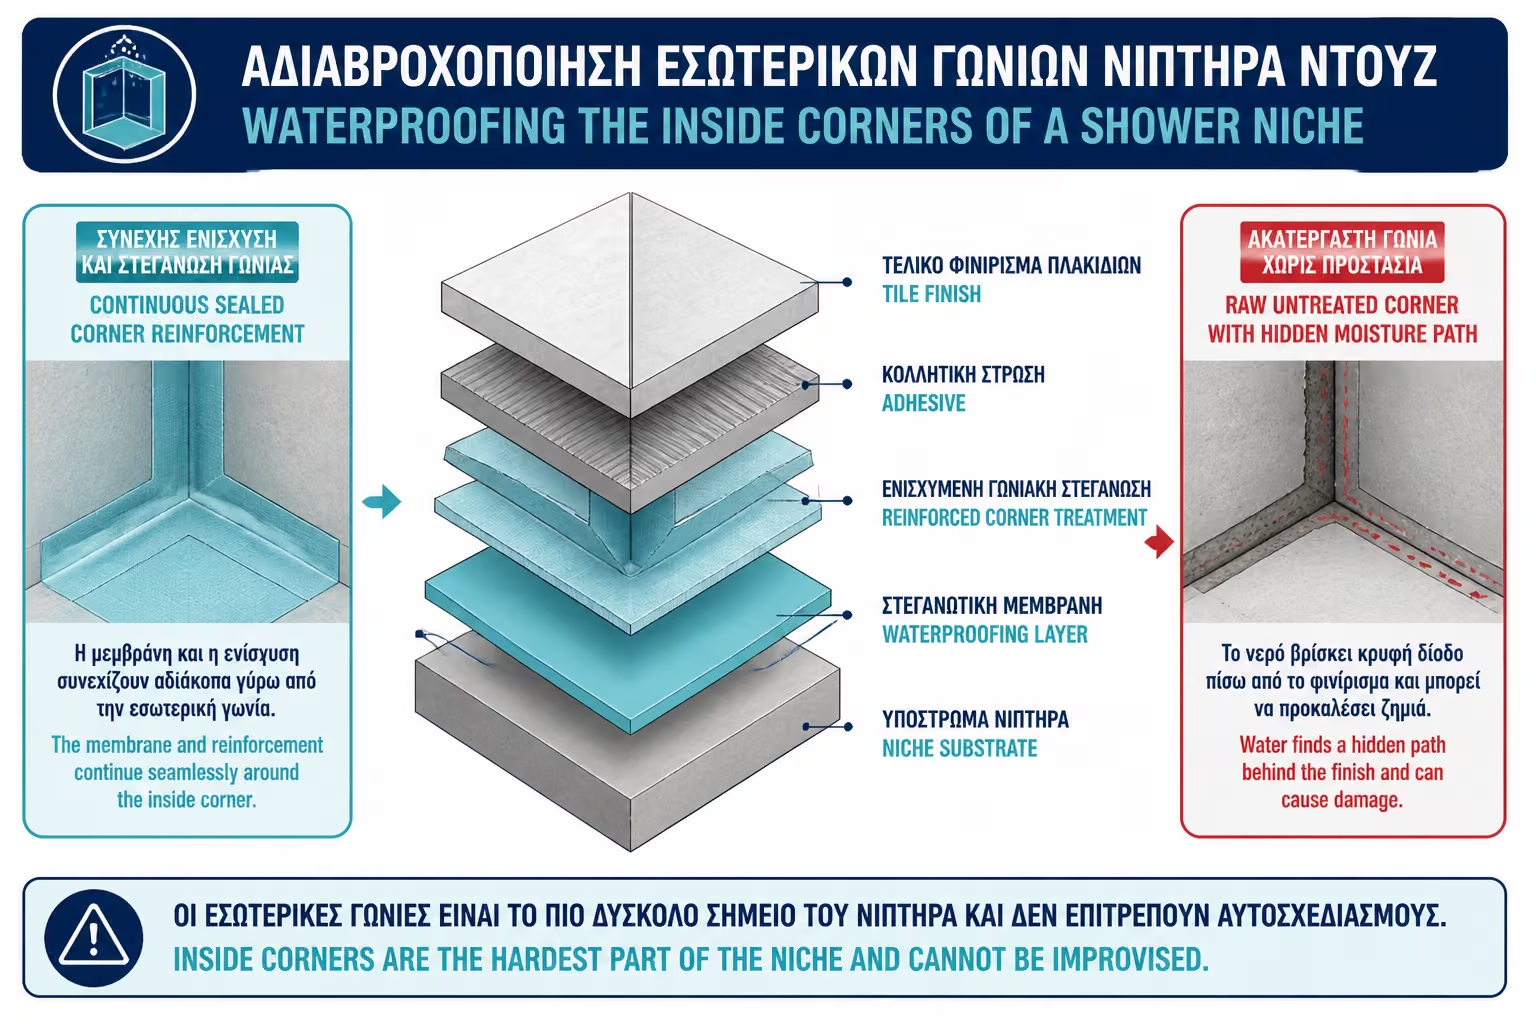
The recess must be sealed as a small independent wet zone within the larger shower zone. It is not enough to waterproof the wall around it and leave the interior with a simple substrate. The back, sides, top, bottom shelf and all internal corners must be a continuous system.
If a spreadable sealant is used, it must be applied to all internal surfaces, with a proper primer where required and in the intended layers. The corners must be reinforced with sealing tape or special pieces. Simply applying into a corner may not be enough, because corners are places for micro-movements and water concentration.
If a fleece membrane or ready-made system is used, care must be taken in cuts and overlaps. Each joint must be sealed as provided by the system. The membrane should not be roughly cut in the corners and simply covered with a tile. The point is continuity of sealing, not just having some material on every surface.
A safe yardstick for the owner is to ask, "If there were no tiles going in, would this alcove be like a small airtight box?" Doesn't mean it has to stay that way, but the logic is sound. The tiles are a final covering. The waterproofing must be present underneath as a stand-alone protection.
Corners are always critical in sealing, but in recess they become even more critical. A simple shower usually has floor-to-wall joints and vertical corners. A recess has many small corners packed into a small space: back bottom corner, side corners, top corners, front edges, shelf joints with backs and sides.
Every corner is a potential spot for cracking, micro-movement or poor coverage. When the spreadable material is passed quickly, it can be left thin on the inner edges. When the film is cut carelessly, small gaps can be created in the corners. And when the tile is installed, all of this disappears from the visible surface.
Proper fit requires special tapes, corner pieces, or careful reinforcement, depending on the system. Especially in the lower back corner of the recess, where water can remain, reinforcement is necessary. One should not rely on grout alone.
A common mistake is to treat the indentation as a small surface and assume that it "doesn't need that much detail". In fact, the smaller and more complex the surface, the more detail matters.
There are ready-made recesses or prefabricated boxes for showers on the market, usually made of materials suitable for wet areas. These solutions can reduce the risk considerably because they give stable geometry, clean edges and a more controlled substrate. But it does not mean that they are installed without sealing. They must be properly integrated into the rest of the wall system.
The built-in recess offers greater dimensional freedom and can be precisely adapted to the space. But it is more demanding. It needs clean construction, correct configuration, stable substrate and very careful waterproofing. If done haphazardly, it has a higher chance of failure.
Before you finalize the choice or installation, review the following points first:
| Selection | Advantages | What needs attention |
|---|---|---|
| Ready prefabricated recess | Fixed geometry, clean edges, less improvisation | Proper integration with the wall waterproofing system |
| Built in recess | Absolute adaptation to dimensions and design | Substrate, corners, shelf slope and full waterproofing |
| Recess with a single stone or marble shelf | Clean finish, fewer joints at the horizontal point | Correct outward tilt and good contact seal |
| Recess with small tiles or mosaic | Easier adaptation to small surfaces | More joints, therefore more need for proper waterproofing |
The choice should be made based on technical design, not just looks. A ready-made recess can be safer in many projects, while a built-in one can give a better aesthetic result when a good craftsman is present.
The recess should not be sealed as a cut piece. It must be connected to the waterproofing of the rest of the shower wall. If the wall is waterproofed up to 2 meters or up to the height of the tiles, the recess must fit within this continuous protection.
The weak point is often the front panel of the recess, that is, where the inner surface meets the flat wall. If this frame is not reinforced, microcracks can develop at the edges. Water ends up there from the surface of the wall and from inside the recess.
In spread-on systems, the waterproofing must continue from the wall into the recess without interruption. In films, the compounds must have the prescribed coatings or bands. If a ready-made recess is used, its perimeter must be tied with the tapes or accessories provided by the system.
If the recess is installed after the wall is waterproofed without proper reattachment, a discontinuity is created. It doesn't look like it from the outside, but technically it's like a window was opened in the insulation and covered with a tile.
Placing tiles inside the recess is more demanding than a simple flat wall. There are small surfaces, cuts, internal corners, edges and often trying to line up the joints with the rest of the bathroom. If not designed properly, it can result in poor aesthetics or, worse, a technically weak finish.
The bottom shelf must be placed with the required slope outwards. If tiles are used, the adhesive should not fill unevenly and create a small setback. If a single piece is used, such as marble or artificial stone, it must be cut and installed with the correct slope from the beginning.
Internal corners should not be overloaded with grout to "close" bad cuts. Grout is not a material for correcting bad geometry. At points of change of level or at corners where micro-movements are expected, elastic sealing may be required, depending on the system and application instructions.
Also, attention should be paid to the edges. Profiles, 45 degree cuts or special finishes can be used, but each solution has technical consequences. 45 degree cuts give a cleaner result, but are more sensitive to bumps and require excellent fit. Profiles are more practical, but must be properly sealed and integrated.
The grout in the recess must be suitable for a damp zone and applied correctly. In areas that often receive water, it is worth using better quality grouts with reduced absorbency and greater resistance to stains. In demanding applications, epoxy grout can also be considered, provided that the workshop has experience in its application.
Silicone or suitable rubber sealant has a role in joints and corners, but should not be considered a primary seal. If the recess relies on silicone to keep water out of the masonry, then the construction is incorrect. The basic protection should be under the tiles.
A practical problem is that the silicones inside the recesses are more stressed because they come into contact with soaps, bottles, cleaners and standing water. If the bottom shelf is not sloped, the silicone in the back corners will turn black and wear out faster. The owner may think that the problem is the quality of the silicone, when the real cause is poor flow.
Final sealing is maintenance and finishing. It should not be the only line of defense.
In more modern bathrooms, recesses are often combined with hidden LED lighting. The result can be very beautiful, especially in hotel-style bathrooms or architecturally designed walk-in showers. But here comes an additional issue: electrical safety in a wet zone.
The lighting in or near the recess must be studied by a licensed electrician and be suitable for the specific zone of the bathroom. It is not enough to put a simple LED strip because "it won't get too wet". The shower has water, steam, cleaning agents and the possibility of direct contact with moisture.
In addition, any cable, profile or drilling into the recess is an additional break in the sealing. If not planned in advance, lighting can negate the protection that has been worked so hard. Electrical routing, profile, transformer and access points must be provided before surfaces are closed.
For residences, often the safest and most practical option is to avoid lighting within the immediate wet zone, unless there is a clear engineering study. Aesthetics should not come before safety and sealing.
Even a properly constructed recess needs reasonable use and maintenance. If the bottles stay permanently in the same place, the water does not dry out easily from underneath. If aggressive cleaners are used, joints and sealants may wear out. If the ventilation of the bathroom is bad, the humidity stays longer.
A practical habit is to periodically clean the bottom shelf of the recess and remove salts and soaps. If there are many products, it is advisable not to fill the recess so much as to block the outflow of water. The recess must be able to dry.
If blackening occurs in the rear corners, it should not always be treated as a simple matter of cleanliness. It may be an indication that water is pooling or that the seal is being strained. If the silicone opens or the joint crumbles, it needs to be checked.
Maintenance is no substitute for proper construction, but it helps a proper system last longer.
Indentation errors are often the result of haste or poor sequencing. Because the indentation is small, it is treated as a detail. In fact, it is one of the most challenging parts of the wall.
Before you finalize the choice or installation, review the following points first:
| Error | Possible consequence | Correct approach |
|---|---|---|
| Horizontal or upside down lower shelf | Stagnant water, browning of joints, straining of corners | Slight outward tilt |
| Waterproofing only on the surrounding wall | Moisture in the recess and in the masonry | Full sealing of back, sides, bottom and top |
| Omission of corner reinforcement | Cracks and small leaks | Tapes, corner pieces or compatible reinforcement |
| Construction on a loose substrate | Poor adhesion and detachment | Stabilization and proper preparation before insulation |
| Rough tile cuts | Large joints, difficult sealing, poor aesthetics | Careful design of joints and edges |
| Silicone base instead of waterproofing | Temporary protection, future failure | Waterproofing under the tiles |
| Recess opening without piping control | Damages or forced workarounds | Wall check before design |
| LED without wet zone study | Safety hazard and insulation breaks | Study by an electrician and suitable materials |
A typical example is a niche that was very nicely made with a marble lower shelf, but the shelf was inserted perfectly horizontally. After each shower, some water was left behind in the bottles. In a few months, the back corner turned black. Owner changed silicone but problem returned. The cause was not only silicone. It was that the water never drained properly.
The cost of a shampoo recess depends on whether it is a ready-made system or a built structure, on the dimensions, the substrate, the type of tile, the cuts, whether there is a single shelf, on the need for special profiles, on the waterproofing and on whether the work is done as part of a complete bathroom renovation or as an individual intervention.
In a complete bathroom renovation, the recess is usually built into the total cost. But it is not a "free detail". It takes time, cuts, materials, sealing, precision and coordination. If the bathroom is standard 5 sq.m. and moving indicatively in Greece in 2026 around €3,200–€5,500 for a simple/medium renovation, a properly constructed recess can increase the cost depending on the difficulty and materials. In more demanding bathrooms, with a walk-in shower, linear siphon, large tiles and custom details, the total cost can reach around €6,000–7,500 or more.
Before you finalize the choice or installation, review the following points first:
| Factor | How does it affect cost? |
|---|---|
| Ready-made or built-in recess | Off-the-shelf solution has product cost, built-in more labor |
| Dimensions | More recess means more material and more cuts |
| Waterproofing | Tapes, corners, films or spreads increase the technical work |
| Tile type | Large tiles, marbles or 45° cuts increase the difficulty |
| Single shelf | Stone, marble or artificial material have an additional cost |
| LED lighting | It needs an electrician, proper materials and extra sealing attention |
| Wall condition | Old dampness, loose plaster or pipes increase preparation |
The low price in a recess should be read carefully. If it only concerns "opening and tiling", without waterproofing, corners and shelf inclination, then it cannot be compared to a complete technical construction.
A proper quotation should not simply state “recessed construction”. It must describe where it will be done, what dimensions it will have, what substrate it will be made of, how it will be waterproofed and how it will be finished. It must also state whether special tapes, corner pieces, profiles, single shelf, VAT and materials are included.
The owner should ask for a specific answer on the slope of the bottom shelf. If the technician does not mention it, he should ask. The same goes for the interior corners. Will there be movies? Will a membrane be used? Will waterproofing be applied? Will the recess connect to the waterproofing of the rest of the wall?
If there is lighting, it must be listed separately, with an electrician and appropriate equipment. If there is a single marble or other shelf material, it should be clear if it is included and how it will be installed.
The more specific the indent, the less it must rely on verbal agreements. The details are what will decide whether the recess will remain beautiful and functional or if it will become a permanent spot of moisture.
Although recesses are practical and beautiful, they are not always the best choice. If the wall is very thin, if there is a lot of piping, if the wall borders on a sensitive area, if the crew is inexperienced, or if the budget does not allow for proper waterproofing, a high-quality surface solution may be preferable.
A well-placed exterior case or sturdy shelf may be less impressive, but more secure than a sloppy alcove. In renovation, the most correct solution is not always the most impressive. It is the one that suits the space, the use and the quality of application that can be guaranteed.
Special care is needed when the owner wants to add a recess to an already existing shower without a complete renovation. This usually means opening a wall, local intervention in the waterproofing and trying to connect with old materials. In such cases, the risk is greater and should be evaluated by a professional.
Indentation is worth it when it can be done right. If it's going to be casual, it better not be.
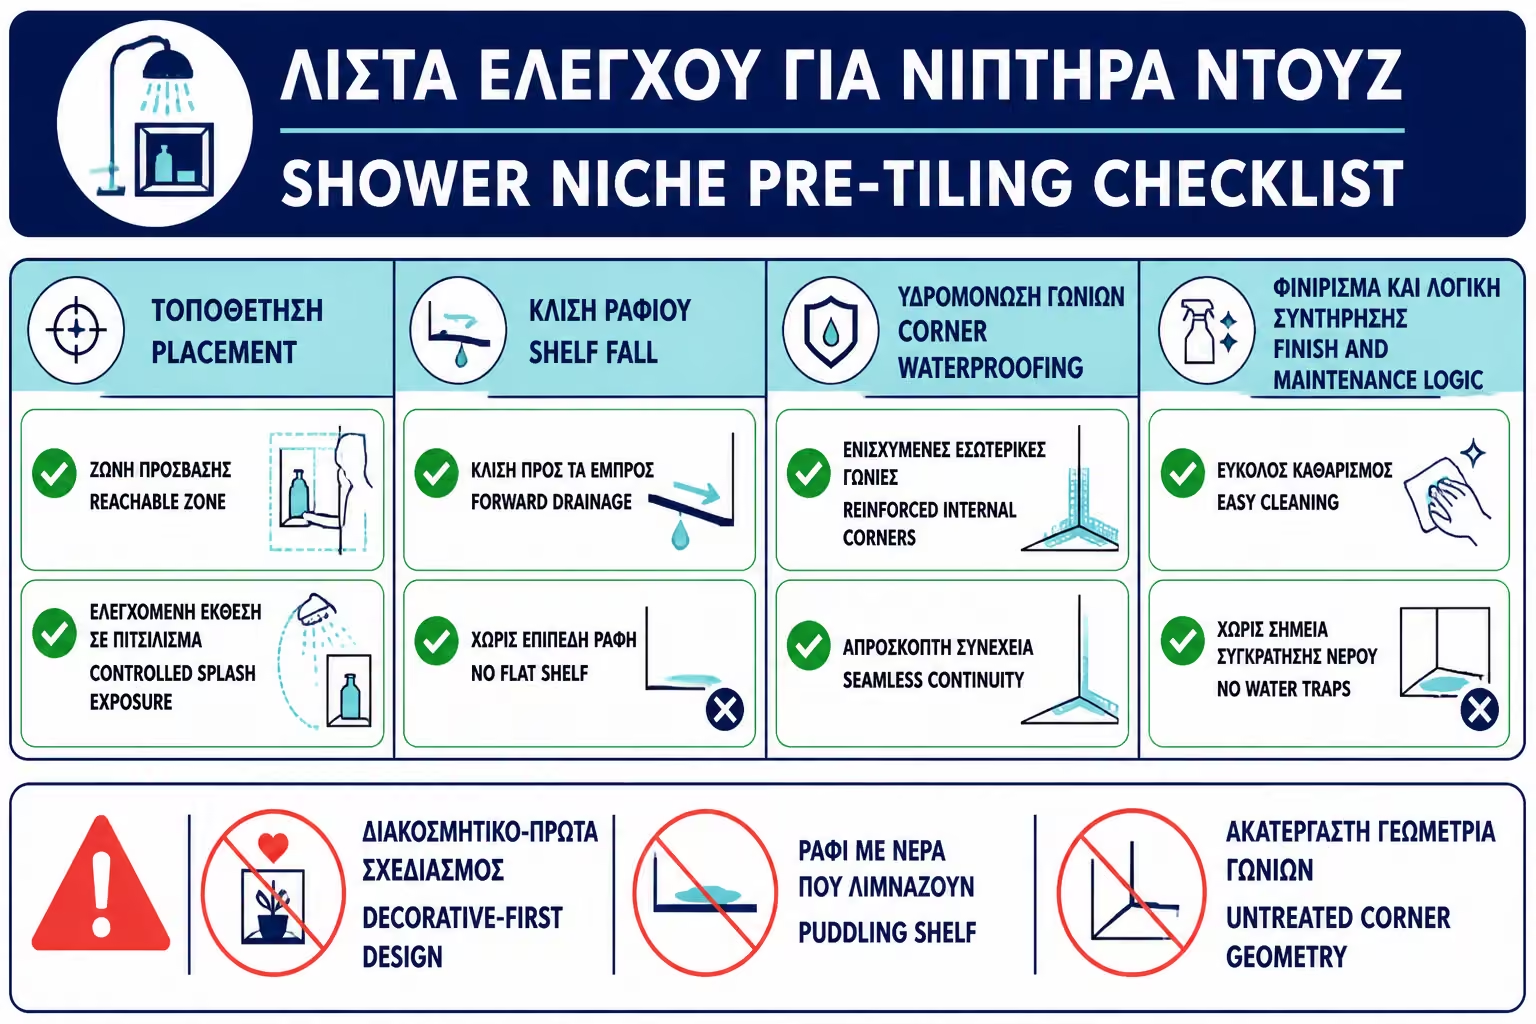
Before the tiles are laid, the recess must be checked as a stand-alone critical point. It is much easier to fix something at this stage than after the shower is complete.
Before you finalize the choice or installation, review the following points first:
| Question | Yes / No |
|---|---|
| Has it been checked that the wall can be indented without a problem? | Yes / No |
| Have possible piping or electrical inside the wall been identified? | Yes / No |
| Is the recess substrate stable and suitable for a wet area? | Yes / No |
| Does the bottom shelf slope slightly outwards? | Yes / No |
| Isn't there a reverse slope to the back of the recess? | Yes / No |
| Is the recess back sealed? | Yes / No |
| Are the sides and top sealed? | Yes / No |
| Are all interior corners reinforced? | Yes / No |
| Is the recess connected continuously with the waterproofing of the rest of the wall? | Yes / No |
| Are correct tile cuts or edge profiles provided? | Yes / No |
| Won't the end shelf hold water behind the bottles? | Yes / No |
| If there is an LED, has it been tested by an electrician and is it suitable for a wet zone? | Yes / No |
| Does the quote include waterproofing, materials, labor and VAT net? | Yes / No |
If most of the answers are not clear, the recess should not be tiled yet. The indentation is small in size, but large in risk when done carelessly.
If you must keep only one thing, keep this: the shampoo recess must seal like a small shower inside the shower. Do not think of it as just a tiled shelf. Ask for full waterproofing on the back, sides, top, and bottom, reinforcement in all corners, and a slight outward slope on the bottom shelf. If water pools inside the recess, even good waterproofing will be stressed every day for no reason.
Shampoo recesses can significantly upgrade a shower, both practically and aesthetically. They free up space, organize products and give the bathroom a cleaner look. But it is not a simple decorative detail. It is a technical construction in one of the most humid areas of the house.
Their success is judged before the tiles are put in. It is judged by whether the wall is suitable, whether the substrate is stable, whether the lower shelf has a correct slope, whether the waterproofing is continuous and whether the corners are reinforced. Finishing tile can make a recess look beautiful, but it can't fix a bad base.
The owner must ask the authority for a clear technical description. Not just "we're going to build a recess", but how it's going to be built, how it's going to be waterproofed, what's going to be done in the corners, how the water is going to run off the shelf, and how it's going to tie in with the waterproofing of the rest of the wall.
A properly constructed recess can operate for years without problems. A rough recess, however, can become one of the most insidious moisture spots in the bathroom, precisely because the problem is hidden within the wall. In the shower, details are not a luxury. It is the real protection of the structure.
Return to category.
Go to categoryReturn to the central guide.
Go to guide