
Bathroom Waterproofing & Moisture Protection
Return to category.
Go to categoryWhen talking about waterproofing a shower, most people think of the floor first. And logically so. That's where most of the water falls, that's where the siphon is, that's where the runoff is created, and that's where stagnant water often appears. But in a real shower, especially in daily use, the walls receive much more stress than it appears at first glance.
Water doesn't just fall down. It hits the walls, rolls behind the shower column, collects around the mixer, gets into corners, gets into joints, pipes, escutcheons and penetration points. In small bathrooms, where the shower is close to a sink, basin or furniture, moisture travels even further. This means that the waterproofing of the walls is not a decorative detail. It is a necessary part of the system.
One of the most frequent mistakes in practice is to waterproof the floor properly but treat the walls superficially. A short waterproofed upstand may be applied around the base, like a waterproofing "skirting", and then tiles are run to the top. The bathroom looks correct, but the zone that receives daily water exposure is still essentially unprotected. Months later, the result shows up as swollen plaster, dark joints, moisture on the back of the wall, or problems around the mixer.
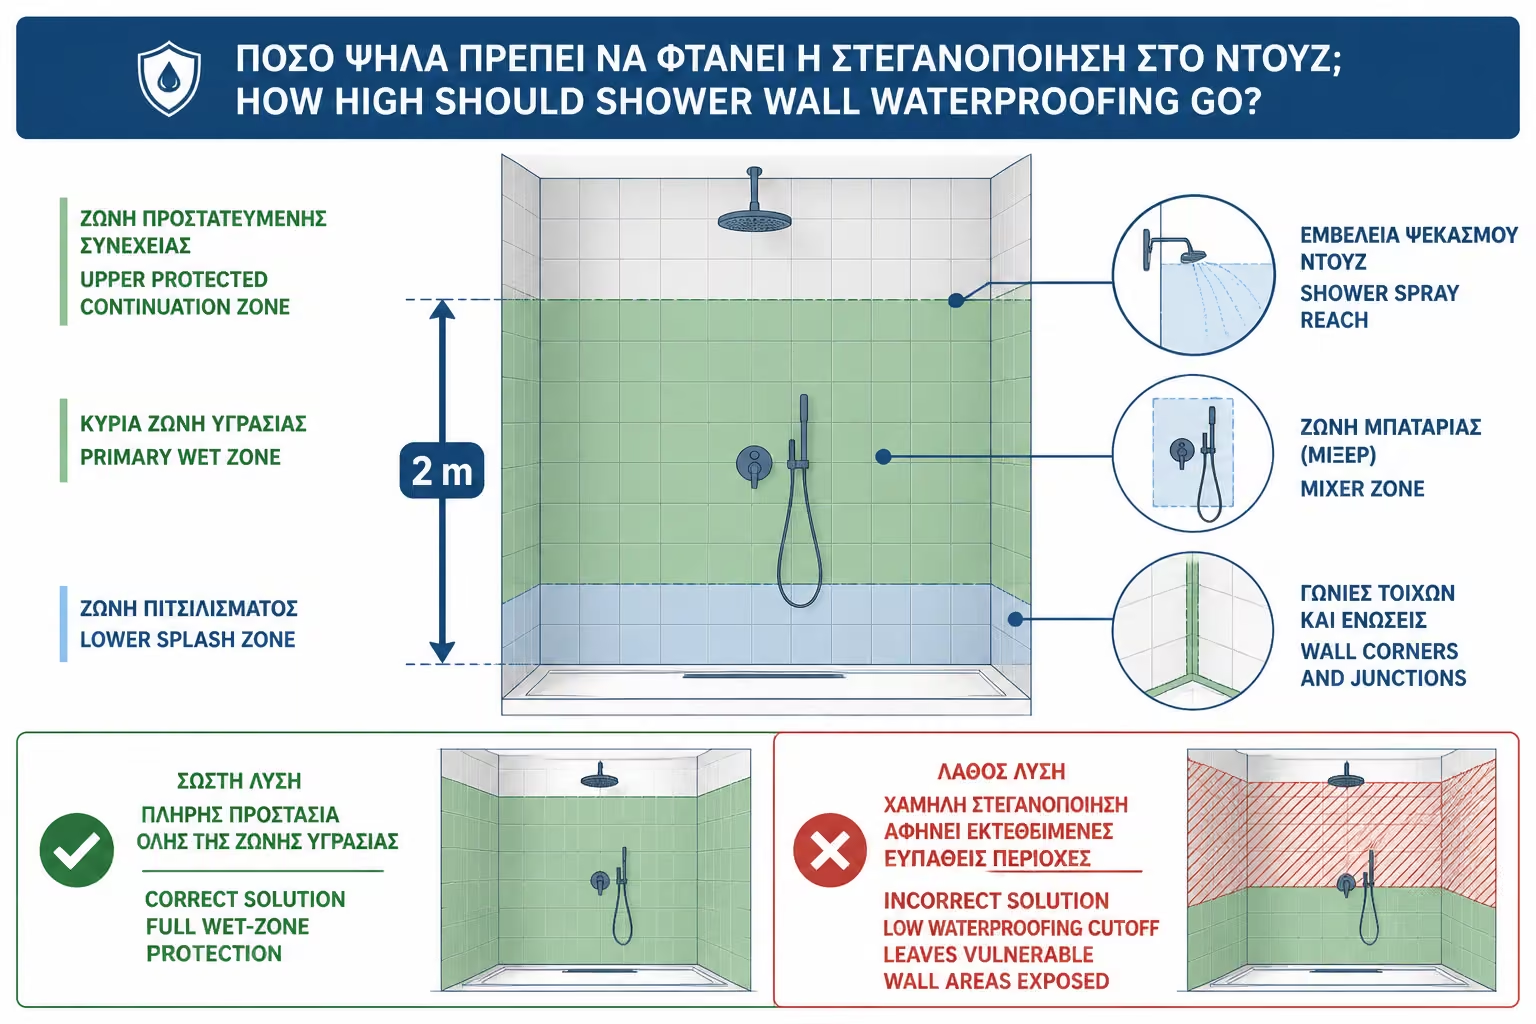
In practice, for the shower zone, the waterproofing should rise at least to approximately 2 meters from the finished floor, i.e. to a height that covers the main spray and water flow area. In many cases, especially with a fixed ceiling shower, tall users, a small cabin or heavy use, it is better to reach even higher or up to the height of the tiling. The main thing is not to stop low because "that's where the water reaches". In everyday use, water always reaches further than we think.
This guide explains why shower walls need serious waterproofing, what height is considered practically safe, why the area around the mixer is one of the most critical spots, and what the homeowner needs to look out for before tiling surfaces.
The shower walls receive water, steam, soap, cleaners, and temperature changes every day. They are not just a backdrop behind the shower. They are an active part of the wet zone. Every time someone showers, water hits the tile surface, runs down it, and passes over joints, corners, escutcheons, mixers, and fixing points.
Tiles alone should not be considered complete waterproofing. They may have low absorbency, especially if they are porcelain, but joints, corners and openings around pipes remain sensitive. Over time, joints become stressed, their cleaners wear away, and small cracks or capillary gaps can allow moisture to pass behind the finished surface.
In older bathrooms, this problem often shows up on the other side of the wall. For example, the shower may back onto a bedroom or hallway. The homeowner sees peeling paint, bulging plaster, or a musty smell and assumes there is a leaking pipe. Sometimes there is indeed a plumbing failure. In other cases, moisture has gradually passed through the shower wall because the waterproofing was inadequate or missing.
The correct approach is to consider the shower walls as a wet surface with constant stress. Not like a simple bathroom wall that will just accept tile.
For the shower zone, a practical and safe approach is for the waterproofing to rise at least approximately 2 meters from the finished floor. This height covers the basic area where water falls, splashes and flows during use. It's not a random number. It roughly corresponds to the zone where the user's body, the shower head, the mixer and the largest water flows are located.
In many cases, the right thing to do is to go even higher. If there is a ceiling shower, if the shower head is high, if the bathroom is small and splashes get everywhere, if the shower is used daily by several people or if we are talking about professional/tourist use, waterproofing up to the full height of the lining is a safer option.
The mistake is to stop the waterproofing low, for example at 30 or 50 cm above the floor, with the logic that "the water will fall down". This may make sense in other applications as simple base protection, but not in the shower zone. There the water hits the wall directly and passes over critical points.
The technical rationale is simple: we seal where there is systematic contact with water, not just where we assume the water will end up. In the shower, this zone is high.
The shower mixer is one of the most sensitive parts of the wall. There are pipe passages, connections, threads, escutcheons, possible micro-movements and places where water often falls directly. Even if the hydraulic connection is correct, the point around the mixer is still critical for sealing.
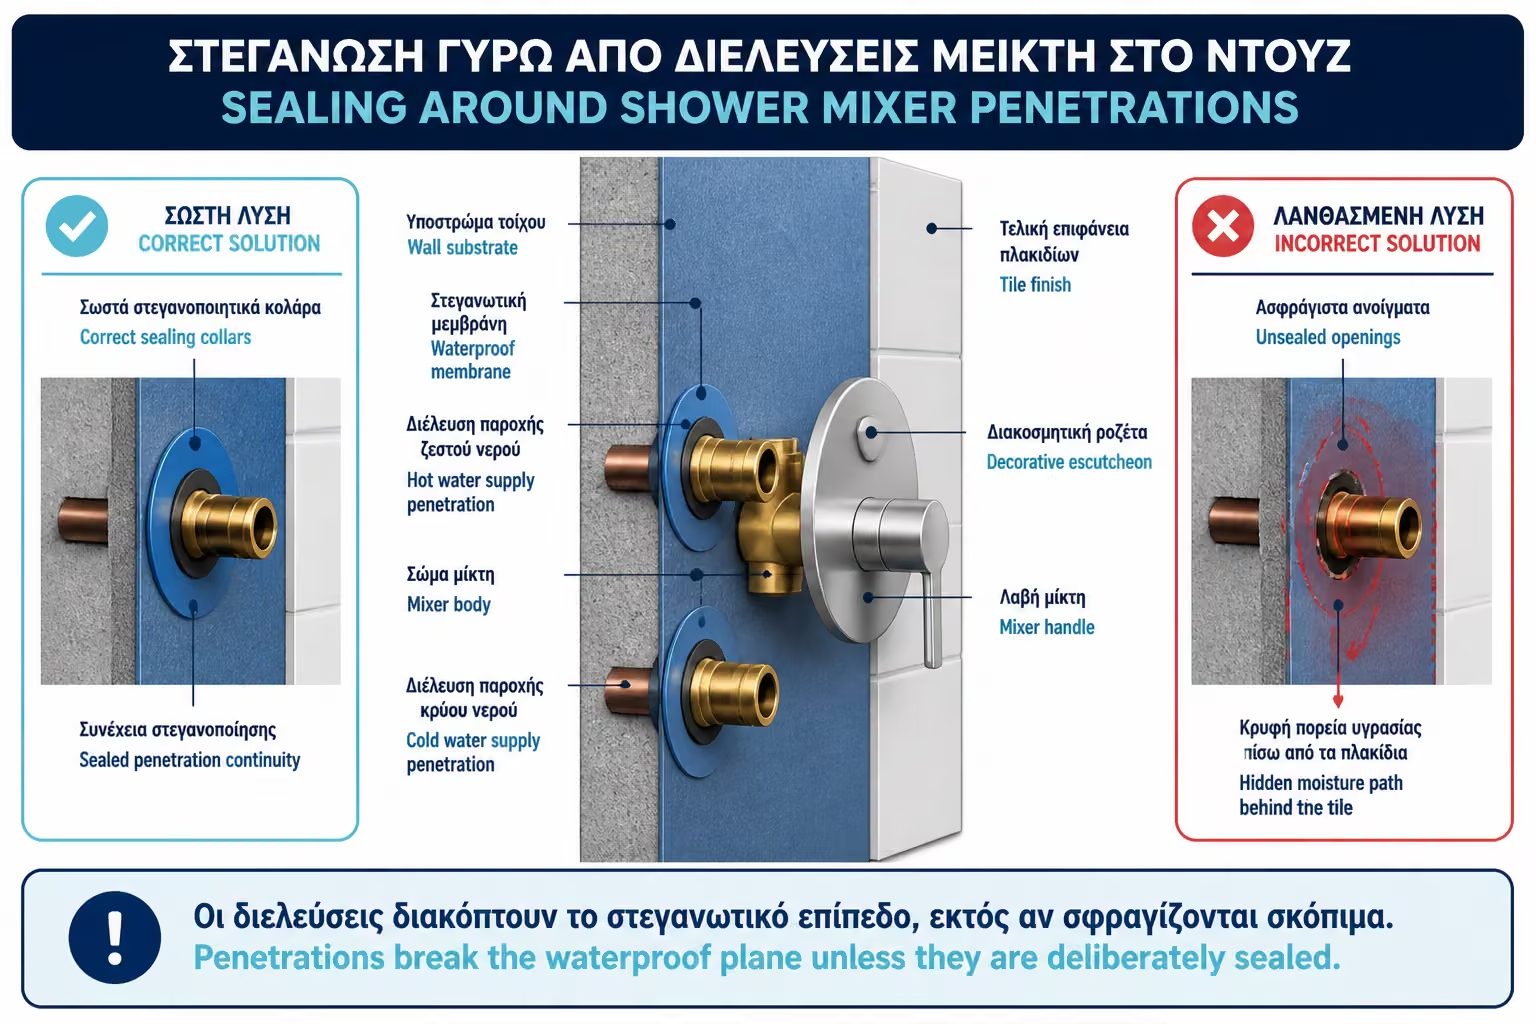
The problem is that the mixer creates "holes" in the sealing surface. For the hot and cold water supplies to come out, the wall is opened. There the tile is cut, the glue is interrupted and the waterproofing must be passed around the pipes safely. If the spot is simply left behind a rosette, without a special seal, moisture can gradually pass behind the tile.
A very common scenario is the following: the mixer is installed normally, the escutcheons cover the openings and the wall looks perfect. But behind the escutcheons there is a gap or a bad seal. With each use, some water passes through the spot, flows behind the tile and is absorbed by the substrate. The problem is not immediately apparent. After time, moisture appears below, blackening of joints or swelling on the back side of the wall.
That is why special collars, cuffs, tapes, or another suitable elastic sealing detail are needed around the mixer supplies, depending on the system. The escutcheon is only a finishing cover. It should never be treated as the main seal.
Many homeowners think that if the wall is tiled up to the ceiling, then it is protected. This is not necessarily correct. Tiling and waterproofing are different things. The tile is the final surface for use and cleaning. Waterproofing is the protective layer below it.
A wall may be tiled up to the ceiling, but the waterproofing underneath has only gone up a few inches or not at all. From the outside, the bathroom looks complete. Technically, though, the protection stops well below the stress zone. If water gets through joints or around the mixer, the substrate behind the tiles can start to hold moisture.
Conversely, there can be proper waterproofing up to 2 meters and tile up to higher for aesthetic reasons. This is technically more correct, because the critical zone is protected regardless of the final height of the lining.
Best practice, where cost and system permit, is that in the shower area the waterproofing should follow at least the practical height of water exposure and, in demanding cases, reach the full lining height. The whole bathroom does not need to be waterproofed like a swimming pool, but the shower should be treated as a truly wet zone.
Waterproofing the walls is not just "putting a material on a flat surface". The tough spots are breaks, corners and joins. That's where most failures occur.
The first critical area is the floor-wall junction. That's where water collects, that's where there are micro-movements and that's where two different levels meet. Simply applying without tape may not be enough, especially in walk-in showers. Corner sealing tape integrated into the system is usually required.
The second area is the vertical corners of the walls. If the shower wall meets another wall, the corner receives water, cleaning agents and thermal changes. There the waterproofing must have continuity and elasticity. Corners should not rely on grout alone.
The third area is around the mixer, shower column, hand shower outlet, water outlets and any perforation. This requires special parts or careful application. Any hole in the waterproofing is a potential water entry point.
The fourth area is the points of attachment of accessories: shower rods, glass supports, shelves, seats, handles. If the wall is punctured after waterproofing, the point must be properly sealed. Otherwise, a small screw can invalidate a large part of the protection.
On shower walls, liquid-applied waterproofing is often a very practical solution. It can follow surfaces, corners, penetrations, and small imperfections more easily than a sheet membrane. As long as the substrate is prepared correctly and the material is applied in the intended coats, it can provide reliable protection.
The crucial thing is not to make the application like simple painting. The coated material has a specific consumption, requires a specific thickness and often needs two coats. If too thin, the surface may appear covered, but not perform as required. If tapes are not inserted in corners and special pieces around pipes, the protection remains incomplete.
On walls of old plaster, damp-proof plasterboard, cement board or repaired substrates, the choice of primer and sealant should be made based on compatibility. Not all materials are suitable for all surfaces. Waterproofing on loose plaster or dust makes no sense.
A good sprayable system on the shower walls can be very effective. It is enough to treat it as a technical application and not as "a hand of material before the tiles".
Fleece films can also be used on the walls of the shower, not just on the floor. They have the advantage of creating a ready-made waterproofing sheet with a controlled thickness. On large, clean, flat surfaces they can provide a very reliable solution.
The thing about walls is that there are more details: batteries, pipes, corners, niches, shelves, supports, cuts. There the membrane needs careful planning and special parts. If it is roughly cut around a water supply and then covered with the rosette, the system loses its value.
In demanding constructions such as hotel bathrooms, frequent use, large walk-in showers or full waterproofing systems, membrane on the walls can be an excellent choice. In smaller residential projects, a combination is often used: membrane or special system on the floor and plastered on the walls. This can work very well as long as there is material compatibility.
The choice should not be made with the logic "the cloth is always better" or "the spreadable is always enough". In walls, the right detail around the transitions is often more important than the type of material itself.
Before the tiles are inserted, the area around the mixer must be checked and properly sealed. Supplies must be stable, properly aligned and free of leaks. Openings around piping must be clean, not broken uncontrollably or filled haphazardly.
The sealant must then be passed around the fittings in a manner that closes the break. This can be done with special pipe cuffs, rubber collars, sealing strips or a compatible spreadable system. The exact material depends on the system, but the logic is the same: waterproofing should not stop before the pipe and continue after. It should embrace the point.
After the tiles are installed, the escutcheons and mixer should fit properly, but should not be considered the only protection. If there is an open gap behind the rosette, water can pass through. Ideally, the point is already protected under the finished surface.
A typical mistake is to cut the tile around the supply with a large opening, cover it with the rosette and not do any waterproofing behind it. From the outside everything looks perfect. Technically, though, there is an open moisture path to the substrate.
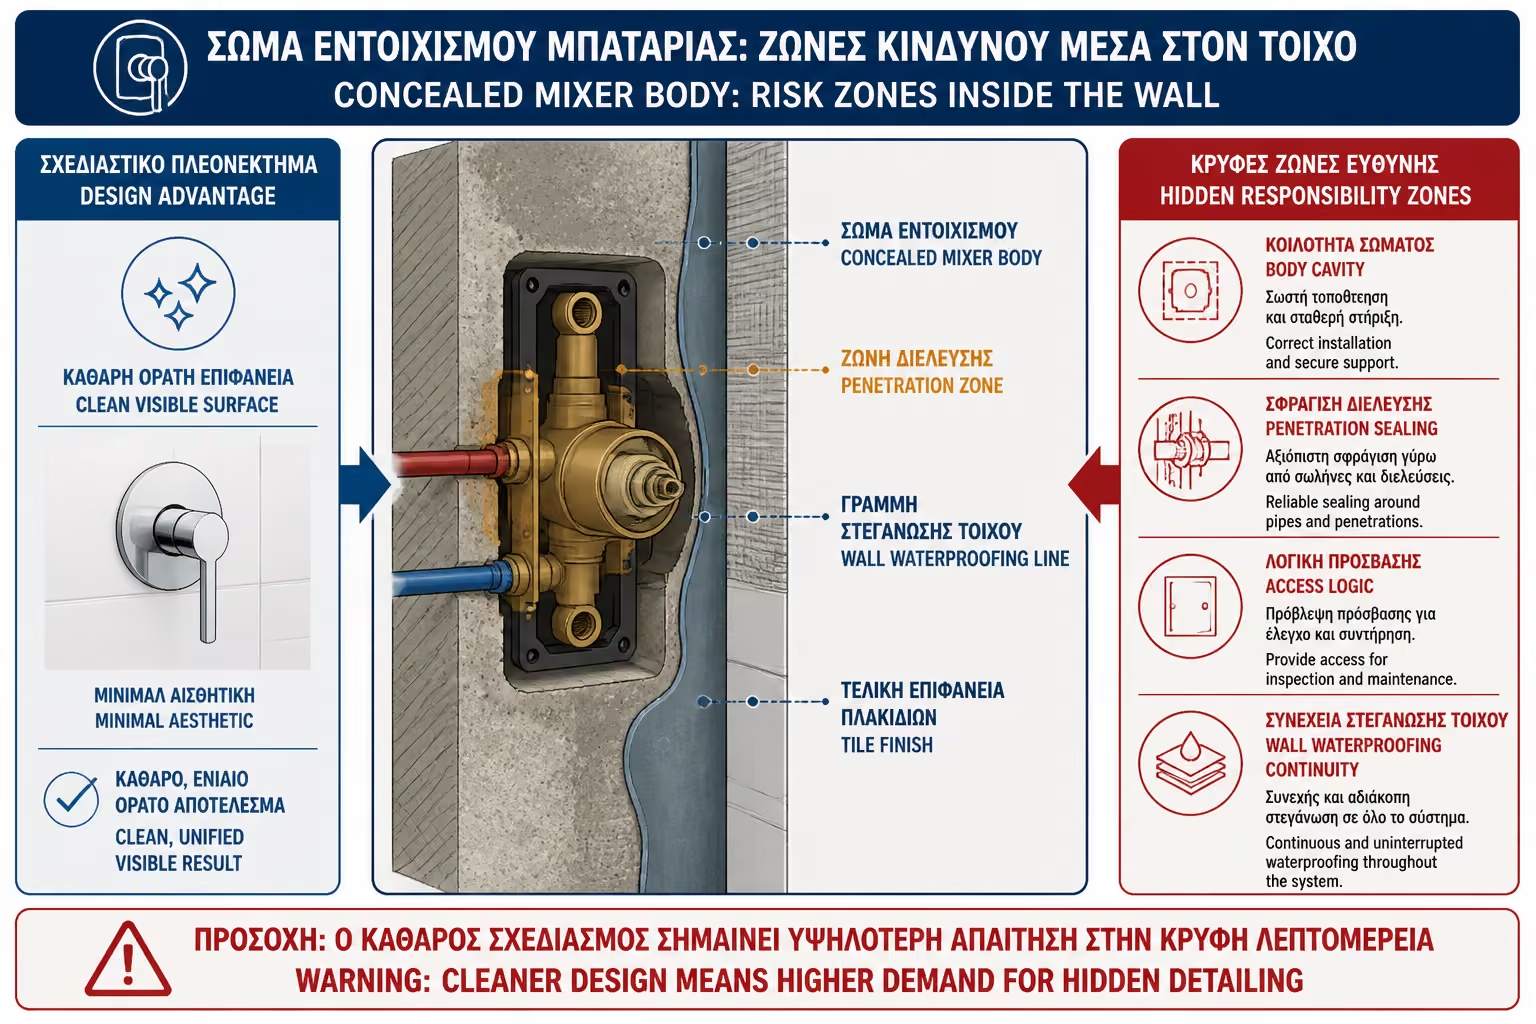
Built-in batteries give a very clean result, but increase the sealing requirements. In a simple external mixer, the supplies come out of the wall and the connection is relatively accessible. In a built-in, much of the mechanism is inside the wall. This means that proper fitting and sealing must be done before the surface is closed.
The hidden body must be placed according to the manufacturer's instructions, at the correct level and depth. If it goes too far in or too far out, it can cause problems in the final placement. If it is not properly sealed around the perimeter, water can pass behind the facade.
In such applications, the mixer belt is not just two pipe holes. It's a whole technical box inside the wall. It needs proper support, leak testing before closing, compatible sealing, and future access to parts provided by the manufacturer.
The aesthetic value of the built-in mixer is great, but it should not lead to a hasty installation. If done wrong, the repair can mean peeling tiles in one of the most visible areas of the bathroom.
Shampoo niches, built-in shelves and seats make the shower more practical and more beautiful. At the same time, they create additional points where the waterproofing must be very careful. Each recess has horizontal surfaces, corners and joints. There the water can stay longer.
An improperly sloped niche on the bottom shelf may retain water after each use. If the waterproofing behind the tiles is not correct, the moisture will work in the same place every day. The same goes for built-in seats or benches inside the shower. The more complex the geometry, the more important the tapes, corners and continuity of the waterproofing.
Alcoves should be designed in advance, not haphazardly opened at the time of tiling. They must have a proper footing, a slight outward slope and full sealing on all internal edges. If the construction is made of plasterboard or cement board, a suitable system for wet areas must be used.
Here the difference between aesthetics and technical construction can be seen very clearly. A niche can look luxurious, but if it holds water or is not properly sealed, it becomes a weak point.
In walk-in showers with a fixed glass and an open entrance, the water is not as restricted as in a closed cabin. This means that the walls may receive water over a larger area and in a less predictable way. Splashes travel, especially when there is strong water pressure or a rain shower.
In such cases, the height and width of the waterproofing should be evaluated more generously. It is not enough to seal just the point directly behind the mixer. The entire zone receiving water must be protected, including side walls, low areas near the entrance and points where water can hit by reflection.
A practical example is a small bathroom with a 90 cm walk-in shower and a 70 cm fixed glass. In the photo it looks clean and modern. In everyday use, however, if the shower mixer is turned outwards or if someone takes a shower in a hurry, water can reach side walls and low zones that were not considered "inside the shower". If there is no protection there, moisture can appear in unexpected places.
The open shower needs more careful zone planning. The less we restrict water with cabin, the more we have to think about where it might end up.
Wall mistakes are usually not visible on the day of delivery. The tile covers everything and the owner sees a clean, new surface. But the real quality lies underneath.
Before you finalize the choice or installation, review the following points first:
| Error | Possible consequence | Correct approach |
|---|---|---|
| Waterproofing only low on the base | Moisture behind tiles at usable height | Waterproofing at least up to about 2 meters in the shower zone |
| No special details around the mixer | Water behind escutcheons and facilities | Cuffs, collars or compatible sealing around piping |
| Tile up to the top without waterproofing below | A false sense of protection | Separation of final lining and actual waterproofing |
| Omit tapes in the corners | Cracks and moisture in joints | Reinforcement in horizontal and vertical corners |
| Drilling for non-sealed components | Water ingress from screws and brackets | Sealing of each perforation |
| Waterproofing on a loose substrate | Poor adhesion and detachment | Repair and priming before application |
| Rushed tiling | Entrapped moisture or adhesion failure | Compliance with drying times |
The most insidious mistake is the vague description in the offer. If it says "bathroom waterproofing" without mentioning height, zones, angles and mixer, the owner does not know what will actually be done. It may think that the entire shower is protected, when in fact only a low section is passed through.
Waterproofing the walls in the shower zone is not usually the biggest cost of a bathroom renovation. But it is one of the most critical stages. The cost depends on the application height, square footage, type of material, condition of the substrate, corners, niches, number of pipe passages, area, floor, access, whether VAT is included and whether we are talking about a complete job with materials and labor.
In a complete bathroom renovation in Greece in 2026, where a typical 5 sq.m. it can be indicatively around 3,200–5,500€ for a simple/medium solution and 6,000–7,500€+ for more demanding options, proper wall waterproofing is a small percentage of the total cost. However, its omission can lead to disproportionately high repair costs.
Before you finalize the choice or installation, review the following points first:
| Factor | How does it affect cost? |
|---|---|
| Seal height | As the app goes up, materials and labor time increase |
| System type | Spreadable, film or combination have different costs |
| Corners and niches | More details mean more movies and specials |
| Mixer belt | It wants cuffs, collars or careful sealing |
| Substrate condition | Loose plasters and old dampness increase preparation |
| Complete or individual work | In a complete renovation it is more easily integrated into the overall project |
If an offer is lower, it doesn't necessarily mean it's bad. But you have to see what it includes. If it doesn't mention wall sealing, mounting height, and details around the mixer, then you're probably comparing two different things.
The owner does not need to know all the technical specifications of the materials. But he needs to ask for clarity. The correct question is not only "will waterproofing be installed?". It is "where will it go, up to what height, with what system and how will the mixer supplies be sealed?".
Before the work begins, it is a good idea to request in writing that in the shower area the waterproofing will be raised to at least about 2 meters or higher where the layout requires. It must also be stated whether tapes will be inserted in the corners, whether special pieces will be used around pipes and whether the system is compatible with the tile adhesive that will follow.
The mixer belt must be discussed separately. If there is a simple external mixer, provision must be made to seal around the supplies. If there is a built-in, the manufacturer's instructions must be followed and a check made before the wall is closed.
It is also good practice to photograph the stages before the tiles are inserted. Not to create distrust with the workshop, but to have a record of what was done. In the event of future damage or surgery, photos are of great help.
Wall waterproofing problems don't always show up as an obvious leak. They often start with small marks that the owner considers normal wear and tear. For example, the joints around the mixer darken faster than the rest. The silicone in one corner often opens. There is a smell of dampness after bathing. The paint on the back side of the wall is flaking slightly.
If the problem is around the mixer, it can be confused with a hydraulic leak. This should be checked by a plumber. However, if there is no active pipe leak, then the possibility of water ingress from the surface of the shower, i.e. from joints, escutcheons or poor sealing around the passages, should be considered.
It is not a correct solution to constantly cover the spots with new silicone without diagnosis. If moisture has gotten behind the tiles, surface sealing can trap moisture and delay the actual repair.
The earlier the problem is detected, the more likely it is that limited intervention can be done. If left for years, it can affect plasters, furniture, adjacent spaces or even the adhesion of tiles.
Sealing shower walls, especially around mixers and pipes, is no simple DIY job. A homeowner can change a worn surface silicone if they know what they're doing, but they can't fix substantial failure behind the tiles without technical intervention.
A professional is needed when there are built-in batteries, when walls are opened, when new services are installed, when the shower layout is changed, when there is moisture in an adjacent area or when a full waterproofing system must be applied before tiling. There are plumbing, substrates, materials and details involved that need to work together.
The most dangerous DIY logic is "I'll cover it with an insulator and then stick tile". If the substrate is wrong, if the material is not compatible, if the mixer is not sealed properly, or if the corners are left without reinforcement, the result may only look good temporarily.
The correct approach is to use craftsmen who can explain the system. Not just which tile will go in, but what will be behind it.
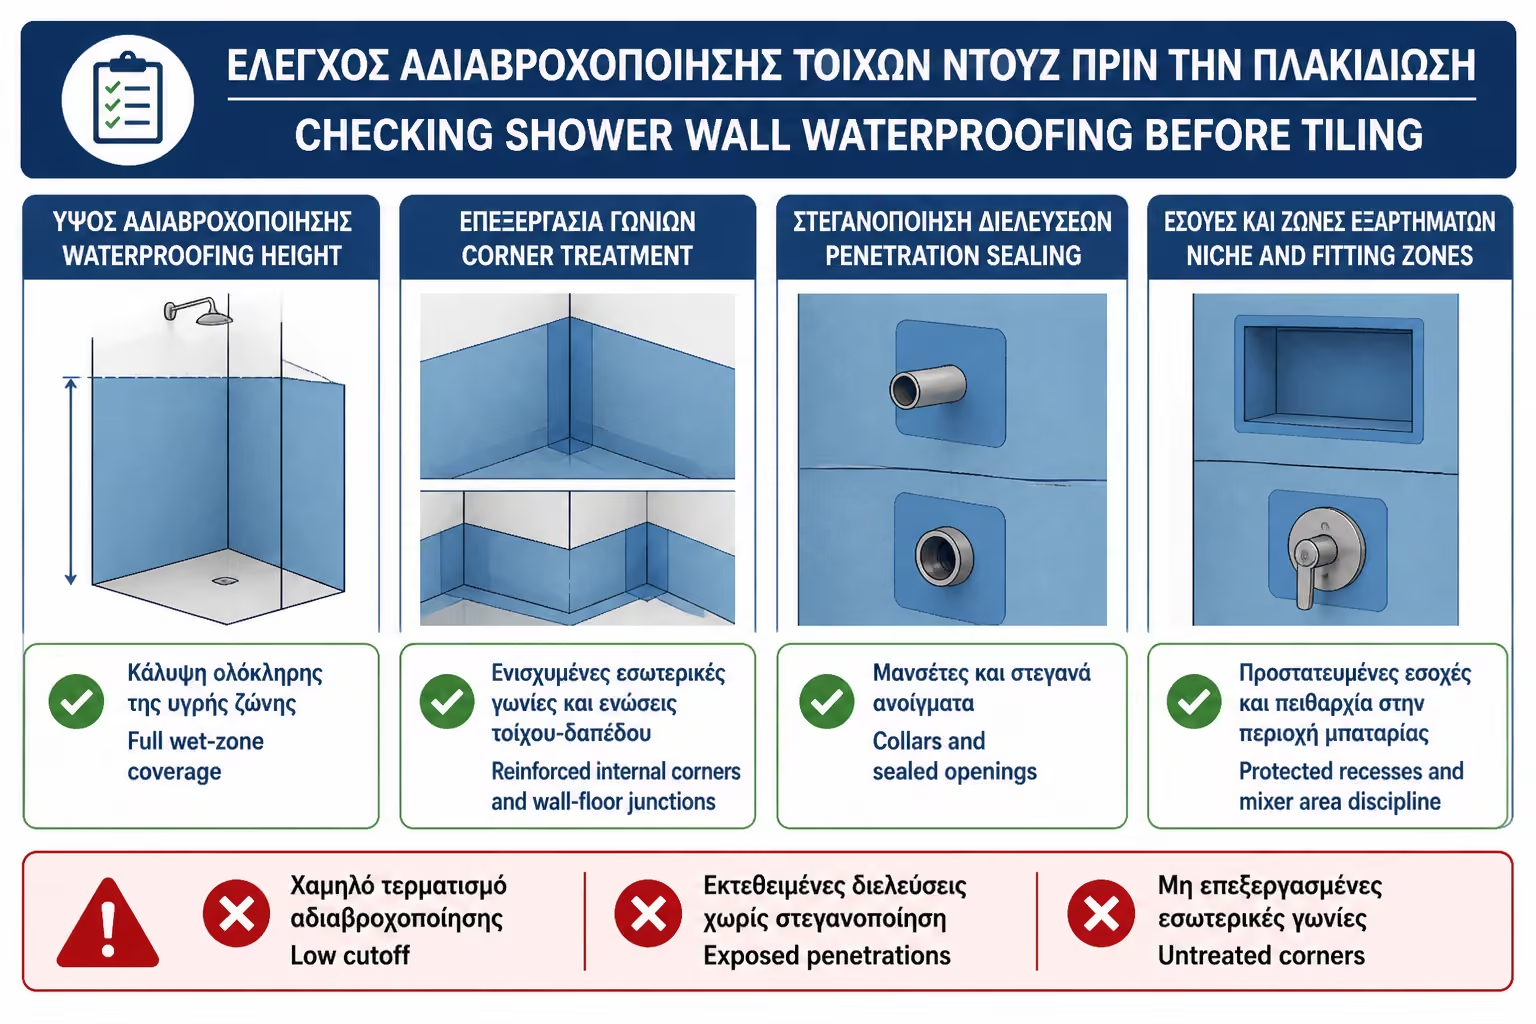
Before the shower walls are covered with tiles, it's worth doing a hands-on check. It is the last stage where the critical points are still visible.
Before you finalize the choice or installation, review the following points first:
| Question | Yes / No |
|---|---|
| Does the seal in the shower zone rise to at least about 2 meters? | Yes / No |
| Has it been considered whether it needs to go up to full tile height? | Yes / No |
| Are floor-to-wall joints sealed with tape or a compatible system? | Yes / No |
| Are the vertical corners of the shower reinforced? | Yes / No |
| Does the belt around the mixer have a special seal? | Yes / No |
| Are there cuffs or collars around water supplies? | Yes / No |
| Are the supplies leak tested before the wall is closed? | Yes / No |
| If there is a built-in mixer, is it installed according to the manufacturer's instructions? | Yes / No |
| Is the substrate firm, clean and free of loose spots? | Yes / No |
| Has primer been applied where required? | Yes / No |
| Are the fixing points for glazing, shelves or bars provided without voiding the waterproofing? | Yes / No |
| Does the quote clearly state sealing height, materials, labor and VAT? | Yes / No |
If you can't answer these questions, it doesn't mean the work is necessarily bad. But it does mean that clarification is needed before everything is covered with tile.
If you must keep only one thing, keep this: in the shower, wall waterproofing should not stop low. Ask for it to rise to at least about 2 meters in the zone that receives water, and pay special attention to the shower mixer area. Escutcheons and silicone are not enough if there is an open gap behind them. Pipe penetrations must be sealed as part of the waterproofing system before the tiles are installed.
Waterproofing the walls of the shower is one of the stages that is less visible, but has the most impact on the life of the bathroom. The floor is critical, but the walls receive water, steam and cleaning agents every day. If they are left unprotected behind the tiles, moisture can gradually seep into the substrate and become a problem much later.
The practical height of 2 meters in the shower area is a safe base for most homes. In more demanding cases, the waterproofing can and should be raised even higher. The important thing is to protect the actual zone of use, not just a low section near the floor.
The area around the shower mixer deserves special attention, because the waterproofing is interrupted there by pipe penetrations, escutcheons, and fittings. If this point is not properly treated before the tiles are installed, repairs later are difficult and often expensive.
The owner should ask for a clear description: how high the waterproofing will go, how the corners will be formed, what will be done around the mixer, and whether the materials are compatible with one another. A beautiful bathroom is obvious on the first day. A properly sealed bathroom proves itself after years of daily use.
Return to category.
Go to categoryReturn to the central guide.
Go to guide