
Bathroom Waterproofing & Moisture Protection
Return to category.
Go to categoryThe flat walk-in shower is one of the cleanest and most impressive solutions in a modern bathroom. The floor of the shower continues almost uninterruptedly in the rest of the bathroom, without a raised base, without an obvious step and without the classic "lip" that distinguishes the shower area. The result looks more comfortable, more luxurious and more accessible, especially in small bathrooms where every centimeter counts.
But the simpler the picture looks, the more demanding is the construction underneath. The step in a traditional shower is not only an aesthetic limit. It also acts as a natural water barrier. When we remove it, all the responsibility goes to the correct geometry of the floor, the drains, the siphon, the waterproofing and the final water management. If any of these are done casually, the water will not "respect" the minimal aesthetics. It will move to the lowest point, even if it is outside the shower.
The biggest technical challenge in the level walk-in shower is that waterproofing cannot be treated as just a local job inside the shower. When the floor is flush with the rest of the bathroom, the wet zone doesn't have such a clear boundary. Splashes, water flow, minor slope failures and daily use can affect a larger area. That's why a unified waterproofing logic is needed, not just "a little insulation where the water will fall".
In practice, many problems with flat showers do not show up in the first week. The bathroom is delivered beautiful, the glass looks clean, the linear siphon works and the owner is satisfied. After months, however, the signs may begin: moisture near the bathroom door, water passing towards the vanity unit, blackening of the joints outside the shower zone, swelling in the skirting board of the next room or permanent moisture near the glass.
This guide explains what a level walk-in shower really means, why it is technically more demanding than a lip shower, how the single seal should be designed and what points should be checked before tiling the floor.
When we say level walk-in shower, we mean that the finished floor of the shower is on the same or almost the same level as the rest of the bathroom floor. There is no visible shower base, no classic step and access is direct. This can be aesthetically very beautiful and functionally comfortable, especially for the elderly, children or people who want easier access.
Technically, however, "level" does not mean "completely level". The floor of the shower must be inclined towards the spout. The challenge is that this slope must be created within the overall thickness of the floor, without raising the rest of the level too much and without creating an unwanted lip. In other words, the floor should look uniform, but act as a controlled drainage surface.
This is where it is often misunderstood. The owner asks that "everything be straight", meaning that there is no step. But the technician must explain that there must be a flow inside the shower zone. If the whole bath becomes really flat, the water will spread out. If the flow goes wrong, it can lead the water to the rest of the bathroom.
A proper level walk-in shower is not a flat surface with a spout. It is a floor with carefully hidden geometry. There lies its technical value.
In older bathrooms, the bathtub or overhead shower created a natural boundary. Even if there was a small failure in the drain, the water stayed in the basin or behind the rim. The step acted as a simple but effective barrier.
When this limit is removed, the water has more freedom of movement. If the shower is open, without a door or with only one fixed glass, splashes can reach further outside. If the slope is not correct, the water can move towards the bathroom. If the siphon does not pull quickly, the water level rises temporarily and may escape from the shower zone.
This does not mean that a level-access shower is a bad solution. It means that we have to replace the natural barrier of a step with proper technical design. Here, "safety" no longer comes from an upstand, but from floor levels, slopes, drain position, glass length, and the extent of the waterproofing.
A practical example is a small bathroom where the walk-in shower is next to the vanity unit. If there is no step and the glass is short, small amounts of water may reach the furniture every day. If the floor outside the shower has not been designed as a potential wet zone, swelling, dampness or wear may occur over time.
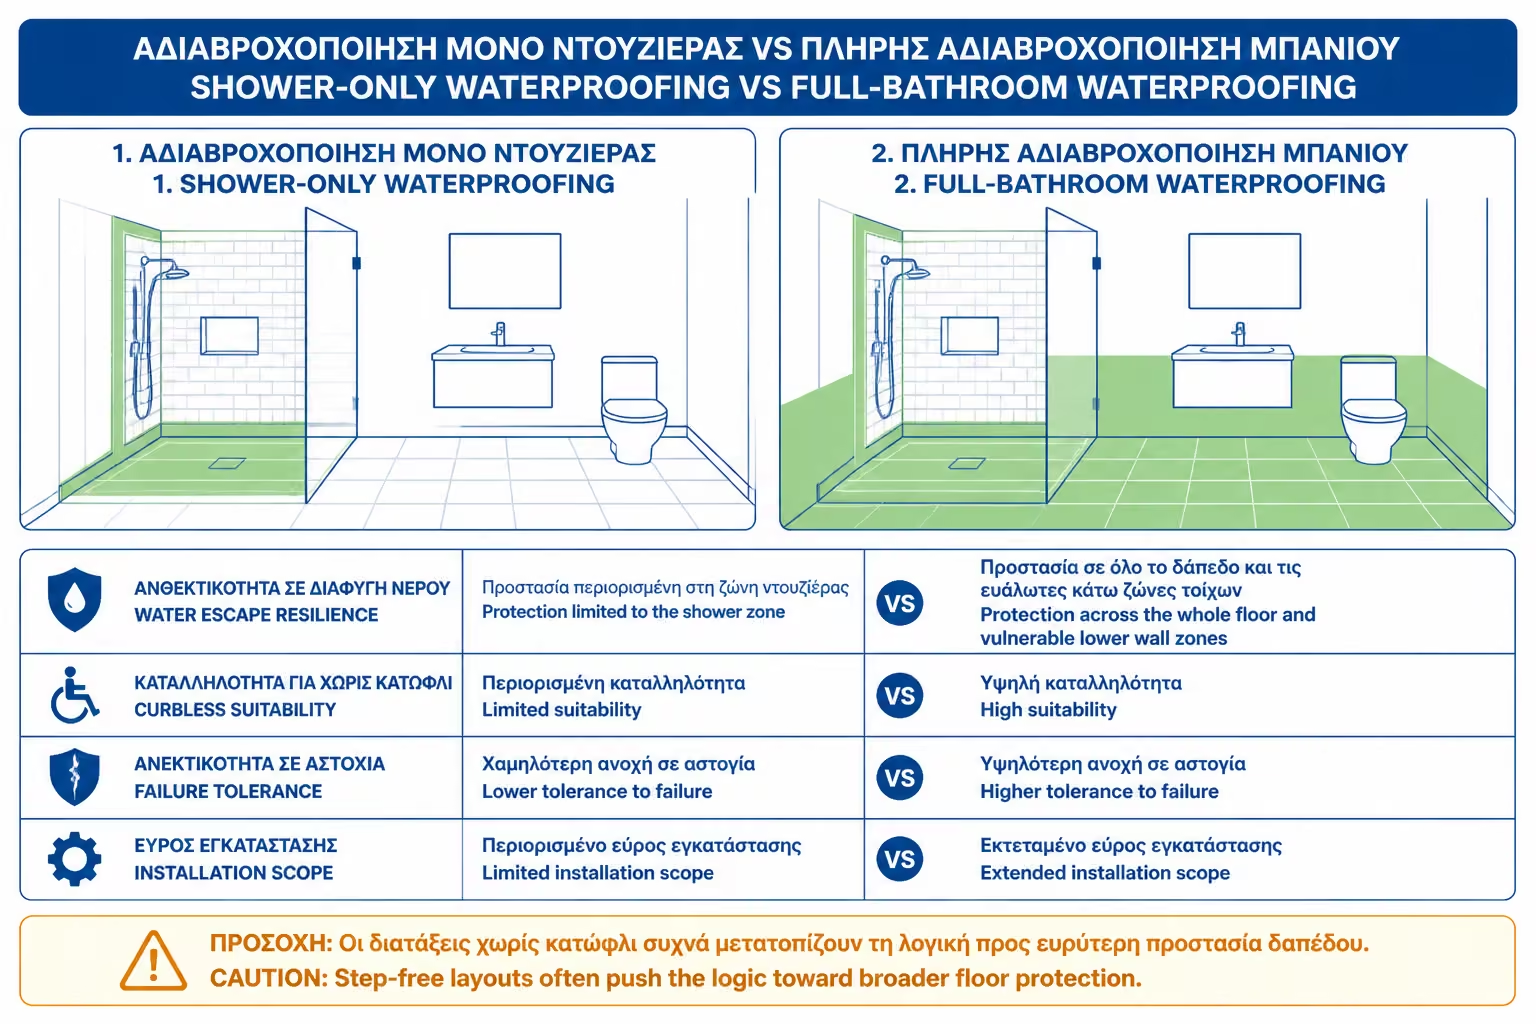
In a shower with a clear boundary, the waterproofing can be concentrated mainly within the shower zone, with special attention to the floor, drain, and walls. In a level walk-in shower, the limit is more fluid. The zone where water can reach does not always stop at the imaginary glass line.
That is why waterproofing should be treated as a single floor system and not as a small local patch. The shower floor needs to be fully waterproofed, but often a significant portion of the rest of the bathroom needs to be protected as well, especially around the shower outlet, linear spout, glass and corners.
The same applies to the walls. If the shower is open and water can hit the side surfaces, waterproofing must cover those zones too. It is not enough to waterproof only the wall behind the mixer. Real use conditions should determine the extent of protection.
The right thought is this: "Where can water reach in daily use?" and not "Where does the shower seem to end in the drawing?". In flat showers, this difference is decisive.
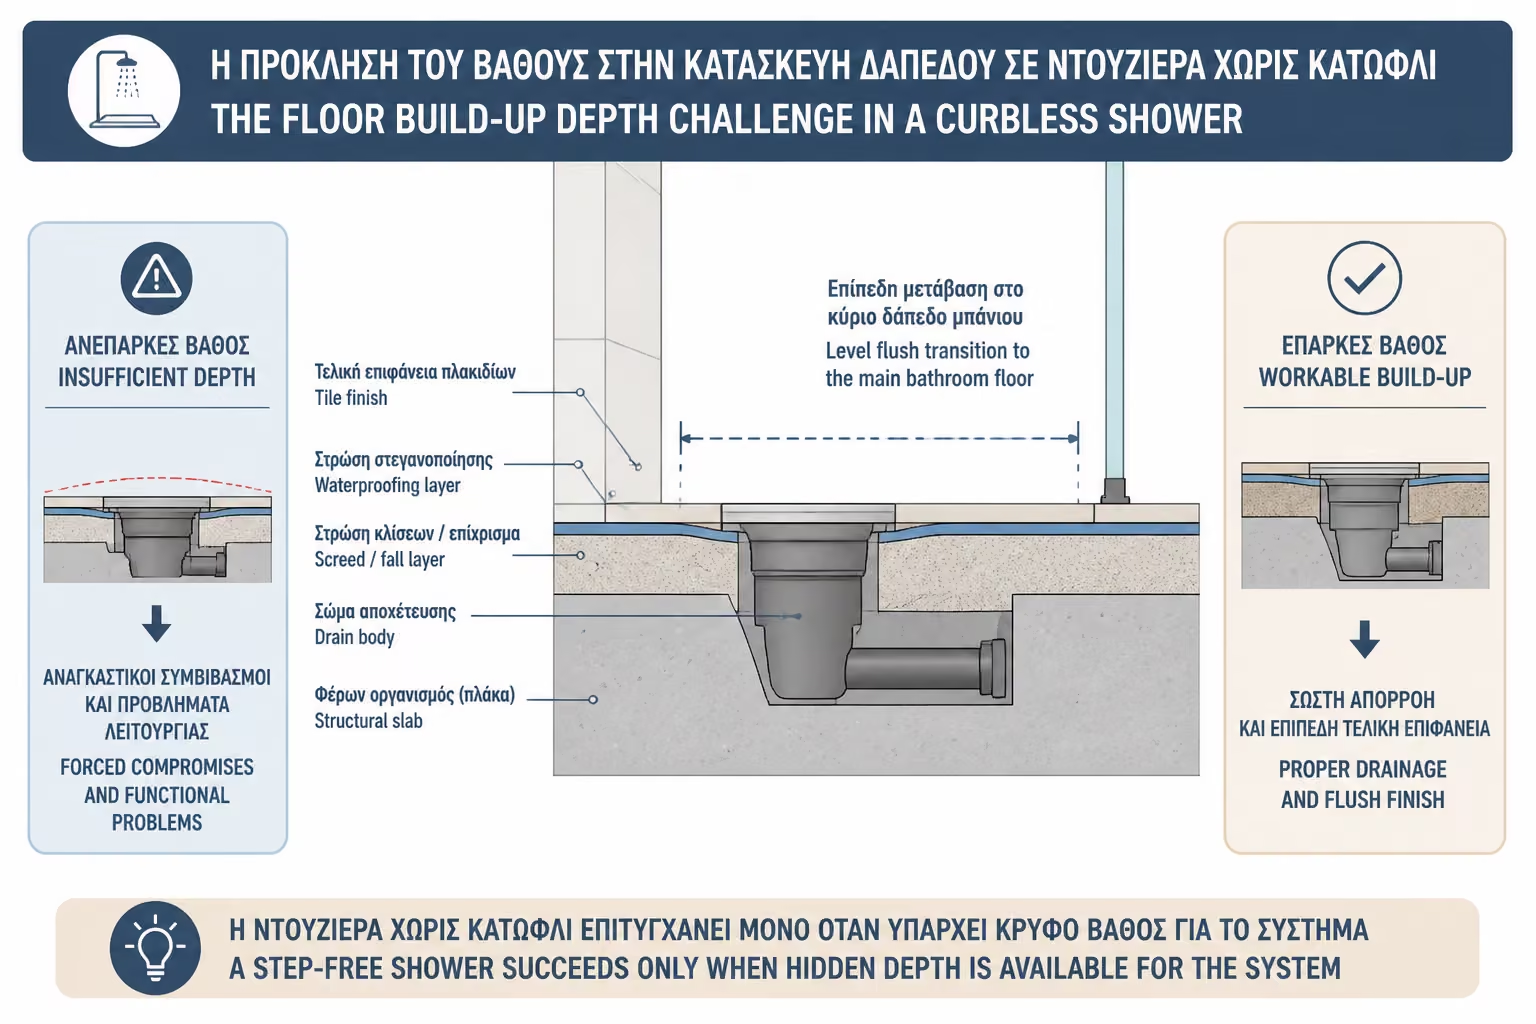
To make a level walk-in shower, there must be enough available height in the floor to accommodate the drain, siphon, grout, grout, waterproofing, adhesive and tile. In new construction, this can be predicted from the design. In renovations of old apartments, it is often the biggest obstacle.
Many old bathrooms are not deep enough to comfortably fit a low-profile linear trap with a proper drain slope. If the spout goes in too high, the shower can't be really level. If the drain is not properly sloped, the water may drain slowly. If the entire floor is raised to create height, a step may appear at the entrance to the bathroom.
This is where honesty is needed before the project begins. Not all bathrooms are suitable for truly level, no-compromise walk-ins. Sometimes an almost flush solution can be made with a very small lip. Other times a special low height siphon is needed. In some cases, the technically safer solution is a subtle elevation of the shower area.
An owner should not push for "zero steps" if the space does not allow it. Aesthetic desirability must be weighed against function and sealing. A very low and properly designed threshold can be better than a theoretically level shower that holds water.
The technical success of the flat walk-in shower lies in the design. The floor must guide the water towards the siphon without creating a sudden change in level at the entrance of the shower. This requires careful calculation before the cement mortar is made.
In a shower with a wall-side linear drain, the cleanest solution is usually a one-sided slope from the entrance toward the drain. That way the water moves in one direction and large tiles can be installed more easily. In a shower with a central drain, multiple converging slopes are required, which makes a flat and unified look harder to achieve.
Typically, a practical slope of 1%–2% is the basis of design. This means about 1–2 centimeters of height difference per meter. But the final choice depends on the length of the shower, the tile, the siphon and the water supply. Too little slope leads to stagnant water. Too much tilt can become uncomfortable or unsightly.
The important thing is that the slope should not be "made" with the tile adhesive. It must be molded into the cement mortar or suitable substrate before waterproofing. Glue can make minor corrections, but it is not a flow forming material.
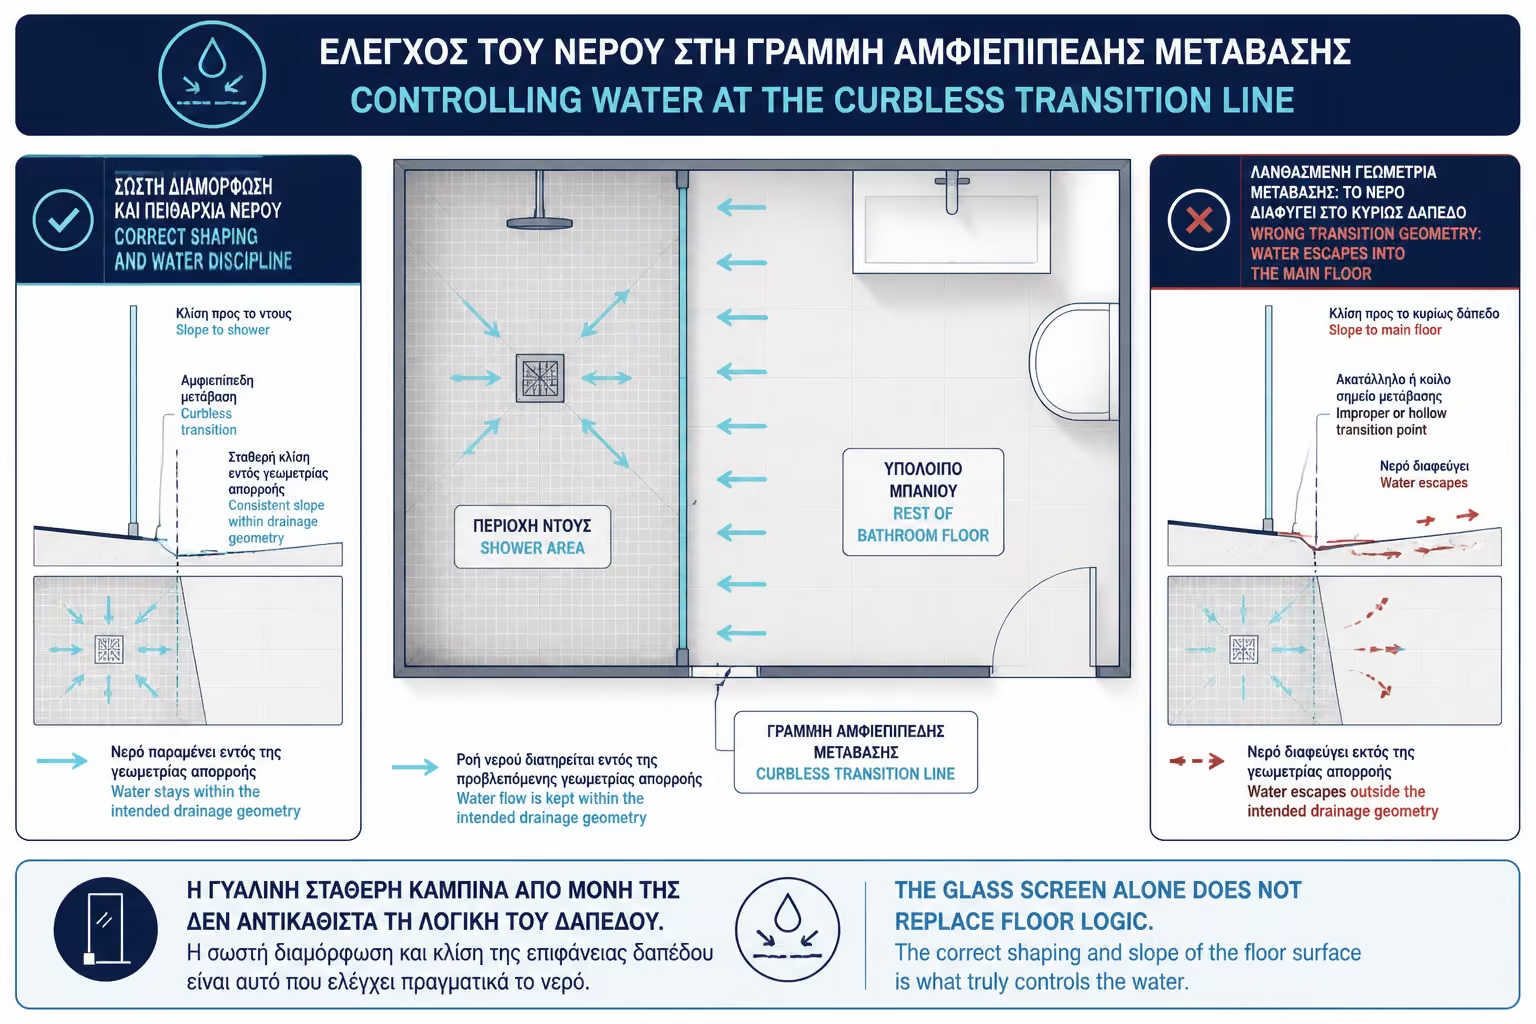
In a level walk-in shower, there is a critical line that is often not seen: the transition line from the shower zone to the rest of the bathroom. There it must be decided how to stop the main flow of water without a step.
This line can be located under the fixed glass, at the entrance of the shower or at a point of change of slope. If designed correctly, water stays within the catchment zone. If it is designed incorrectly, the water will seep through to the rest of the floor, even if the shower looks beautiful.
In some layouts, the rest of the bathroom has a very slight auxiliary slope toward the shower or toward a second drain for extra safety. In others, the floor outside the shower is essentially flat, but waterproofed over a larger area. The choice depends on the space, the use pattern, and the technical constraints.
The mistake is to think that the glass line alone solves the problem. The glass limits splashes, but does not create a hydraulic boundary on the floor. If the slope drives water out, the glazing will not stop it.
In flat walk-in showers, the linear spout is usually the most popular choice. The reason is not only aesthetic. Technically, it allows for a cleaner one-sided slope, which facilitates a uniform look for the floor. Especially when the siphon is placed on the wall or on the edge of the shower, the water can be directed into a drain line.
The central siphon can work, but it is more difficult when we want a single floor without a step. The gradients must converge to a point. This is best suited to smaller tiles or mosaics, not so much to the large tiles that are often chosen for modern bathrooms.
Before you finalize the choice or installation, review the following points first:
| Runoff option | Advantages of level shower | Technical difficulties |
|---|---|---|
| Linear siphon on the wall | Clear image, one basic gradient, suitable for large tiles | It needs an accurate level, a proper gasket and an excellent seal at the linear joint |
| Linear siphon at the entrance | It can act as a water collection line | It needs attention for cleaning, level and aesthetics |
| Central siphon | Simple, familiar solution, often cheaper | Complex gradients, more cuts, harder with large tiles |
| Wall-side linear drain | Very clean result | Greater technical demand and more difficult future repair |
For a level walk-in without a step, a linear drain is often the more natural choice. But appearance alone is not enough. It must have adequate flow capacity, be compatible with the waterproofing system, and fit within the available floor height.
The waterproofing of the floor in a level walk-in shower needs to be more careful than a simple local waterproofing. Water can seep out of the immediate shower zone, so the protective system must realistically cover the area that can get wet.
In many cases, the correct solution is to waterproof the entire bathroom floor or at least a large part of it, with particular reinforcement in the shower zone. This depends on the layout, the size of the bathroom, the type of glass and the existence of a second siphon. In small bathrooms, where practically the entire floor can get wet, a wider seal is often safer.
The crucial thing is the continuity. The waterproofing should not stop exactly at the imaginary line of the shower. If there is a break where water can pass, a weak point is created. The protection must rise at the junctions with the walls, tie with the siphon and reinforce at the corners.
Whether a fleece film or a spreadable system is used, the application must be continuous and consistent. In flat showers, membranes often have an advantage on the floor because they give a more controlled layer. Spreadables can also work well, but need meticulous application, proper thickness and reinforcement in critical areas.
In the level walk-in shower, the floor-wall joint is one of the points that receives daily stress. That's where two surfaces meet, that's where water ends up, that's where there are micro-movements and that's where the first signs of moisture often appear.
The floor waterproofing must go up to the walls in a continuous manner. It shouldn't stop at acne. Sealing tapes are usually used in the corners so that the joint has elasticity and continuity. Simple application without reinforcement may not be enough, especially when the shower is open and water often reaches the corners.
In the shower zone, the waterproofing of the walls must rise sufficiently, often at least to around 2 meters or higher depending on the layout. In the rest of the bathroom, lower but continuous protection may be needed at the base of the walls, especially if there is a possibility of the floor getting wet.
A common mistake is to make good insulation in the floor, but to treat the perimeter joints as a simple detail. In fact, that's exactly where the water works when it escapes from the shower zone.
Fixed glass in a walk-in shower is important to limit splashes, but should not be considered a technical moisture barrier. It does not completely seal the floor, does not stop water moving due to the wrong slope and does not protect against water vapor or leaks under the tiles.
The position and length of the glass should be designed along with the water flow. If the glass is too short, the splashes will reach outside. If it is placed in the wrong place, it can hold water at its base. If it is punched at critical points without proper sealing, it can injure the seal behind the tile.
In level showers, the base of the glass is particularly sensitive. Water, detergents and salts collect there. If the profile or supports are not properly sealed, small moisture paths can be created. And here the same principle applies: silicone is a final seal, not a substitute for proper waterproofing underneath.
A very beautiful minimal glass may not be enough for a small bathroom with strong water pressure. Aesthetics should be judged based on use, not just photography.
Large tiles are a common choice in level walk-in showers because they enhance the sense of continuity. Fewer joints, clearer image, greater sense of space. But technically it is not always the easiest solution.
Large tile means less ability to follow complex gradients. If the shower has a central spout, the large tile can create cutting and fitting problems. If there is a linear siphon and a one-sided slope, the solution is more compatible, but still requires a very precise cement mortar.
Anti-slip should also be considered. A very smooth tile can look luxurious, but in a flat shower where the water can spread out more, the choice of surface matters. There is no need to choose an overly rough material that is difficult to clean, but there must be a balance between safety and maintenance.
Installing large tiles requires a suitable adhesive, proper coverage, a flat substrate and an experienced craftsman. If there are gaps under the tile, especially in a wet zone, problems can arise over time.
There is no one answer for all bathrooms. In a large bathroom with a well-enclosed shower, full sealing of the shower zone and a reasonable perimeter protection may be sufficient. But in a small bathroom, where the walk-in shower is open and water can get almost everywhere, waterproofing the entire floor is often a safer option.
Fully waterproofing the floor does not mean that the bathroom becomes a swimming pool. It means that the substrate is protected from possible daily moisture. The water must again be properly directed to the siphon. Waterproofing does not replace slopes, it simply reduces the risk of damage if water reaches areas outside the shower.
Particular attention needs to be paid to the areas around the bathroom door, the vanity unit, the basin and the baseboards. If water often reaches these points, the damage may not be immediate, but over time it may appear on wooden furniture, joints, cases or adjacent walls.
In level walk-in showers, the question should not be "how little insulation can we put in?". It should be "which surface has a realistic chance of getting wet?". This surface must be protected.
Mistakes in shower planes usually start from over-enthusiasm about the image. The owner wants a clean floor, large tile, minimal glazing and zero steps. But if the technical limits of the space are not checked, the construction can become vulnerable.
Before you finalize the choice or installation, review the following points first:
| Error | Possible consequence | Correct approach |
|---|---|---|
| Requirement for perfectly level floor without height control | Poor drainage or insufficient runoff | Check available thickness before design |
| Sealing only inside the shower | Dampness in areas that get wet outside of the shower | Wider or single floor waterproofing |
| Slight slope for aesthetic reasons | Stagnant water | Practical slope of about 1%–2%, depending on the project |
| Incorrect position of linear siphon | Water to the rest of the bath or slow drain | Siphon design along with downspouts and drainage |
| Very small window | Splashes outside the shower zone | Choice of lens length based on actual use |
| Large tiles on complex gradients | Poor cuts, low spots, or weak drainage | Combination of tile with siphon type |
| Drilling of supports without sealing | Local moisture entry | Careful sealing of each perforation |
| Indefinite “walk-in shower” offer | Gaps in slopes, waterproofing, and drain detailing | Detailed description of technical stages |
A typical example is a bathroom where the floor was made one with a large tile, but the slope of the shower was too small to not see the "downhill". The result was beautiful in tradition, but after each use water remained in front of the glass and passed to the furniture. The problem was not the tile or the silicone. It was the wrong balance between aesthetics and runoff.
A level walk-in shower usually costs more than a simple shower, not just because it looks more modern, but because it requires more precision. It needs proper height control, possible drain relocation, a good-quality linear drain, careful screed work, consistent waterproofing, accurate tiling, and properly selected glass.
In the Greece of 2026, a typical bathroom of about 5 sq.m. it can be indicative of €3,200–€5,500 for a simple to medium renovation. When a level walk-in shower with linear siphon, membrane or complete waterproofing system, large tiles and custom glass is included, the total cost can more easily move towards €6,000–7,500 or more, depending on the materials and the difficulty.
Before you finalize the choice or installation, review the following points first:
| Factor | How does it affect cost? |
|---|---|
| Floor height available | If not sufficient, special solutions or elevation may be needed |
| Linear siphon | Costs vary by length, quality, flow and flange |
| Single sealing | More squares, strips, corners and materials |
| Large tiles | They require a better substrate, careful gluing and precise cuts |
| Walk-in glass | It is affected by dimensions, thickness, supports and custom construction |
| Old sewer | May require additional plumbing work |
| VAT and subject of offer | It must be clear whether materials, labor and finishes are included |
A low bid for a level walk-in shower needs careful scrutiny. It may be reasonable if the case is simple, but it may not include critical steps such as single waterproofing, proper siphon connection, corner tapes or proper cement mortar. The comparison should be based on the exact scope of work, not just the final price.
A proper quote for a level walk-in shower should be more detailed than a simple reference to "shower construction". It should describe how the level issue will be solved, what type of drain will be used, where it will be placed, how the slopes will be formed, what surfaces will be waterproofed, and how the waterproofing will connect to the drain and the walls.
Ideally, demolition, plumbing, screed work, waterproofing, tapes, corners, adhesive, tiling, glass installation, and final sealing should be listed separately. It must also be specified whether materials, labour, VAT, debris removal, and any special components are included.
The owner must ask for a clear answer on three critical points: whether the floor can really be leveled, how much of the bathroom will be waterproofed, and how it will be checked that water does not come out of the shower zone. If these are not answered, the offer is incomplete.
A good offer is not necessarily the most expensive. She is the one who doesn't leave the critical technical stages to the phrase "we'll see along the way".
Although the walk-in level is very attractive, it is not always the right solution for every bathroom. If the floor does not have enough available height, if the drainage is in a difficult position, if the bathroom is too small and the water will constantly come out, or if the budget is not sufficient for proper waterproofing, a different approach may be needed.
In some cases, a low overhang or a small discreet lip can provide much more safety without ruining aesthetics. In others, a ready-made, low-profile shower may be a more practical solution. The right renovation is not the one that copies the photo, but the one that works in the particular house.
Particular attention is needed in apartment buildings, where a leak may affect neighbors or common elements. There the risk of a hasty flat solution is greater. If in doubt, it should be checked by an experienced technician or engineer before deciding on the final solution.
The walk-in level is worth it when it can be done right. If it is going to be compromised on critical points, it is better to choose a simpler but safer solution.
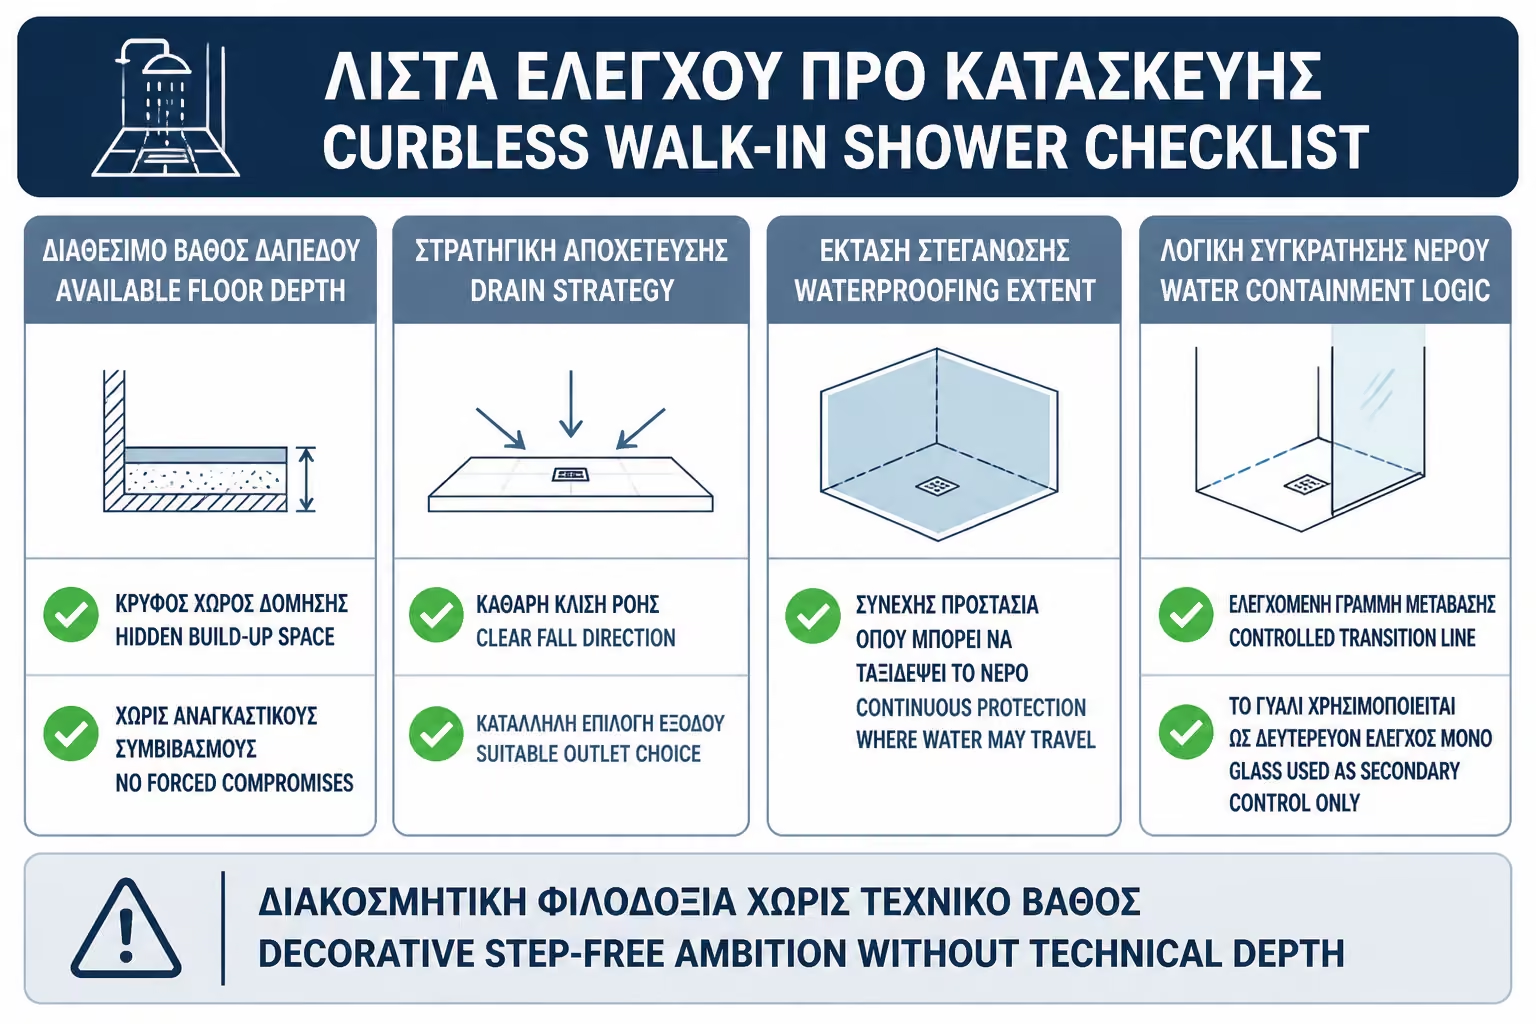
Before you approve a level walk-in shower, it is worth putting the proposal through a practical check. Most failures can be avoided if they are caught before grouts, membranes and tiles are put in.
Before you finalize the choice or installation, review the following points first:
| Question | Yes / No |
|---|---|
| Has it been checked whether there is enough available floor height? | Yes / No |
| Can the drain slope properly to the siphon? | Yes / No |
| Has a drain suitable for a level walk-in shower been selected? | Yes / No |
| Does the siphon have a gasket or a waterproof connection? | Yes / No |
| Have the final levels been calculated with tile and glue? | Yes / No |
| Will the grout form a clean slope to the siphon? | Yes / No |
| Has it been decided whether to waterproof the entire bathroom floor or a large part of it? | Yes / No |
| Will the waterproofing be attached to the walls with corner tapes? | Yes / No |
| Has the tile been checked to match the floor slopes? | Yes / No |
| Does the length and position of the lens adequately limit splash? | Yes / No |
| Are supports, profiles and perforations sealed? | Yes / No |
| Will runoff be checked before final delivery? | Yes / No |
| Does the offer clearly state materials, labour, VAT and technical stages? | Yes / No |
If several answers are "I don't know", it does not mean that the solution is excluded. But it means that it is not designed enough yet. In level walk-in showers, ambiguity is one of the biggest risks.
If you have to keep only one thing, keep this: the level walk-in shower is not just a “shower without steps”. It is a construction where the floor, siphon, drains and waterproofing must work as a single system. Do not remove the step without planning what will technically replace it. Ask for available height control, clear downspouts, waterproofing compatible siphon and waterproofing throughout the area that can realistically get wet.
The walk-in shower without steps can give a bathroom an excellent sense of comfort, cleanliness and modern aesthetics. But its success is not judged by how unified the tile looks, but by how what lies beneath the tile is designed. Without proper drains, without a suitable siphon and without a single seal, the minimal image can hide a significant risk.
Removing the step means removing a natural water barrier. For the construction to function properly, this barrier must be replaced by technical precision: correct level, sufficient slope, correct drainage, waterproofed floor zone and protected joints with the walls.
The homeowner must view the walk-in floor as a complete system, not as an aesthetic option that is simply added to a standard renovation. Before approving the construction, he must ask if the space allows it, how the water will go away, how far the waterproofing will extend and how the critical points will be protected.
When all this is done correctly, the level walk-in shower is one of the most functional and beautiful solutions for the modern bathroom. But when done in a hurry or with too much emphasis on the image, it can turn into one of the most difficult points to repair. In the stepless shower, detail is not a luxury. It is the protection of the bathroom itself.
Return to category.
Go to categoryReturn to the central guide.
Go to guide