
Bathroom Waterproofing & Moisture Protection
Return to category.
Go to categoryA window in the shower area is one of the most difficult details in a bathroom. On the one hand, it offers natural light and ventilation, something valuable in humid spaces. On the other hand, it is right where water, steam, soaps and temperature changes fall every day. The result is a construction that must behave not like a simple interior window, but like an element inside a permanently wet zone.
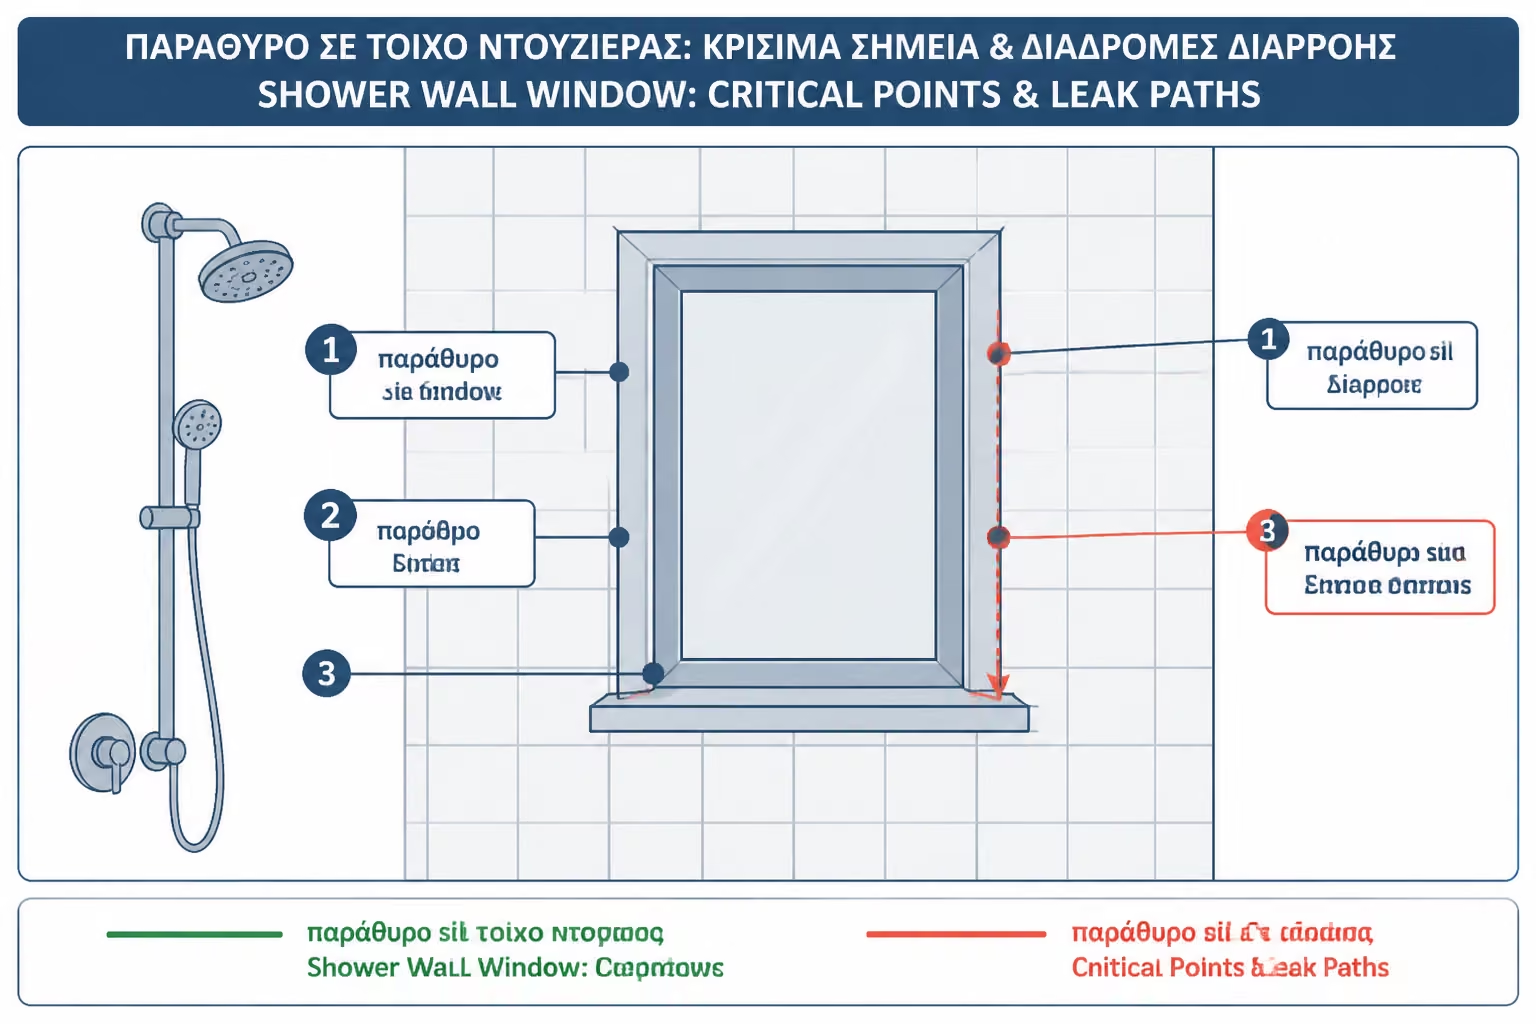
The big mistake is to treat the window as a mere interruption of the tile. Tiles are put in around the frame, some silicone is applied at the end, maybe the sill is changed, and the job is considered done. In practice, however, water hitting the window does not behave kindly. It sits on the windowsill, enters the corners, rolls to the sides, passes behind profiles, finds small joints between tile and frame, and sooner or later tests all the weak points.
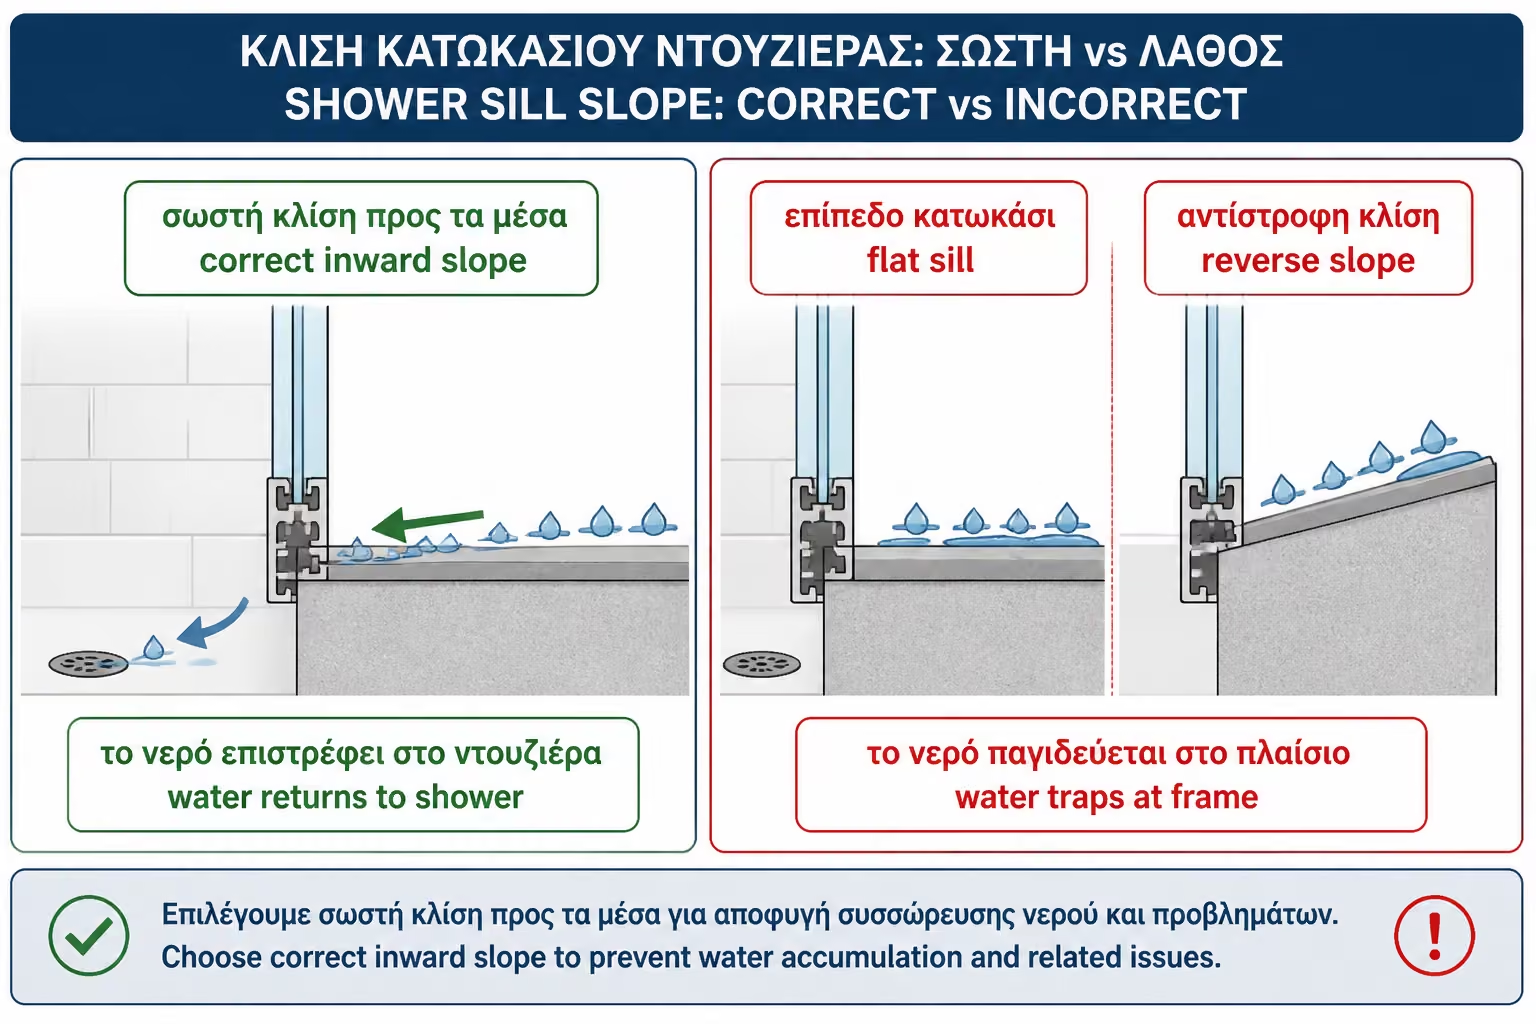
The windowsill is the most critical point. If it is horizontal or slanted towards the window, it will hold water. If water stays there after every shower, the silicone, joints and case will be constantly stressed. If the waterproofing is not properly turned over the sill and sides, water can seep behind the tiles and create dampness inside the wall. In a window in the shower, the sill should be designed like a small shower area: with slope, waterproofing, waterproofing strips and proper final sealing.
The case is the second big issue. If it is wooden or old metal, the situation becomes more difficult. The wood should not be wet every day, because it can swell, rot or peel. Old metal can rust. Even a modern aluminum or PVC casing needs a proper connection to the waterproofing of the wall. The case itself is not waterproof. It is a framing element that must be integrated into a watertight system.
This guide explains why the window in the shower is so vulnerable, how the window sill should be sealed, what to do with the frame, when tapes and sealants are needed, which materials are safer and what the owner should check before tiling.
A window in a plain bathroom wall receives mainly water vapor and occasional moisture. A window in the shower zone receives direct water. This completely changes the technical requirement. We are no longer talking about "moisture resistance", but about a surface that gets wet every day and must be properly dried.
The water hits the glass, the profiles, the sill and the sides. From there it rolls down. If the geometry is correct, the water flows back into the shower. If the geometry is wrong, water enters the frame, sits on the sill or goes behind the tiles.
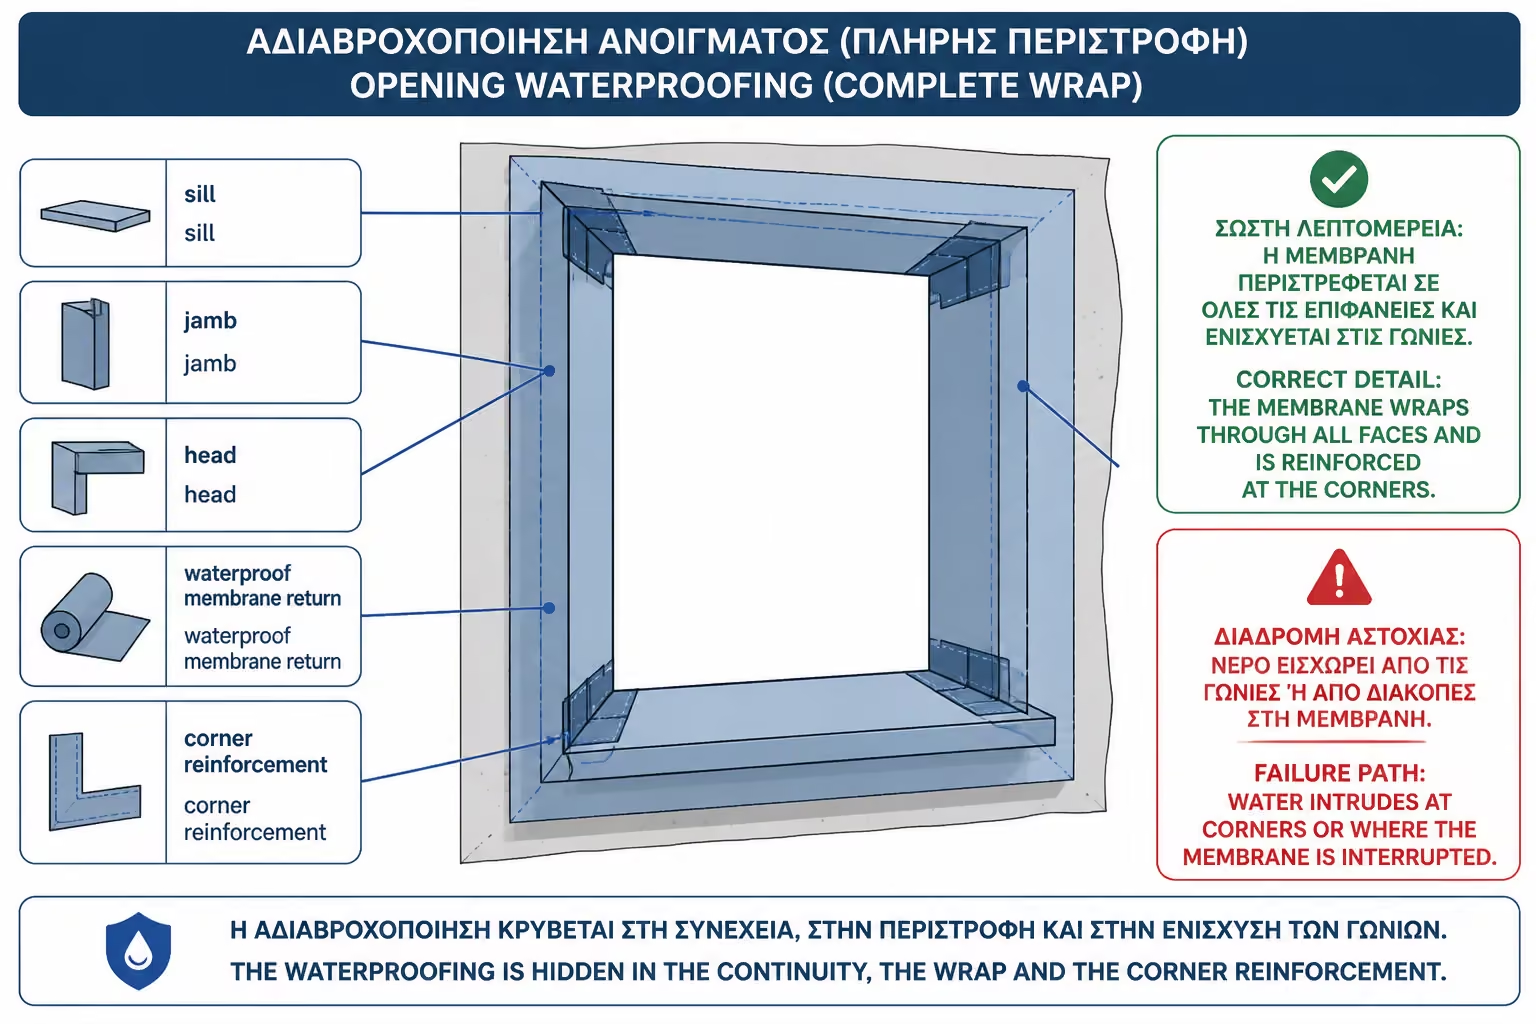
In this case, the waterproofing must treat the window opening as a “hole” in a wet zone. Just as water pipes need cuffs and corners need tape, so the window needs special perimeter detailing. It is not enough for the general waterproofing of the wall to stop near the frame.
The window inside the shower is a point of material change: tile, glue, waterproofing, plaster or cement board, casing, glass, sill and silicones. Any hardware change is a potential water path if not properly planned.
The first and most important technical element is the slope of the sill. The bottom of the window should not be flat. It must have a clean slope towards the inside of the shower, that is, towards the point from where the water can return to the floor and the siphon. If the windowsill is horizontal, the water will pool. If it leans towards the case, the water will be directed to the worst possible place.
The slope should not be created with a bit of tile adhesive at the end. It must be part of the sill construction. If the window sill is made of tiles, the substrate below must have the correct slope. If it is made of marble, granite or artificial stone, the piece must be cut and installed at the appropriate slope.
A good practical criterion is that no water should remain on the windowsill after the shower. If you see drops sitting firmly in the corner of the case, the point will be tired. The best waterproofing is the one that does not allow water to pool.
Slope is geometric protection. Waterproofing is technical protection. Both are needed.
In a window in the shower, the sill should ideally have as few joints as possible. A single piece of marble, granite, artificial stone or suitable solid material may be safer than several small pieces of tile with joints on the horizontal surface. The more joints there are in the window sill, the more places there are where water can stay.
This does not mean that tile is prohibited. But it does mean that if tile is used, the joints must be properly designed, with a suitable grout and full waterproofing underneath. On a horizontal or near-horizontal surface inside the shower, a simple cement joint will be more stressed. In such cases, epoxy grout may be a more reasonable choice for the finished surface, without replacing waterproofing.
Joints at the corners of the sill should be treated with rubber sealant where there is a change of material or level. They should not be filled roughly with a stiff grout that can crack. The rear connection to the case is particularly critical and needs the right material, not just a joint.
The windowsill is a small surface, but it is one of the places that gets wet the most. It must be designed with this logic in mind.
The waterproofing of the shower wall should not stop at the flat surface around the window. It must turn inside the opening cheeks: lower sill, sidelights and top. In other words, the entire inner surface of the opening must be treated as a wet zone.
Αν η υγρομόνωση σταματήσει λίγο πριν την κάσα, δημιουργείται αδύναμο σημείο. Water can pass through the tile-casing joint and find the substrate behind the siding. This is especially dangerous if the wall is of dry construction, plasterboard or old plaster that cannot withstand constant moisture.
In the inner corners of the opening, sealing tapes or special corner pieces are needed. Sill meets sides, sides meet wall, frame meets trim. Όλες αυτές οι ενώσεις είναι πιθανές γραμμές αστοχίας. A simple pass of spreader without tape in such corners is insufficient for daily wetting.
The correct pre-tiling image should show a continuous “basin” of waterproofing around the window. Όχι απλώς έναν μονωμένο τοίχο με ένα άνοιγμα στη μέση.
The material of the case greatly affects the technical solution. Modern PVC or aluminum cases are usually more suitable for a wet environment than a wooden case. But if they are inside the shower zone, they also need a proper connection to the tile and waterproofing. Water must not pass behind the profile.
The wooden frame inside the shower is a problematic choice. Even if painted or varnished, daily wetting can cause blistering, discoloration, mold or peeling paint. If there is already a wooden case and it cannot be replaced, it needs very careful protection, but it must be said that the risk remains higher.
Old metal cases may have hidden rust or gaps behind the tile. If water gets into these areas, stains, swelling or corrosion may occur. Simple silicone in the final joint is not enough if the base of the profile is already problematic.
In a new renovation, when the window is inside the shower, it is seriously worth considering replacing the old frame with a suitable wet environment frame. Sealing can protect a lot, but it doesn't change the nature of an unsuitable material.
The final joint between the tile and the casing should not be filled with rigid cementitious grout. The case and the tile are different materials, with different micro-movements. There, an elastic sealant is needed, usually a suitable neutral or sanitary silicone, depending on the materials.
The choice of silicone matters. On aluminum, PVC, painted profiles or special surfaces, neutral silicone is often a safer choice than a classic acidic one, especially if there is a risk of incompatibility or corrosion. If there is natural stone on the windowsill, a silicone suitable for stone is needed so that it does not leave stains.
The silicone must be applied to a clean and dry surface. If there are salts, dust, old mastic, soaps or moisture, the adhesion will be poor. The application must have a correct cross-section. If the gap is large, a backer rod or other configuration may be needed before the sealant.
Very important: the final silicone does not replace the waterproofing that must be present below and around the opening. It is the last line of defense, not the only one.
A single window sill made of marble, granite or artificial stone can be a good solution, because it reduces the joints in the wetting surface. If cut at a proper slope towards the shower and laid on a waterproofed substrate, it can work much better than a series of small tiles.
But be careful: marble is not automatically a waterproof system. It may have absorbency, stain from the wrong silicone or discolor from cleaners. Its joints with the case and sides must be properly sealed. The underside and sides must be pressed onto a secure base, with no gaps to trap moisture.
If natural stone is chosen, compatible sealants must be used. A wrong silicone can create an oily stain on the edges. Also, it must be considered whether impregnation or protection of the stone is needed, without this being considered a substitute for waterproofing.
The best solution is not just "laying marble". It is "put a single, sloped, properly sealed and properly sealed window sill".
Window sills are often more insidious than the sill itself. Water can hit the glass, run down the sides, get into the inside corners and end up low on the windowsill. If the sides have tiles with joints and corners without tapes, water can pass behind the lining.
The corners between the side panels and the shower wall must be reinforced with sealing strips. The same applies to joining the sides with the bottom sill. If there is a small surface above the window, it must also be sealed, because steam and splashes can create moisture.
In small windows, the many small tile cuts around the opening create more joints and more points of failure. The quality of the paving is of great importance here. Bad cuts that "close" with too much joint or too much silicone are technically vulnerable.
The window isn't just the bottom line. It's the entire opening.
The frame itself must be able to handle water. Some windows have internal gutters, drain holes or a design that directs water to the outside. But when the window is inside the shower, it receives water from the inside, which is not always the primary use for which it was designed.
It must be checked whether the frame holds water in the lower profiles. If there are drainage holes, they must not be blocked. If the profile has places where water remains, these will fill with salts and mold. If the glass-frame joint is old or has worn rubbers, water can enter the profile.
On old windows, daily wetting from showers can reveal problems that were not visible when the window was only receiving water vapor. Before planning the final paving, the condition of the frame should be checked. If it has loose spots, rust, worn tires or poor drainage, waterproofing the wall is not enough.
The frame must be part of the technical evaluation. Not just something that will "stay as it is".
The wooden frame inside the shower area is one of the most difficult cases. Wood and everyday water are not good allies. Even if the wood is painted with a good ripolin, varnish or protectant, joints, edges, screws and micro-cracks remain vulnerable. Over time it can swell, blacken or rot.
If possible, replacing with PVC or aluminum is usually technically safer. If this is not possible, at least the wood should be protected as much as possible: thorough cleaning, repair of weak points, suitable paint or varnish for a wet environment, proper silicone on the joints and very good ventilation.
Even so, it must be understood that the solution is maintenance and not ideal. A wooden case that gets wet every day will need regular inspection. If cracks appear in the paint or blackening of the joints, they must be dealt with immediately.
In articles and offers, the wording must be honest: the wooden window in the shower is not "sealed forever" with a little silicone. It needs serious protection and monitoring, and often the best solution is replacement.
If the shower wall is of dry construction and includes a window, the requirement rises even more. Drywall, wet drywall, or even cement board around an opening that gets wet every day needs a complete waterproofing system. The cut edges of the panels around the window are vulnerable if not protected.
In such an application, slabs suitable for wet areas, such as cement boards or special panels, should be preferred, and not simple plasterboard. The joints of the panels around the window should be reinforced, the corners should be taped, and the waterproofing should be turned on all sides.
The window sill must be sturdy and not flexible. If the drywall moves, the silicones and joints will wear out. The frame should also be firmly attached to the frame and not just "held" by the paneling.
In dry construction, the slightest water ingress behind the tile can go inside the wall. That is why the window inside the shower is a detail that must be designed before the wall is closed, not after.
A bathroom window can get wet from both sides: inside from the shower and outside from rain. If the outer side has a bad apron, bad seal or reverse slope, water can enter from the outside. Then the owner may think that the shower is to blame, while the problem comes from the outside frame.
Before doing internal sealing, it is worth checking the external side as well. The outer apron should be sloped outwards, drip where required and properly seal with the frame. If rainwater is backing up to the casement, the problem may occur on the inside sill.
In old frames, the external silicones or mastics may have dried out. If the frame is already problematic from the outside, the internal waterproofing may not be sufficient to solve all the dampness.
Correct diagnosis differentiates wetness from showers, wetness from condensation and wetness from rain. All three can appear around the same window.
The window inside the shower does not only accept water in liquid form. It also accepts water vapor condensation. The glass and frame can be colder than the bathroom air, especially in winter. Water vapor condenses there, creating droplets that run down to the windowsill.
If the window does not have a thermal break, if the glass is single or if the ventilation is insufficient, condensation can be intense. Even if there is no direct water from the shower, the windowsill can stay wet for a while due to condensation. This increases the risk of mold and silicone wear.
Good ventilation helps a lot. If the window opens, it should be used after showering as long as it does not cause any other problems. If the bathroom has a fan, it should run long enough after use. Sealing protects against water, but ventilation reduces the time surfaces stay wet.
Condensation is not solved with silicone alone. It wants better ventilation, thermal behavior of the frame and proper drainage of the drops.
In a renovation, the window is usually already there and we can't always move it. Then it must be decided whether it will stay, whether it will be replaced or whether the arrangement of the shower will be changed so that it gets less wet. If the case is old, wooden or problematic, replacement should be seriously considered.
If the window remains, everything must be checked: case condition, rubbers, external sealing, internal sill, slope, old silicones, mold, loose plasters and joints. Then the new waterproofing is planned. It makes no sense to put a new tile over an opening that is already damp.
In some cases, a fixed waterproof panel or special inner cover can be placed on the lower part of the window to reduce direct contact with water. In others, a fixed glass shower screen can protect the window from the main jet. But these are design solutions that need to be carefully evaluated.
The main thing is not to take it for granted that "since it existed before, it will work again". The new showerhead can wet the window much more than the old arrangement.
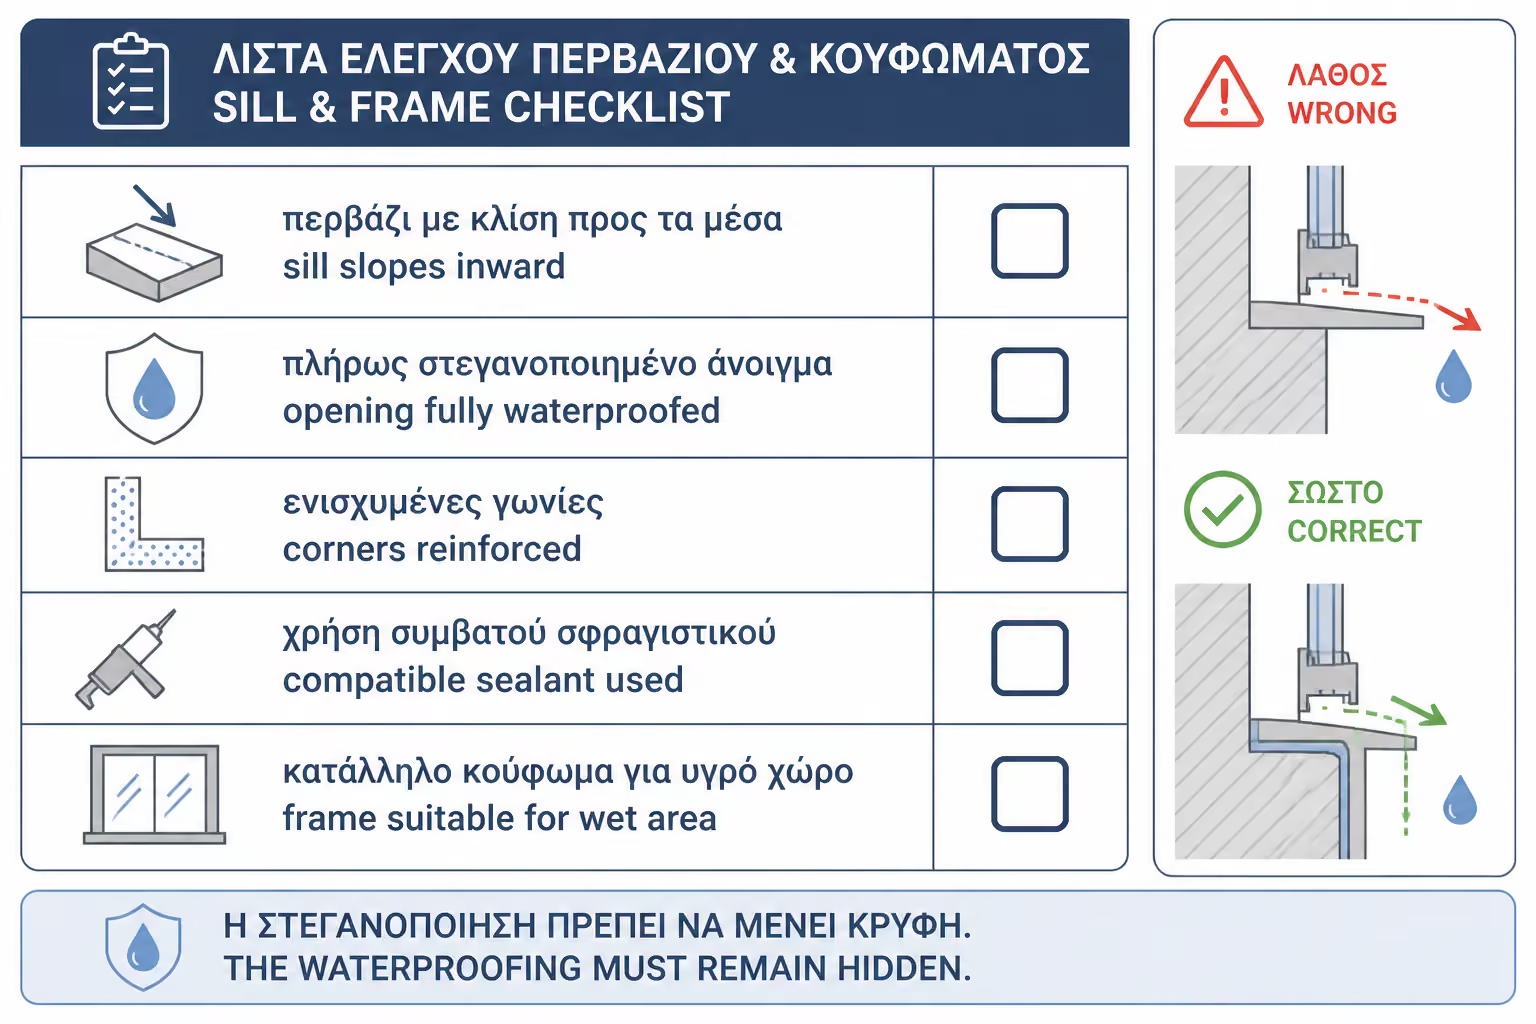
Before you finalize the choice or installation, review the following points first:
| Error | Possible consequence | Correct approach |
|---|---|---|
| Horizontal sill | Stagnant water and mold | Slope to the shower |
| Waterproofing that stops outside the opening | Water behind cheeks and tiles | The membrane rotates inside the opening |
| Simple grout at the junction with the casing | Cracks and water ingress | Case-compatible rubber sealant |
| Wooden case that is wetted daily | Bloating, mold, decay | Replacement or strict protection and maintenance |
| Many joints on the sill | More absorption points | Single sloped piece where possible |
| Old silicone under new | Poor adhesion and quick failure | Complete removal and cleaning |
| Omit tapes in the inner corners | Cracks and hidden moisture | Sealing tapes at the corners of the opening |
| The outer side is not checked | Moisture from rain mistaken for a shower leak | Inspection of outer apron and seals |
| Poor ventilation | Condensation and tanning | Adequate ventilation after use |
A typical example is a window with a marble sill that looks correct, but has a slight slope to the casement. After each shower, a small amount of water remains in the corner of the profile. In a few months, the silicone turns black and the plaster on the sides starts to swell. The problem wasn't just the silicone. It was the wrong slope and the incomplete sealing of the cheek.
Sealing a window inside the shower can increase the cost of a renovation, because it requires more detail: tapes, mastics, special silicones, possible frame replacement, a special sill, more tile cuts and more application time. But this cost is less than the repair of hidden moisture around a window after tiling.
In a typical bathroom of about 5 sq.m. in the Greece of 2026, where a simple to medium renovation can cost around €3,200–5,500 and more demanding solutions with walk-in, special frames, complete waterproofing and custom details can reach around €6,000–7,500 or more, the window inside the shower must be considered an additional technical difficulty. It is not a simple opening in the wall.
Before you finalize the choice or installation, review the following points first:
| Factor | How it affects cost and risk |
|---|---|
| Case material | Wood = higher risk, PVC/aluminum safer |
| Single sill | Increases cost but reduces joints |
| Sealing tapes | Necessary at the corners of the opening |
| Special silicones/mastics | They are needed for case and stone compatibility |
| Frame replacement | Higher cost, but often a better long-term solution |
| Paving of small sides | More cuts and more work |
The cheap solution "tile all around and silicone at the end" is often the most expensive when dampness starts.
A correct quote should treat the window as a separate sealing detail. It is not enough to say "shower wall tiling". It must mention the waterproofing of the window sides, the sill, the tapes in the corners, the sealing with the frame and the type of final sealant.
If there is an old frame, it must be stated whether it will remain or whether it will be replaced. If it remains, check the condition, the rubbers, the old silicones and the exterior. If there is a wooden frame, the danger and the need for protection or replacement must be mentioned.
The offer must also clarify the material of the window sill. Will it be a single piece? Will it be tilted? Will natural stone be used that needs special silicone? Will a tile with an epoxy joint be installed? These details are not decorative. It is part of the tightness.
Finally, materials, labour, VAT and drying times before use must be mentioned. Sealing around a window should not be rushed just before delivery.
Before closing the tiled window, ask if the waterproofing has been turned inside the opening. Ask to see the sill, sides and corners before final cladding. Ask if sealing strips have been inserted into the inner corners.
Ask if the window sill slopes towards the shower. You can check this simply with a little water before the final materials go in, when it is safe and permitted by the work stage. If the water goes to the case, the point must be corrected.
Ask what silicone or mastic will be used to join the casing. Is it compatible with PVC, aluminium, wood or stone? Is it neutral where appropriate? If there is a wooden case, ask if a replacement is recommended or what protection will be applied.
Finally, ask if the outside of the window has been checked. If there is water ingress from rain, internal waterproofing may not completely solve the problem.
Before you finalize the choice or installation, review the following points first:
| Question | Yes / No |
|---|---|
| Is the window in a direct wetting zone from the shower? | Yes / No |
| Does the waterproofing turn inside the window opening? | Yes / No |
| Does the window sill slope cleanly towards the shower? | Yes / No |
| Is the window sill solid or has minimal joints? | Yes / No |
| Do the inside corners have sealing strips? | Yes / No |
| Is the tile-casing joint sealed with rubber material and not grout? | Yes / No |
| Is the silicone/mastic compatible with the case material? | Yes / No |
| If natural stone is present, is an appropriate sealant used? | Yes / No |
| Is the case suitable for daily wetting? | Yes / No |
| Have tires, profiles and external sealing of the frame been checked? | Yes / No |
| Are there any spots where water pools after showering? | Yes / No |
| Is there adequate ventilation to reduce condensation? | Yes / No |
| Are there any pictures of the waterproofing before it was covered? | Yes / No |
If several answers are "don't know", the window has not been treated as a wet zone. And in a window in the shower, this is a serious risk.
If you must keep only one thing, keep this: a window in the shower means the opening must be sealed as part of the shower itself. The window sill needs to slope inward, the waterproofing must be turned on all sides, the corners need tapes and the connection to the frame must be made with a compatible rubber sealant. Silicone in the end does not save a horizontal window sill, a wooden case that gets wet every day or waterproofing that stops before opening.
The window in the shower zone is one of the most demanding details in bathroom waterproofing. It is not enough to "dress" it with tiles and apply silicone around the perimeter. The water that hits the glass, casement and sill every day will test every joint, every angle and every little mistake in slope.
The correct solution starts with geometry. The window sill must be inclined towards the shower and not hold water. It continues with complete waterproofing that turns inside the opening, with tapes at the corners and with compatible silicones or mastics at the junction with the case. If the frame is unsuitable, old or wooden, replacement or at least increased protection should be seriously considered.
The final silicone has a role, but it is not the primary defense. The main defense lies below: in the substrate, in the waterproofing, in the slopes and in the correct connection of the materials. If these are missing, the silicone will darken, open or peel, and moisture will seep behind the tile.
For the owner, the right question is not "will silicone be put around the window?". It is "how will the water get away from the window sill and what is under the tiles if water gets through?". If the answer includes tilt, full waterproofing, tapes and a suitable case, then the window has a serious technical basis. If the answer is simply "we'll close it at the end", then the window remains one of the most vulnerable parts of the shower.
Return to category.
Go to categoryReturn to the central guide.
Go to guide