
Bathroom Waterproofing & Moisture Protection
Return to category.
Go to categoryIn a walk-in shower, water does not forgive bad design. The bathroom may have expensive tiles, a modern linear drain, and a glass partition, but if the floor does not have the correct slopes, daily use will reveal the problem very quickly. Water remains around the drain, moisture stays in the corners, slippery spots appear, joints darken, and the shower never seems to dry properly.
Interestingly, many owners automatically associate such problems with waterproofing. They think that "the waterproofing probably failed". That can indeed happen, but it is not always the full explanation. Waterproofing protects the substrate from water. It does not make the water disappear. The runoff is created by the geometry of the floor, in other words by the correct slopes.
This is the point that is often misunderstood. Cement mortar and waterproofing are not two unrelated stages. The cement mortar gives the shape, the levels and the slope. The waterproofing follows this pattern and protects the construction beneath the tiles. If the screed has the wrong slope, the waterproofing will protect a wrong floor. If the waterproofing is poor, even a proper slope may not prevent moisture under the tiles.
In modern bathrooms, especially when the shower is at the same level as the rest of the floor, the issue becomes even more critical. In the past, a bathtub or ready-made shower tray had clear physical boundaries. Today, many layouts rely on the bathroom floor itself to guide water to the drain. That requires precision, not rough approximation.
This guide explains how shower slopes should be designed, what the role of grout is, how it works with waterproofing, what mistakes lead to standing water and what a homeowner should look for before tiling.
Slopes, or as they are often called in construction, "flows", are the controlled slope of the floor towards the drainage point. Simply put, the shower floor should not be completely horizontal. It must have a small, properly calculated slope so that the water moves naturally towards the siphon.
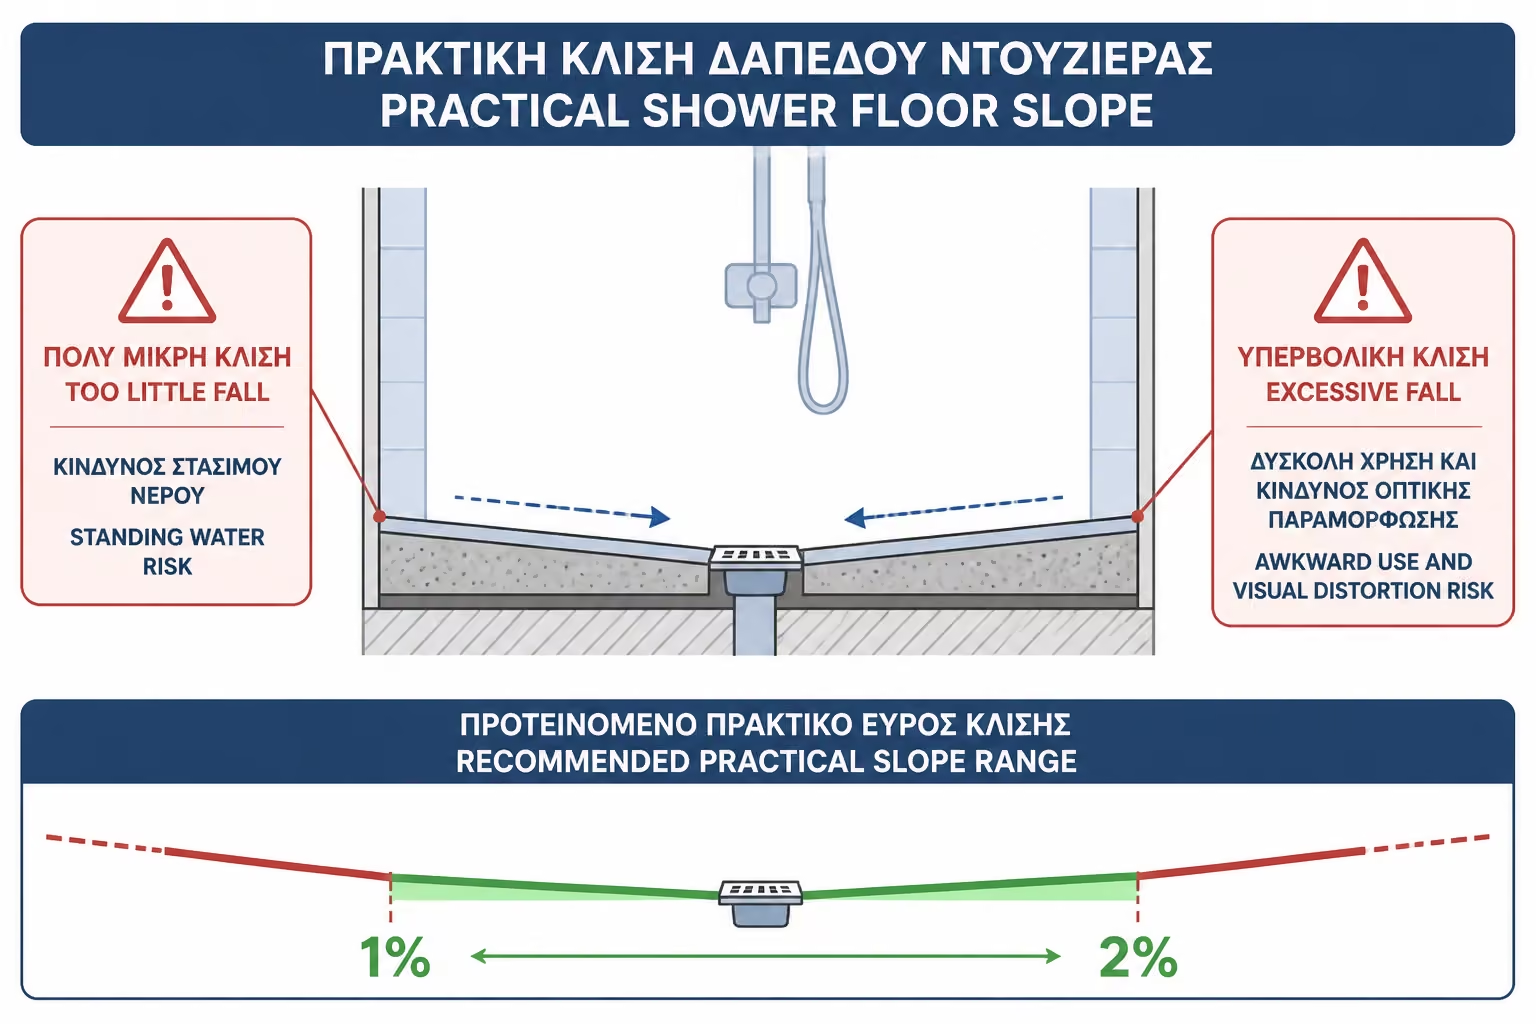
In a properly constructed shower, this slope should not be excessive. The user should not feel that he is stepping "downhill", nor should sharp edges be created under the feet. But it must be enough so that the water does not stagnate after the bath.
Typically, shower floors aim for a slope of around 1%–2%, i.e. around 1 to 2cm of height difference per metre. The exact slope is not mechanically decided. It depends on the size of the shower, the type of siphon, the tile, the location of the drain and whether the floor is one with the rest of the bathroom.
A simple example makes this easier to understand. If a walk-in shower is 1 meter deep and the linear drain is at the wall, a slope of about 1.5% means that the floor at the entrance to the shower will be about 1.5 cm higher than the point near the drain. That can be enough to guide the water properly without creating an uncomfortable feeling underfoot.
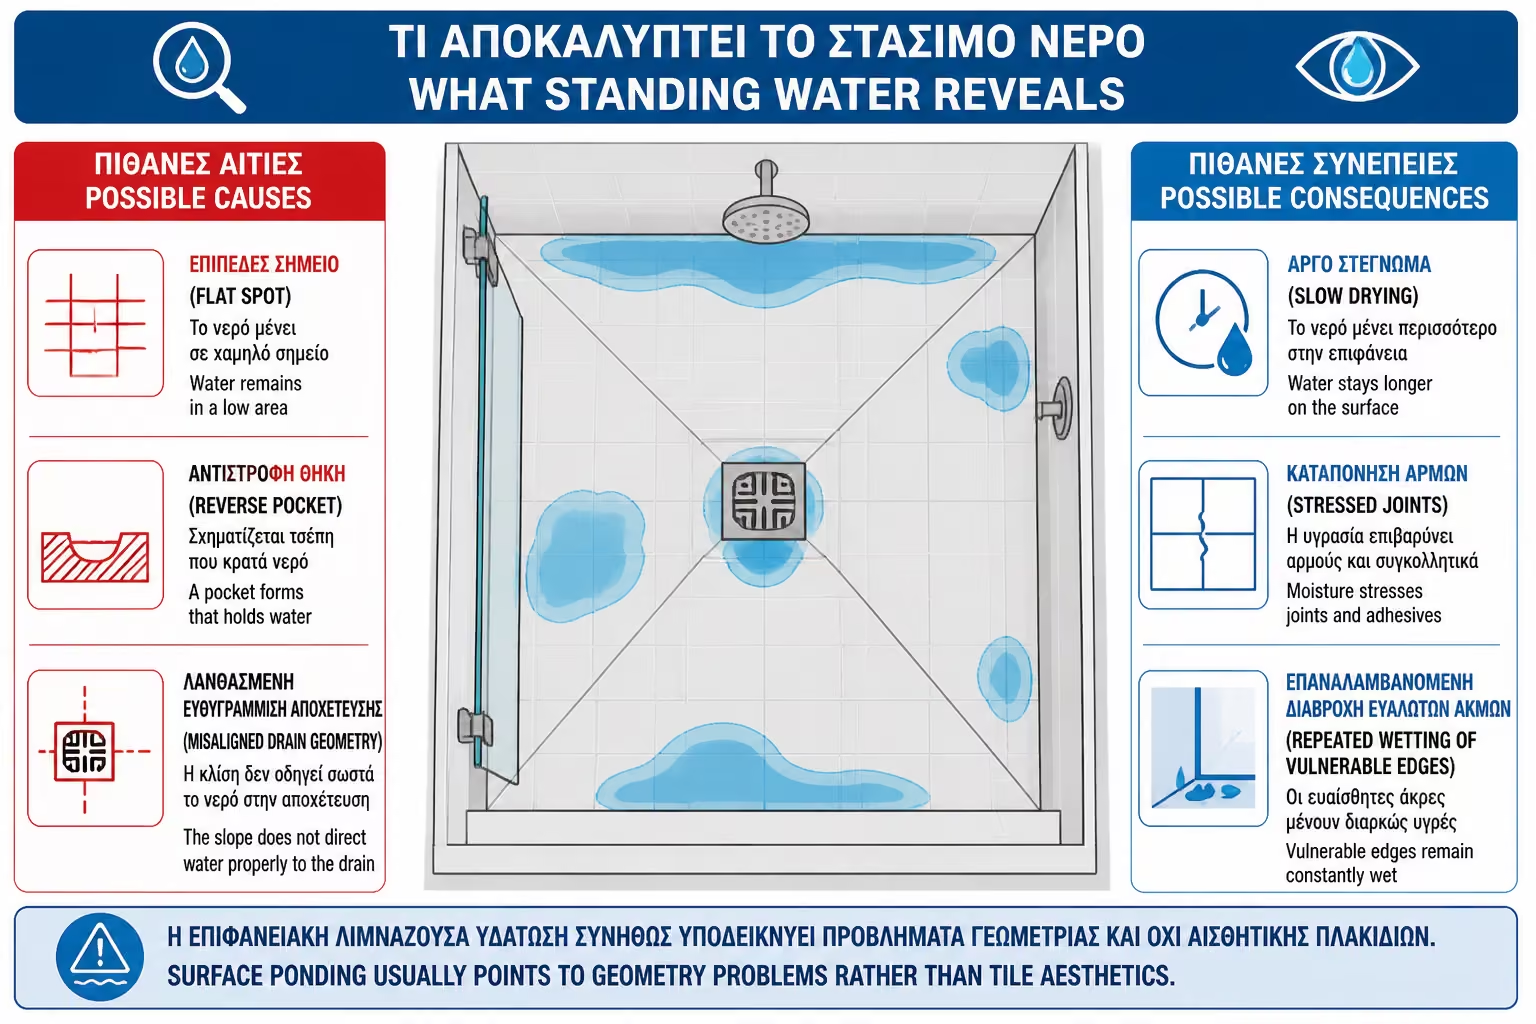
The mistake is to think that a "slight slope" is enough because the eye sees the floor as slightly sloping. Water does not judge with the eye. It follows the lowest level. If there is even a small belly, reverse slope or low point away from the siphon, it will stay there.
Waterproofing is necessary, but it is not a solution for everything. Its role is to protect the cement mortar, slab and walls from moisture that can pass under the tiles. However, it does not have the ability to correct the geometry of the floor.
If the cement mortar has created a wrong flow, the waterproofing will be applied over this wrong form. In other words, it will become a waterproof surface that still holds water. This is important, because a bathroom may not leak down, but remain functionally problematic: it has stagnant water, slippery spots and joints that are constantly stressed.
Conversely, a correct slope without good waterproofing is not enough. Most of the water will escape to the siphon, but some may pass through joints, joints and micro-cracks. If there is no reliable waterproofing layer under the tile, moisture can gradually be absorbed by the substrate.
In practice, the right shower needs both. The cement mortar must create the correct water path. Waterproofing must protect this entire route, especially in the places where water collects: near the siphon, in corners, at floor-wall joints and in areas that receive daily use.
A common example is the shower that "doesn't leak", but after each use a thin pool of water remains near the entrance. The owner may think the problem is the siphon. But sometimes the siphon works normally. The problem is that the water never reaches it properly.
In a shower, the cement mortar is the stage where the final behavior of the water is "written". It's not just a material that fills the gap until the tile goes in. It is the substrate that forms the levels, the slopes and the surface on which the waterproofing will step.
If the cement mortar is made rough, with an uneven thickness, without guides, without a level mark or without calculating the finished tile, then the problems are transferred to all subsequent stages. The tile can correct small imperfections with the glue, but it should not be called upon to "save" a faulty cement mortar. Tile adhesive is not a flow shaping material.
Proper cement mortar should be firm, cohesive, free of loose spots and have a clean slope to the siphon. It must also be dried and cured as necessary before accepting sealing. If the waterproofing is applied over a wet or unstable base, there may be adhesion problems or trapped moisture.
In old bathrooms, especially when a bathtub is removed and the space is converted into a walk-in shower, the screed work has to be done with even more care. The old bathtub hid many imperfections. The new walk-in surface, however, reveals them all. Where there used to be a ready-made body, the floor itself now has to work properly.
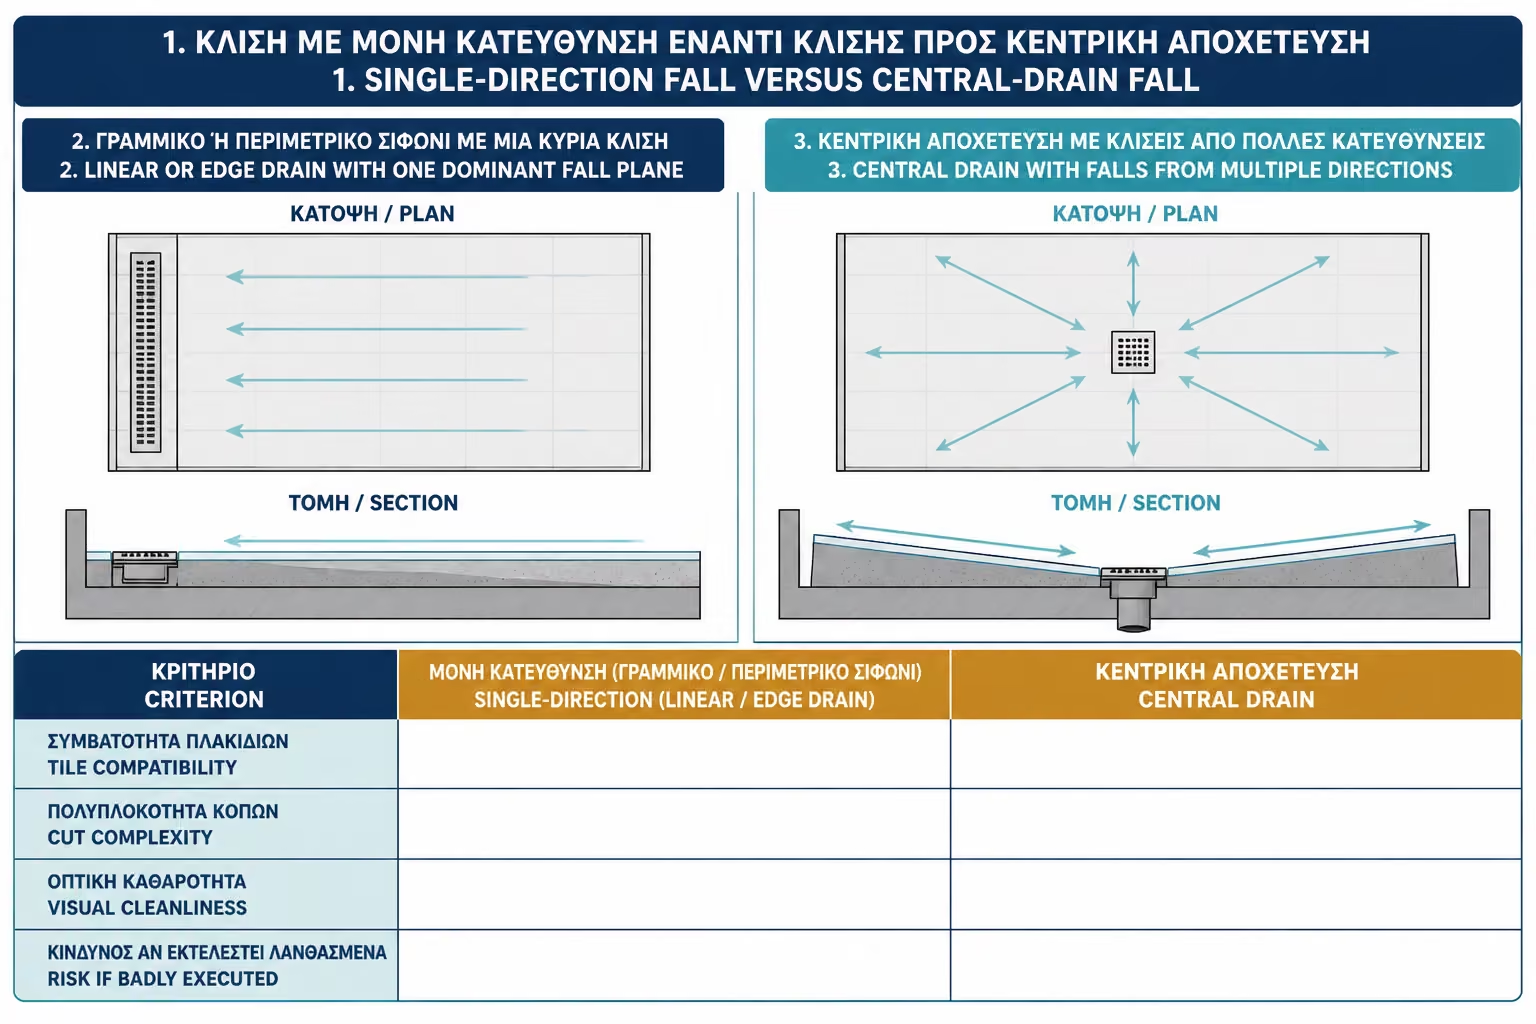
We can't talk about slopes without talking about siphon and tile. These three must be designed together. The location and type of siphon determine the shape of the slope. The size of the tile determines how easily this gradient can be followed without bad cuts or technical difficulties.
In a central siphon, water usually has to be directed from several sides to one point. This creates funnel-like slopes. This solution works well with smaller tiles, because they can more easily follow the level changes. However, if a large tile is used, the cuts become more difficult and the surface may not be laid properly.
In a linear siphon, especially when it is on the wall, a clear slope to one side can be created. This goes better with large tiles and gives a calmer aesthetic surface. But it requires a very correct level of the siphon and a clear straight runoff. If the siphon is inserted a little high or a little crooked, the problem is visible along its entire length.
A classic construction site mistake is choosing a tile before the drain is finalized. The owner chooses a large 60x120 tile to have a modern effect. Then it is established that the shower has a central siphon or compound gradients. The result is multiple cuts, poor fit, or compromise on water flow. The correct order is siphon and flush first, then tile.
The usual technical answer is that the shower needs about a 1%–2% slope towards the spout. But this phrase needs a practical interpretation. 1% means 1 centimeter of height difference per 1 meter of length. 2% means 2 centimeters per meter.
In a small shower, for example 80 cm deep, the level difference can be about 1 to 1.5 cm, depending on the system. In a larger walk-in shower, the difference can be greater. The point is not to blindly apply a number, but to ensure that the water drains away without creating an uncomfortable or dangerous surface.
Too little slope is a more common problem than too much. It is usually done because the owner wants a "completely flat" floor or because there is not enough height available. The result is water that remains after use. On the other hand, too much slope can make the shower uncomfortable, look visually wrong and make it difficult to install the glass or tiles.
The correct slope must be part of an overall level of the bathroom. If the shower floor goes down too much, uncomfortable edges can be created. If it doesn't go down at all, maybe the water is coming out to the rest of the bathroom. The technical solution must balance drainage, comfort and aesthetics.
The shape of the slope depends mainly on the type and position of the siphon. Unilateral slope is visually simpler: the entire floor slopes in one direction, usually in a linear siphon. This solution is very popular in modern bathrooms, because it works well with large tiles and gives a cleaner image.
The slope to center siphon is more traditional and can work very well, but has different requirements. The floor must be shaped from several sides to a point. This means that the tile must be able to follow these changes. With small tiles or mosaic, the solution is quite practical. With large tiles, it becomes more difficult.
There is also the case of the siphon at the shower entrance. This arrangement can help keep water out of the bathroom, but it takes a lot of careful planning. If the siphon becomes a "channel" at the entrance, it must be ensured that the flow, cleanliness and aesthetics work correctly.
Before you finalize the choice or installation, review the following points first:
| Drainage arrangement | Advantages | What needs attention |
|---|---|---|
| Linear siphon on the wall | Clean aesthetics, one basic slope, suitable for large tiles | Correct siphon level, sealing at line joint, good drainage |
| Central siphon | Simple and familiar solution, often more economical | Complex gradients, better with smaller tiles |
| Siphon at the shower entrance | It can hold water before going to the bathroom | It wants excellent level design and cleaning |
| Wall-side linear drain | Very clean architectural effect | Greater technical demand and difficult repair |
The choice should be made based on the space and not just the image. A linear siphon is beautiful, but if there is no height for proper drainage, it can create more problems than it solves.
When the water quickly escapes to the siphon, the waterproofing does its job without unnecessary strain. It protects the substrate from the small amount of moisture that may pass under the finished surface. But when the water stagnates, the situation changes.
Stagnant water stays longer on the joints, on the silicones, near the siphon and in the corners. This increases the chance of moisture getting under the tile. Waterproofing can prevent leakage to the slab, but it cannot prevent continuous stress on the surface materials. Over time, the joints darken, the salts accumulate and the shower looks old much faster.
In addition, stagnant water near the linear siphon presses precisely on the most sensitive point of the structure: the union of the siphon with the floor. If there is a small weakness there, the water will find it. The longer it stagnates, the more time it has to pass through micro-gaps.
A practical example is the shower that dries everywhere except for a 5–10 cm strip in front of the spout. The owner may think that "it's okay, it's just a little water". In practice, this little water is found every day in the same place. That's where the joint will blacken first, that's where the silicone will strain, and that's where the bad detail will show first.
The right shower is not made in random order. First, the location of the drain and siphon must be determined. Then calculate the levels, the finished surface, the thickness of the tile and the glue. Then the cement mortar is formed with the correct textures. Only after the base is correct, clean and mature, waterproofing is applied.
If this order is reversed, the compromises begin. If the siphon is inserted first without the tile being calculated, the wrong level may come out. If cement mortar is applied without checking the drainage, the water may drain slowly. If waterproofing is applied over a bad slope, the floor will remain functionally incorrect. If the tiles are put in before the previous materials have dried properly, there may be an adhesion problem.
The sequence of tasks usually has the following logic:
Before you finalize the choice or installation, review the following points first:
| Stage | Target |
|---|---|
| Drainage control | Check if there is a correct position, diameter and slope of the pipe |
| Siphon selection | To match the height, tile and waterproofing system |
| Level calculation | Provide final height with tile and glue |
| Cement mortar with wrinkles | To create the correct drainage geometry |
| Ripening and cleaning | To have a stable and suitable base |
| Waterproofing | Protect the floor and critical joints |
| Placing tiles | To follow the inclinations without canceling them |
| Grouting and elastic seals | Final joints and maintenance to be completed |
Good organization is seen before the tiles are put in. If the crew can explain this sequence clearly, it's a good sign. If everything is generally described as "we'll fix it along the way", caution is needed.
Waterproofing should not be applied to any surface. The cement mortar must be clean, stable, without dust, without loose spots and without strong irregularities. If it is rubbed or cracked, the seal will not have reliable adhesion.
The substrate must also have the right absorbency. Many applications require a primer prior to sealing. Primer is not a standard detail. It helps to regulate absorbency and better bond the next material. If omitted while the system requires it, the seal may not work properly.
Another issue is the moisture content of the cement mortar. If the base has not dried enough, moisture can be trapped under a waterproofing layer or tile. The time required depends on the thickness, type of mortar, ventilation conditions and system instructions. In quick renovations, this is one of the places where mistakes are often made.
The owner does not need to technically measure the moisture, but can request that the times of the materials be observed. The phrase "it's okay, it will dry underneath" is dangerous in sealed constructions. Anything closed under membranes, adhesives and tiles is not easily ventilated.
Proper waterproofing must follow the shape of the floor and create a continuous protective layer under the tiles. If the floor has a slope towards a linear siphon, the waterproofing must follow this slope without interruption. If there are corners or level changes, they must be reinforced.
The critical point is that the waterproofing should not stop just before the siphon. It must be connected to it. In walk-in showers, the siphon is the lowest point of the structure and receives the largest amount of water. If the waterproofing does not "bond" properly with the siphon, water can pass under the tile and move around the drain.
At floor-wall joints, waterproofing must also be continued. Waters don't just move horizontally. In the shower there are splashes, steam, cleaners and water that ends up in the corners. That's why sealing strips in the corners are not a luxury. It's part of the system.
A good practice is to think of the shower as a very low, invisible basin. The cement mortar gives the shape of the basin. Waterproofing makes this basin protected. Tiles are the final use surface. If one of the three is missing, the system is not complete.
Both systems can be used on properly formed cement mortar, but they have different logic. The spreadable materials are applied in layers and create the waterproofing surface on site. Fleece membranes are installed as a finished sheet and give a more controllable thickness if properly adhered.
In a walk-in shower floor, especially with a linear siphon, fleece membranes have a significant advantage because they reduce the uncertainty of application thickness. But they need correct joints, proper connection with the siphon and a good application without bubbles. It is not enough to spread "a cloth" over the cement mortar.
Spreadable materials are more versatile in details, corners and odd surfaces. They can work very well, but their quality strongly depends on consumption, number of coats, primer and drying times. If too many minutes pass too quickly, the system weakens.
In many cases, a combination approach is practical: membrane on the shower floor and a spreadable or compatible system on the walls and details. But this must be technically compatible. We do not mix materials of different systems without control because "something will last".
Yes, it can. Even if the grouting is done correctly, tiling can create problems if it does not follow the logic of the slopes. The adhesive should not be used to change the geometry of the floor, except for minor repairs. If the tiler puts too much glue in some places or presses the tiles incorrectly, small low spots can be created.
The size of the tile matters a lot. Large tiles with a one-sided slope can give a very beautiful result. However, they have difficulty in complex slopes. Cuts, breaks or rearrangement may be required. If these are not designed in advance, the final image can be both technically and aesthetically problematic.
Grouting also plays a role. Joints should not create small obstacles to the flow of water. If the grout is left high, if it is not cleaned properly, or if the edges of the tiles have small differences in height, water can be held in thin lines. In everyday use, these details show.
Before the shower is handed over, a practical water test should be carried out. Not just a few seconds of running water, but a real check to see whether the water naturally moves to the drain and whether any stagnant spots remain. If the problem is caught before all the finishing details are complete, it is much easier to fix.
Not every drop of water after a bath is an indication of a manufacturing failure. Every shower will have some drops left on the tiles, especially if the surface is matte or non-slip. The problem starts when a visible amount of water remains in a certain spot, when the water does not move to the siphon, or when the area remains wet for a long time.
Standing water is more serious when it occurs near corners, at the shower inlet, around the linear spout or in places where the user steps frequently. There the wear of joints and sealants increases. It also increases the likelihood of slippage, especially in homes with children or the elderly.
If the water remains because the siphon is clogged, the solution is cleaning. However, if the siphon pulls normally but the water does not reach it, then the problem is in the leaks. This distinction is important, because wrong diagnosis leads to wrong repairs.
An owner can change silicones, clean joints, or use strong cleaners, but if the slope is wrong, the problem will return. Proper treatment begins with identifying if there is a local belly, reverse tilt, or poor level around the siphon.
The cost for proper pouring and cementing in the shower depends on whether we are talking about a complete bathroom renovation or an individual intervention. In a complete renovation, this work is usually incorporated into the total cost of the bathroom. Nevertheless, it should not be treated as a negligible detail.
For the Greece of 2026, a typical bathroom of about 5 sq.m. it can range indicatively at €3,200–5,500 for a simple to medium renovation, while more demanding solutions with a walk-in shower, linear siphon, large tiles, better materials and custom details can reach around €6,000–7,500 or more. Within this cost, the correct configuration of the flows is not the largest amount, but it is one of the most critical stages.
If the quote is too low and does not clearly mention cement mortar, pours, waterproofing, siphon and levels, caution is needed. It may refer to a very simple case, but it may also mean that some stages are considered "in the work" without being described. This creates room for misunderstandings.
Before you finalize the choice or installation, review the following points first:
| Work | What affects cost? |
|---|---|
| Cement mortar with wrinkles | Shower size, thickness, access, need for quick mortars |
| Linear siphon | Length, quality, flow, sealing flange |
| Floor waterproofing | Membrane or spreadable, tapes, corners, siphon connection |
| Placing tiles | Tile size, cuts, difficulty of shedding, substrate quality |
| Old base fixes | Fragile points, dampness, old drains, need for reconstruction |
The economy in luxuries is the wrong economy. If the grout is sloppy, patching after tiling can mean peeling. Conversely, getting it right from the ground up costs a lot less than repairing a leaking shower.
A serious offer for a walk-in shower should not simply say "shower construction" or "tiling". It must describe the logic of the runoff. Where will the siphon go? What type will it be? How will the slopes be formed? What waterproofing will be applied? Will there be films in the corners? How will the system be connected to the siphon?
If the quote only mentions the final aesthetic result, the most important part is missing. The owner needs to know what will happen under the tiles. That's where the real quality of the shower lies. Beautiful tile can cover a bad foundation, but it can't fix it.
Ideally, the quote should separate the main technical stages: demolition, plumbing, drain installation, screed work, waterproofing, tiling, grouting, and final sealing. It must also be clear whether materials, labour, VAT, debris removal, and any special components are included.
Vagueness is not always a sign of bad intent. Sometimes it's just miscommunication. But in bathrooms, miscommunication often becomes a technical problem. Anything that is not agreed upon at the beginning can be considered "extra" or not done at all.
Shower drains, cement mortar and waterproofing are not suitable fields for improvisation. An owner can understand the logic, check the quote and ask for correct specifications, but the application must be done by technicians with experience in wet areas.
Special attention is needed in old apartment buildings, in bathrooms where the drain position is being changed, in walk-ins without steps, with linear drains, with large-format tiles, and in spaces that already show signs of moisture. In those cases, mistakes cost more because they are rarely corrected with superficial fixes.
A professional is also needed when there is doubt about the drainage. If the pipe is not inclined correctly, if the diameter is insufficient or if there is old damage, the best cement mortar will not solve the problem. The shower must work both hydraulically and structurally.
The right technician does not promise that "there will never be a problem". It explains what will be done to reduce the risk: correct levels, clean cement mortar, compatible siphon, full waterproofing, tapes, correct adhesive and runoff check before delivery.
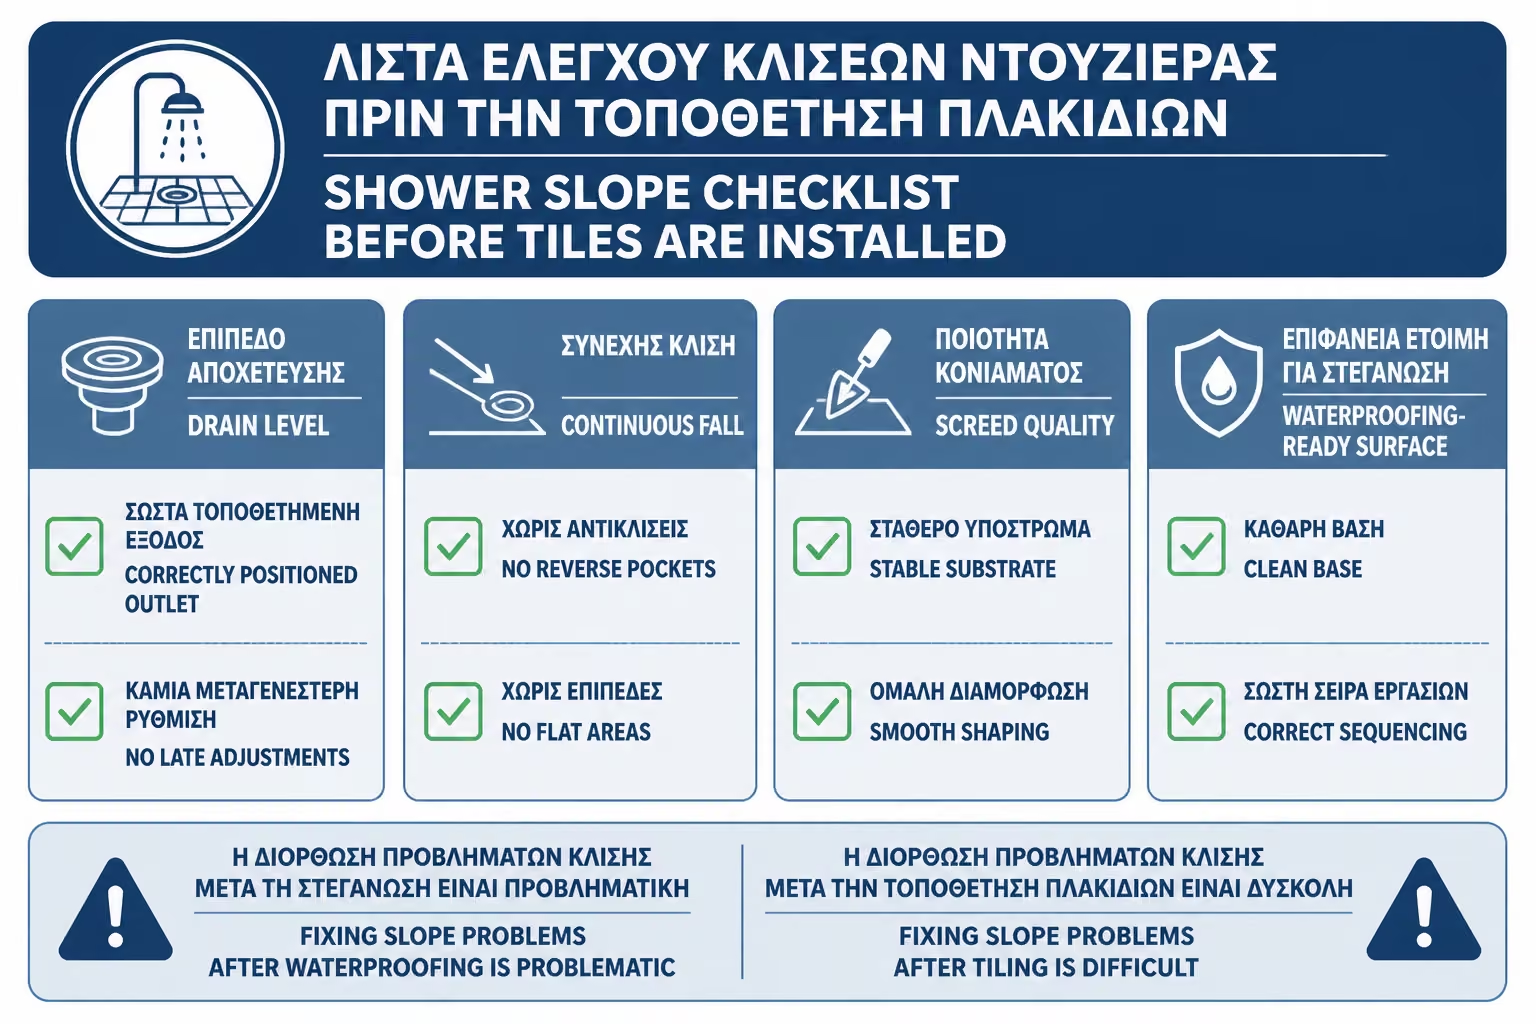
Before covering the shower with tiles, it is worth doing a practical check. It is the last stage where most mistakes can still be corrected without removing the final surface.
Before you finalize the choice or installation, review the following points first:
| Question | Yes / No |
|---|---|
| Has the location and type of siphon been decided upon prior to cementing? | Yes / No |
| Has the slope of the underfloor drain been checked? | Yes / No |
| Has the final level been calculated based on tile and adhesive? | Yes / No |
| Does the grout have a clean slope to the siphon? | Yes / No |
| No tummies or backbends on the floor? | Yes / No |
| Is the grout firm, clean and free of loose spots? | Yes / No |
| Have the drying times before waterproofing been met? | Yes / No |
| Has primer been applied where required by the system? | Yes / No |
| Is the waterproofing properly connected to the siphon? | Yes / No |
| Are corners and floor-to-wall joints taped? | Yes / No |
| Can the chosen tile follow the required slopes? | Yes / No |
| Is there a water test before delivery? | Yes / No |
| Does the offer clearly state materials, labour, VAT and technical stages? | Yes / No |
If several answers are "I don't know", then there is a gap in the organization of the project. And in the shower, the gaps under the tiles are the ones that cost the most later.
If you have to keep only one thing, keep this: waterproofing does not correct bad slopes. First, the screed has to be formed properly, with a clean fall toward the drain and without low spots. Then the waterproofing must follow that correct geometry and connect to the drain and the walls. If water is not directed properly to the drain, even the best waterproofing system will be stressed every day for no good reason.
Shower slopes and waterproofing are two different but interrelated stages. The grout determines where the water will go. Waterproofing determines whether the structure under the tiles will be protected from moisture. If either goes wrong, the system loses its credibility.
In a proper walk-in shower, the water must have a clear path to the drain. It should not settle in low spots, corners, or areas in front of the drain. The waterproofing must follow this path and protect all critical points: floor, drain, corners, and low wall zones.
The owner does not need to know all the technical details of application. But he needs to ask the right questions before starting the project. Where will the siphon go? How steep will the floor be? What tile will be used? How will the waterproofing be done? How will it be checked that there is no pooling of water?
A good shower is not one that only looks flat and modern in a photo. It is the one that dries properly after each use, does not hold water in the wrong places, and protects the bathroom from moisture over time. That happens when floor slopes and waterproofing work together, not when one stage tries to cover up the mistakes of the other.
Return to category.
Go to categoryReturn to the central guide.
Go to guide