
Bathroom Waterproofing & Moisture Protection
Return to category.
Go to categorySilicone is one of the most misunderstood materials in the bathroom. On the one hand, it is necessary. It closes joints, absorbs micro-movements, protects joints of different materials and gives a clean final image to bathtubs, showers, washbasins, cabins and counters. On the other hand, it is often used as a "magic solution" for any moisture problem. Where there is a gap, silicone is inserted. Where there is a leak, more silicone is put in. Where it got black, we go over new ones. It is this logic that leads to most problems.
Silicone is not waterproofing under tiles. It does not replace sealing strips in the corners, cuffs in the fittings, the flange in the siphon or the proper waterproofing in the walls of the shower. It is a final rubber seal. This role is very important, but it has limits. If we ask it to hide poor construction, bathtub movement, moisture behind tiles or a faulty joint, sooner or later it will fail.
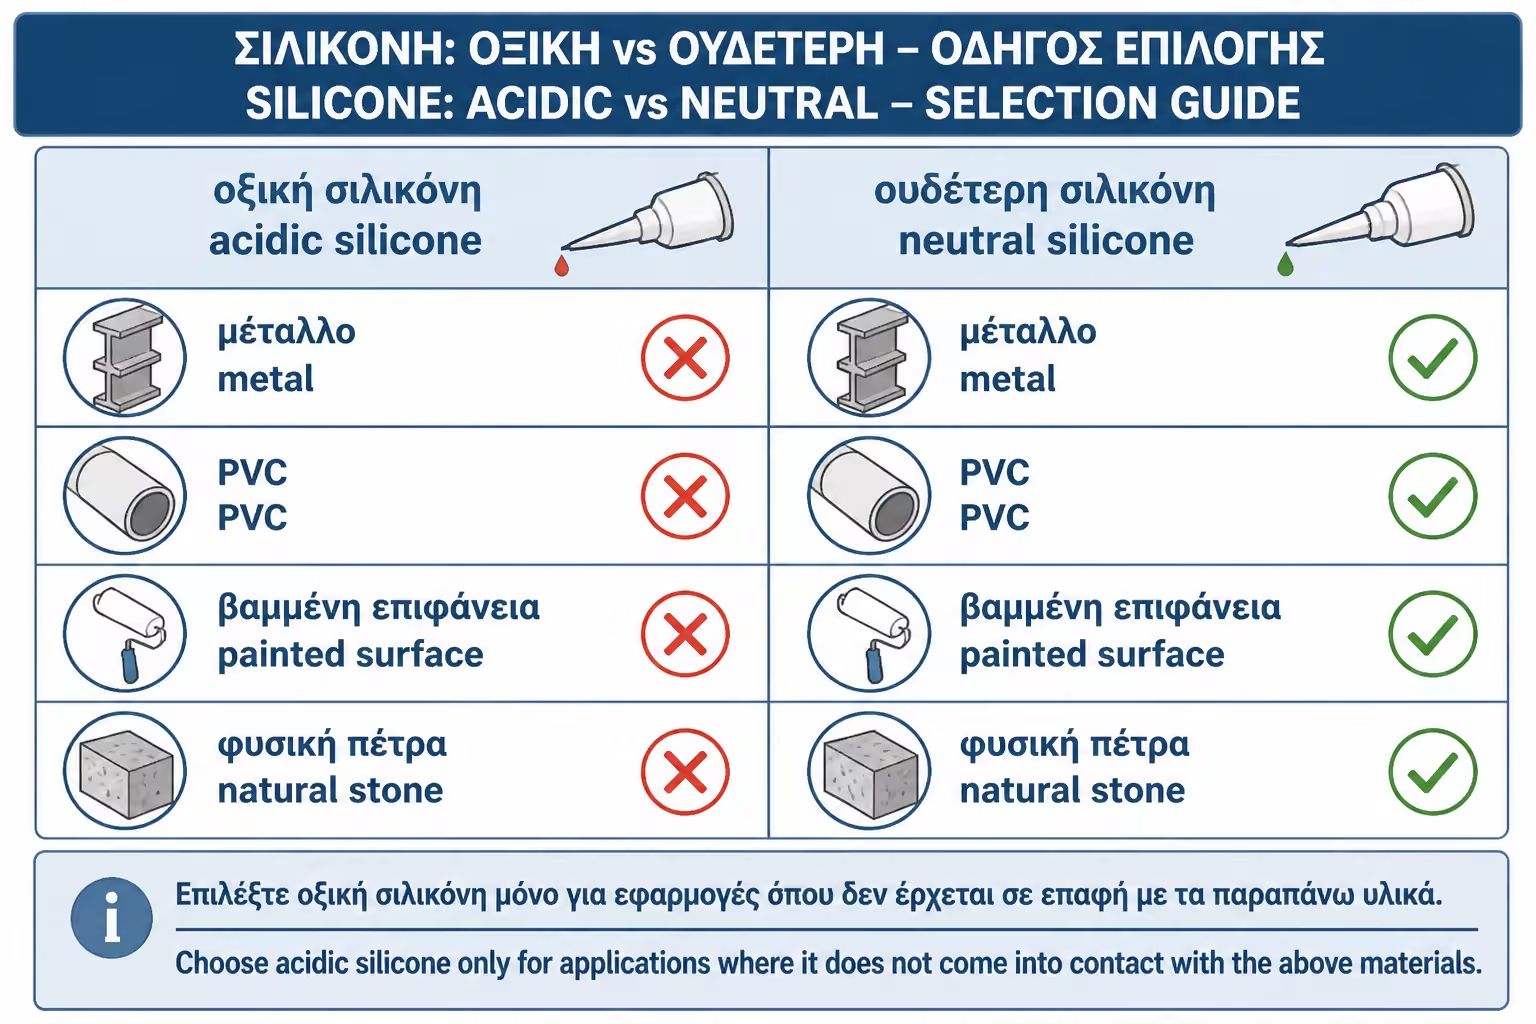
The second big mistake is that all silicones are treated as the same. Is not. There are acid and neutral silicones, sanitary silicones with anti-mold additives, silicones for glass, for ceramics, for metals, for natural stones or for special applications. A silicone that works well on ceramic tile may not be suitable for marble. An acidic silicone may have excellent adhesion to glass and ceramics, but may not be a good choice next to delicate metals or natural stone. The right choice depends on the materials the joint meets.
The third problem is implementation. Even the best anti-mold silicone will blacken or peel if applied over old silicone, salts, soaps, moisture or dust. If the joint is too deep, too wide or the wrong geometry, the silicone cannot work properly. If not given time to cure before using the bath, it can spoil from day one.
This guide explains when to use silicone in the bathroom, what is the difference between acid and neutral, what is anti-mold or sanitary silicone, how to apply it correctly to acne and why annoying tanning is not always a matter of "bad silicone", but often the result of humidity, poor preparation and insufficient ventilation.
Silicone is used in joints where there is movement or change of materials. For example, between tub and tile, between shower and wall, around glass cubicle, in level change corners, behind sinks, on counters, around furniture and at end joints where a rigid material like grout would crack.
Its main advantage is elasticity. A joint between a tile and a bathtub should not be filled with cementitious grout, because the bathtub can move very little. Silicone can follow this micro-motion. The same applies to corners, where two planes meet and there can be a different behavior of the materials.
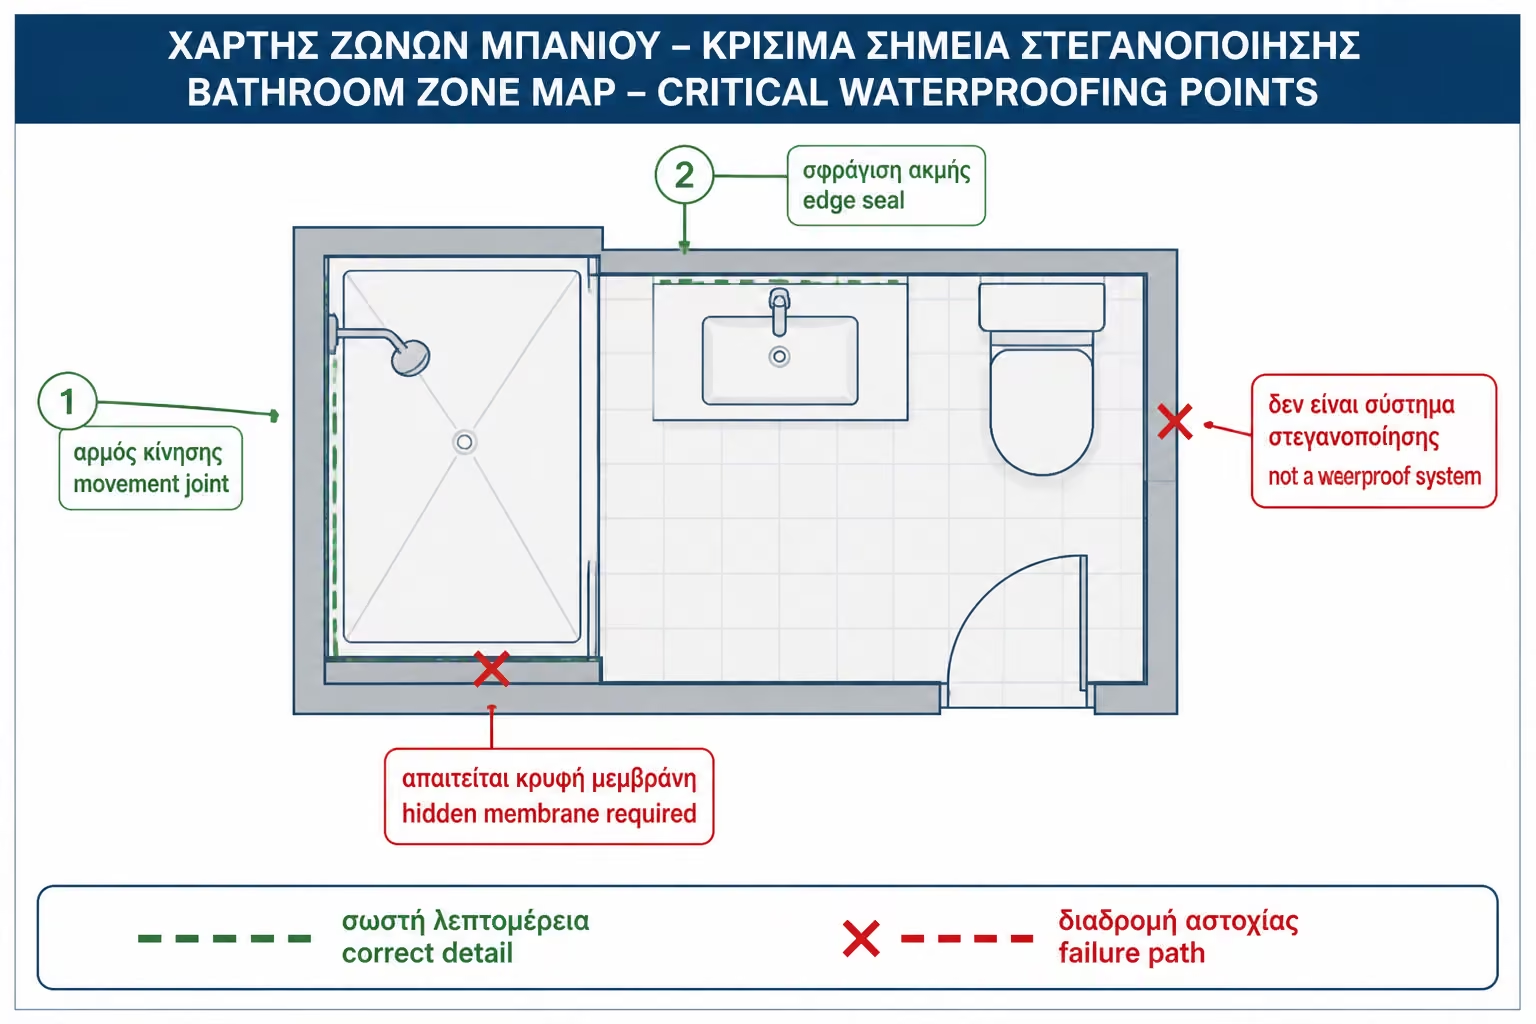
But this does not mean that silicone is the basic waterproofing of the bathroom. Basic protection must be in place under the tiles: waterproofing, tapes, cuffs, siphon gaskets and proper adhesive. Silicone comes at the end to seal visible joints and manage movement.
When silicone is used correctly, it helps a lot. When used to cover deficiencies, it becomes a temporary patch.
Acidic silicone, also known as acetoxy silicone, is the classic silicone that smells strongly of vinegar when applied. It adheres very well to glass, ceramic tiles, and many smooth non-porous surfaces. That is why it is often used in bathrooms, showers, glass enclosures, and sanitary ceramics.
Its advantage is that it works well in many typical bathroom applications, especially when we have tile, porcelain and glass. It is widely available, cheaper than several special neutral silicones and is available in sanitary versions with anti-mold additives.
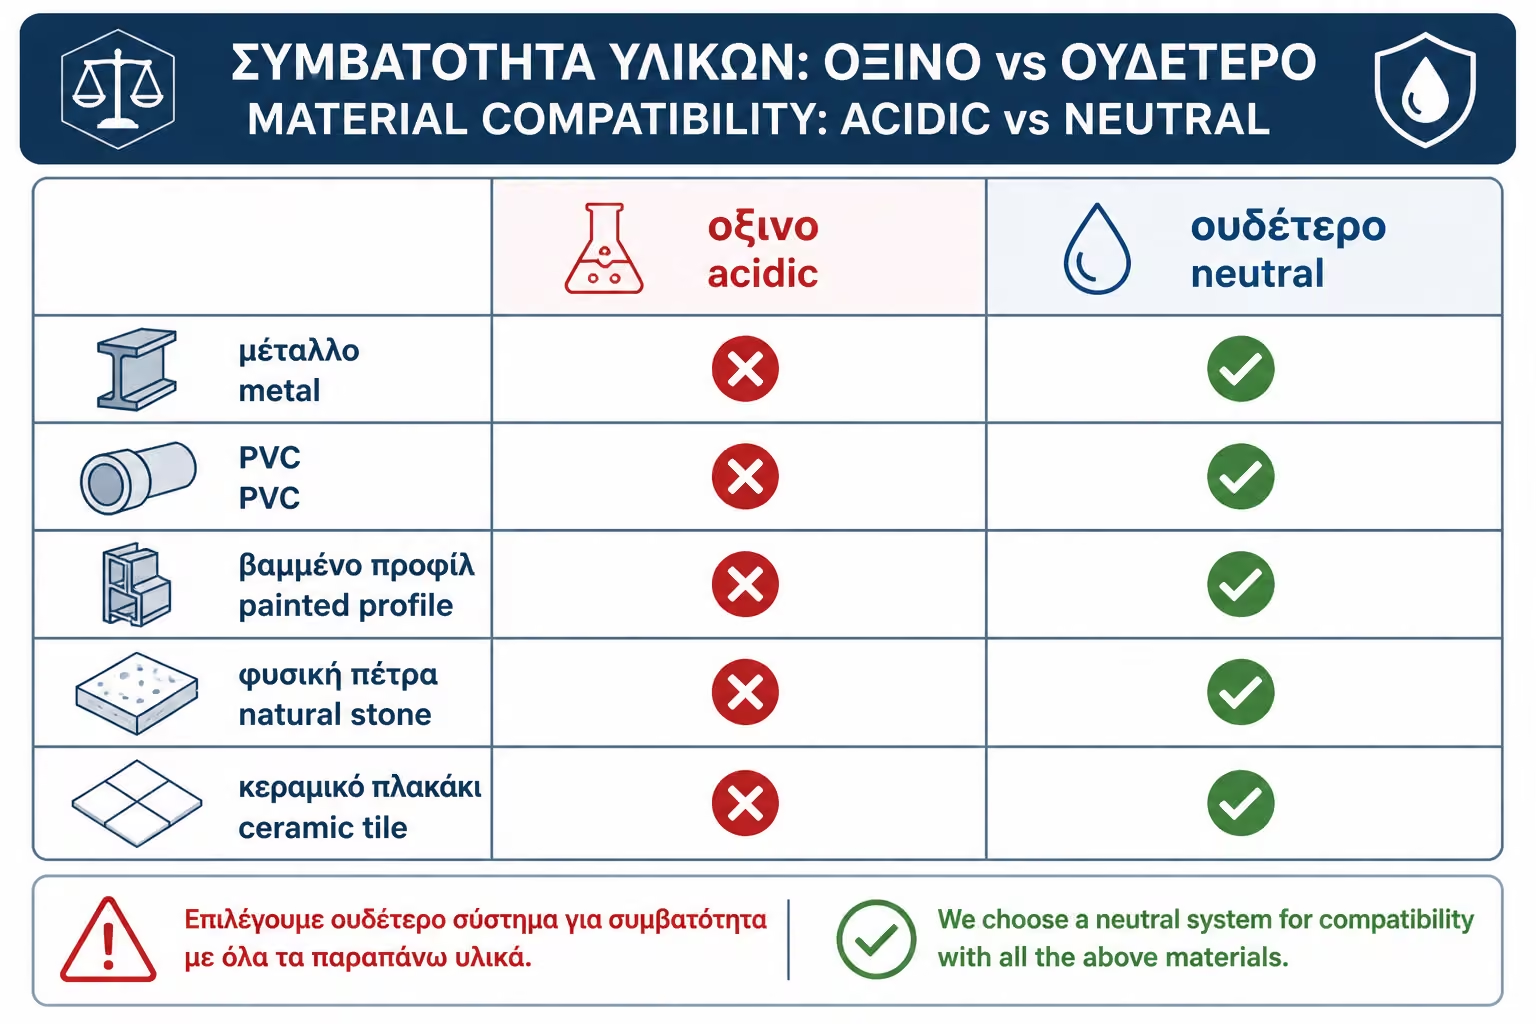
Its disadvantage is that, due to the acid curing mechanism, it is not always suitable for sensitive materials. It may affect certain metals, natural stones, marbles, mirrors or substrates that cannot withstand acidic products. Also, its smell is more intense during application.
So, acid silicone is a good choice for many classic ceramic tile, glass and porcelain joints, but it shouldn't be used mechanically everywhere. If marble, natural stone, special metal or mirror is present, neutral or special silicone should be considered.
Neutral silicone cures without the strongly acidic reaction of classic acetoxy silicone. It usually has a milder odor and is more suitable for a wider range of materials such as metals, natural stones, mirrors or surfaces that may be affected by acid silicone. It is often the safest choice when we are not sure about compatibility.
In the bathroom, neutral silicone can be used in assemblies where different materials meet or where the surfaces are more sensitive. For example, around metal shower-enclosure profiles, on natural stone, on bespoke furniture, on mirrors, or anywhere broader material compatibility is needed. There are also neutral sanitary silicones with anti-mould protection.
Its disadvantage is that it can be more expensive and, depending on the product, have a different curing time or different adhesion to certain surfaces. This is not a problem when chosen correctly. But it is a reason not to randomly choose "neutral" just because it sounds better.
The practical logic is this: for simple ceramic tile, porcelain and glass, a good sanitary acid silicone may be suitable. For metals, natural stone, mirrors, special surfaces or doubt, neutral is usually a safer choice.
Anti-mold or sanitary silicone contains additives that limit the growth of mold on its surface. This is very useful in the bathroom, because silicone joints are often found in places where water, soap and organic residues remain. But mold protection is not a permanent shield for all conditions.
The mold does not appear because simply "the silicone was bad". Occurs when there is moisture, poor ventilation, soap residue, salts, hot environment and non-drying surface. If a silicone is constantly wet behind bottles, in an unventilated corner, or in a bathtub that is used daily without drying, even anti-mold can turn black.
Also, anti-mold additives do not last forever with the same performance. With time, cleaning and exposure to water, the protection may decrease. That's why silicone should be considered a material that will someday need maintenance or replacement.
The right anti-mold silicone helps a lot. But it needs proper application, good ventilation and cleanliness to stay clean.
Silicone is used at changes of plane and at joints between different materials. Typical points include the connection of the bathtub to the tile, the connection of the shower tray to the wall, the finished inside corners of the shower, the profiles of a glass enclosure, the connection of the basin to the tile, the countertop to the wall, and various finishing joints where elasticity is needed.
We do not use silicone as a substitute for waterproofing. We don't put it in order to roughly close the siphon instead of a flange. We do not use it instead of pipe collars in supplies. We do not use it to cover large holes around pipes. We do not use it on an active leak. We don't put it on top of old blackened silicone and expect it to solve the problem.
It is also not correct to fill all the corners with cementitious grout and then put some silicone on top. The final rubber seal must have correct geometry and rest on a clean surface. If the corner is already misfilled with a rigid, cracking material, the silicone will act as a surface covering.
Silicone is a great material when used in the right place. It is a bad solution when used to hide mistakes.
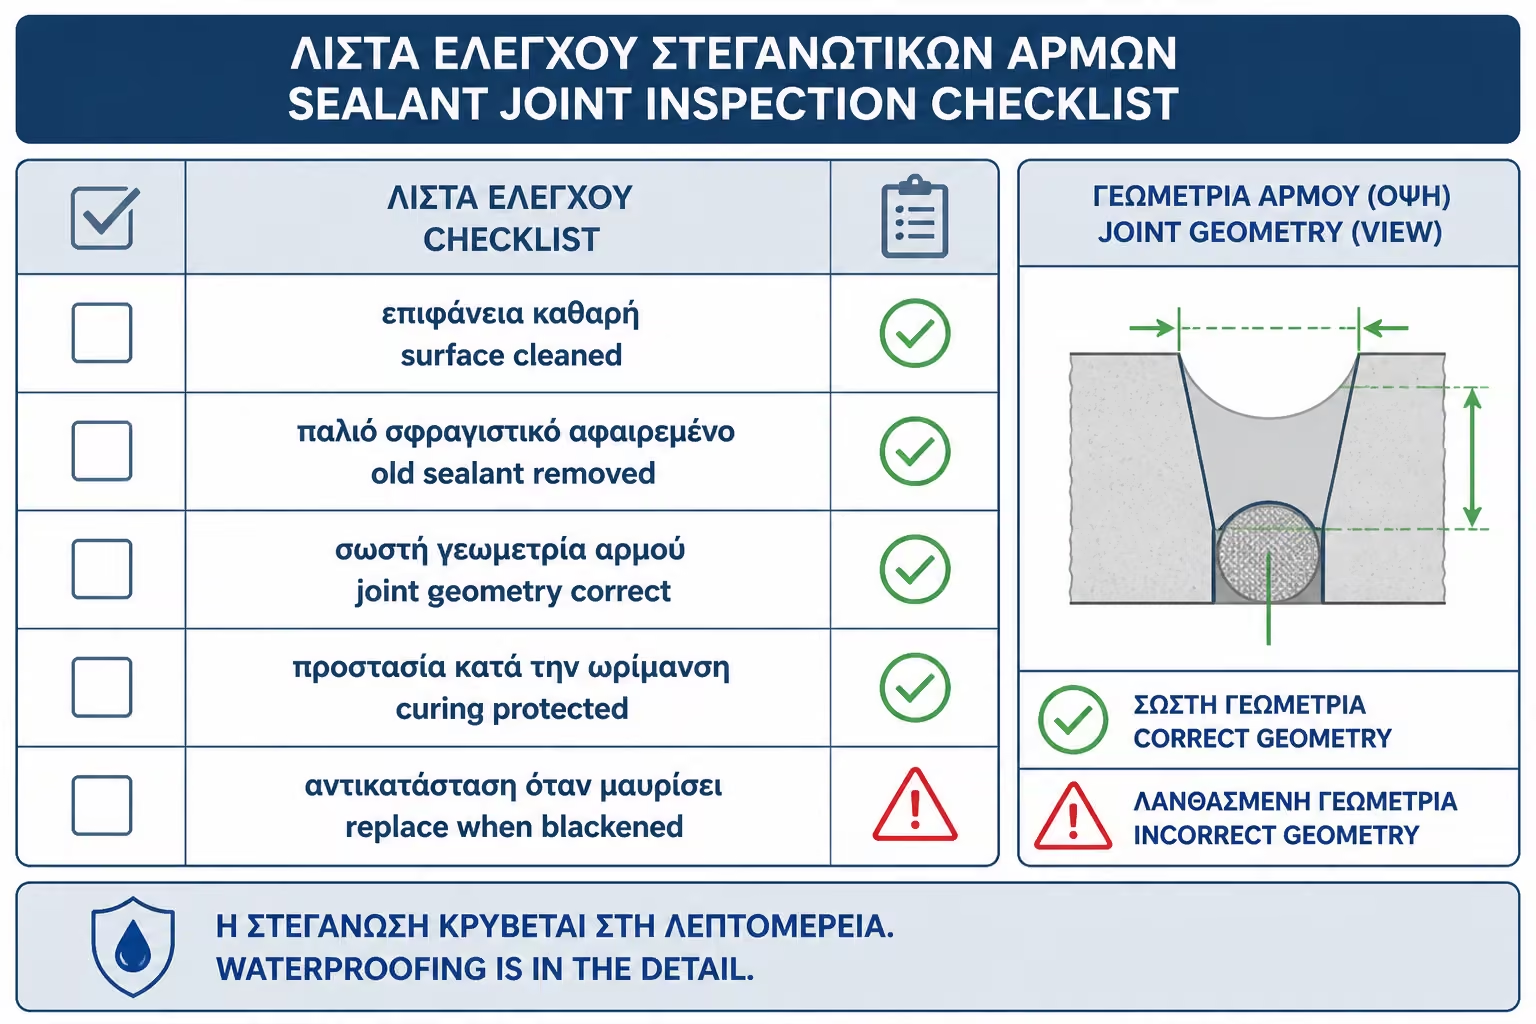
A good silicone joint is not just a pretty line. It must have the right width, the right depth and the right grip on both sides. If the joint is too thin, it doesn't have enough material to move. If it is too deep, the silicone may shrink, slow to cure, or not function properly. If it sticks on three sides, i.e. both sides and the bottom, its elasticity is limited and it can tear.
In deeper joints a joint string, known as a backer rod, is often used. This fills the depth and allows the silicone to have a proper cross section. So the silicone sticks to both sides of the joint and can move without being pulled from the bottom.
The surface of the silicone must be formed with a gentle curve, without gaps, holes, interruptions or "puddles" where water will sit. If the silicone is spread too wide on the tile to cover a bad cut or a large gap, it often stains more easily and peels off at the edges.
Correct geometry is a technical issue, not just an aesthetic one. A beautiful joint can be wrong if it does not have the right cross-section.
Preparation is the most important stage for the silicone to hold. The surface must be clean, dry and stable. Dust, salts, soaps, grease, old silicone, mold and cleaning residues must be removed. If the silicone is applied to dirt, it will stick to the dirt and not to the tile or tub.
When repairing an old joint, the old silicone must be completely removed. It is not enough to cut the visible outer part. New silicone does not stick reliably to old silicone. If a thin oily residue remains, adhesion will be poor.
After removal, the surface must be cleaned and dried. If there is moisture inside the joint, time must be given. If there is severe mold, it should be checked to see if it is superficial or if there is hidden water behind the spot. The new silicone over liquid mold is a temporary solution.
Proper application begins before the cartridge nozzle is cut. It starts with cleaning.
Application must be continuous and controlled. The nozzle is cut to the appropriate size for the width of the joint. The silicone should fill the joint without gaps, not just spread over the surface. The movement should be steady so that no interruptions or bubbles are created.
Using tape on both sides can help get a clean line, especially on prominent edges. The tape must be removed while the silicone is still fresh, before it starts to peel. If left on too long, it can pull the edges or ruin the finish.
Laying must be done with a suitable tool or finger with the correct auxiliary fluid, depending on the product and the practice of the craftsman. Materials that affect adhesion or leave residues must not be used. The finish should press the silicone into the sides of the joint, not just smooth it over the top.
After application, the joint must be protected from water and use until cured. The time depends on the product, thickness, temperature and humidity. Just because the surface doesn't stick doesn't mean the silicone is fully cured.
Blackening of silicone is usually due to mold growing on the surface or micropores/contaminants that have settled on it. Mold loves moisture, heat, poor ventilation and organic residues from soaps, shampoos and leather. Shower corners, the tub-toilet joint and places behind bottles are ideal environments.
A silicone may also turn black when applied to an already contaminated substrate. If the old mold was not completely removed, it can quickly return. If the joint had moisture behind it, the new silicone just closed the problem and the mold reappeared.
Tanning does not always mean there is a leak. It may be a superficial cleanliness and ventilation problem. But if the silicone darkens very quickly after replacement, if it swells, if it peels off, or if there is a smell of moisture, it should be checked for water behind the joint.
Anti-mold silicone delays the problem. It does not remove the conditions that create it.
Prevention starts with the right choice of material. Sanitary silicone with anti-mold protection, suitable for the specific materials, must be used in showers and bathtubs. If there is natural stone or a sensitive surface, a special neutral silicone is chosen.
Then comes the proper application. Clean, dry surface, complete removal of old silicone, correct joint cross-section and curing time. If the silicone is put in roughly, it will turn black or open faster, even if it is of good quality.
Daily use plays a big role. After showering, good ventilation and removal of stagnant water helps a lot. If the bathroom does not have a window, the ventilation must work well. Shampoo bottles should not be permanently placed on silicones or corners holding water underneath.
Cleaning should be regular but not destructive. Very aggressive chemicals, hard brushes or sharp tools can wear down the silicone. Mold prevention is a combination of material, application, ventilation and maintenance.
Silicone doesn't last forever. It must be replaced when it has come off on one side, when it is torn, when it has deep mold that cannot be cleaned, when it has hardened too much, when it has lost its elasticity, or when there is a visible gap through which water can pass.
If the silicone only has surface dirt, it can be cleaned. But if the tarnish is in or under the material, replacement is usually the right solution. There is no point in painting, covering or putting a new layer on top.
When replacing, all old hardware must be removed. If there is residue on the edges, the new silicone will not hold properly. It also needs to be checked why the old one failed. If the cause was bad application, it is solved by proper application. If it was a bathtub move, the bathtub must be supported. If it was hidden moisture, the source must be found.
Silicone replacement is maintenance. It should not be used as a permanent cover-up for a deeper problem.
Before you finalize the choice or installation, review the following points first:
| Application | Usual choice | What to watch out for |
|---|---|---|
| Ceramic tile with bathtub or shower | Sanitary acidic or neutral | Be suitable for wet areas |
| Glass cabin | Often acid or special for glass | Beware of metal profiles |
| Metal profiles / aluminum / inox | Usually neutral | Avoid possible corrosion or incompatibility |
| Marble / natural stone | Special neutral for stone | Avoid stains |
| Mirror | Special neutral for mirrors | Not accidentally acidic |
| Washbasin with tile | Sanitary, depending on materials | Clean and dry surface |
| Deeper joint | Silicone + backer rod | No filling the entire gap with silicone |
| Old blackened joint | Complete removal and new application | No new silicone over the old |
The table does not replace the product instructions. But it helps make it clear that the choice isn't just about color or price.
Before you finalize the choice or installation, review the following points first:
| Error | Possible consequence | Correct approach |
|---|---|---|
| New silicone over old | Rapid detachment and re-emergence of mold | Complete removal of old material |
| Wrong type of silicone | Poor adhesion, stains or incompatibility | Choice according to materials |
| Silicone on wet surface | Peeling and tanning | Completely dry before application |
| Use of silicone as waterproofing | Hidden leaks behind tiles | Waterproofing under the tiles |
| Very thin joint | Tearing from small movements | Correct width and depth |
| Very deep joint without backer rod | Poor cross section, slow ripening | Use of joint cord |
| Rigid grout in the corners | Cracks | Elastic seal at level changes |
| Use before the silicone matures | Deformation or failure | Waiting according to the product |
| Poor bathroom ventilation | Mold and tan | Adequate ventilation after use |
A prime example is a bathtub where the silicone is replaced every few months and turns black again. If every time new silicone is put on the remains of the old one, without drying the spot and without checking the movement of the tub, the problem will not be solved. It will be repeated.
Silicone itself is not a big expense in a bathroom renovation. The difference between cheap generic silicone and good sanitary silicone is small compared to the cost of the overall project. The real cost is in the work: cleaning, removing old silicone, proper preparation, careful application and curing time.
In a typical bathroom of about 5 sq.m. in Greece in 2026, where a simple to medium renovation may cost around €3,200–€5,500 and more demanding solutions with a walk-in shower, glass enclosure, full waterproofing, and upgraded materials may reach around €6,000–€7,500 or more, the right silicone is a small but critical cost. It makes no sense to cut corners on a material that protects high-risk finishing joints.
Before you finalize the choice or installation, review the following points first:
| Selection | Cost | When is it worth it? |
|---|---|---|
| Cheap generic silicone | Low | Not for critical wet zones |
| Sanitary anti-mold silicone | Medium | Basic choice for bathroom |
| Neutral special silicone | Medium to higher | Metals, natural stone, mirrors, special surfaces |
| Professional replacement of old silicone | It depends on cleaning and length | When there is browning, peeling or failure |
| Backer rod / special preparation | Small additional cost | In deeper or larger joints |
Skimping on bad silicone or sloppy application often results in redoing the job much sooner.
A proper offer should not simply say “bath silicones”. It must mention the points of application: bathtub, shower, cabin, sink, counter, corners or perimeter joints. It must also state that appropriate sanitary or special neutral silicone will be used depending on the materials.
In repairing old silicone, the quote should include removal of old material, cleaning, degreasing and drying. If these are not mentioned, there is a risk of simply passing over the top, which usually fails quickly.
If there are deeper joints, it is advisable to provide a backer rod or other correct configuration. If natural stone or special material is present, compatible silicone must be specified. If the tub is acrylic and moves, the support must be checked first.
The offer must separate materials, labour, VAT and curing time before use. The right silicone isn't just about the cartridge. It's the application.
Before applying silicone, first ask what type will be used. Is it acidic or neutral? Is it sanitary? Is it suitable for the materials there? If marble or natural stone is available, ask if it is special for such use.
Ask if the old silicone will be completely removed. If the answer is "we will pass over", the assignment is not correct. Ask if the surface will be cleaned and dried before application. If the joint is large, ask if a backer rod is needed.
If it is a bathtub, ask whether it is stable and whether it needs to be filled with water before sealing. If it is a glass enclosure, ask how the profiles and screws will be sealed. If it is a shower corner, ask what is underneath: have waterproofing tapes been installed, or is silicone the only line of defence?
Finally, ask when the bathroom can be used again. Silicone takes time. If it gets wet too soon, its adhesion or surface may be damaged.
Before you finalize the choice or installation, review the following points first:
| Question | Yes / No |
|---|---|
| Was silicone chosen suitable for wet areas? | Yes / No |
| Checked if acid or neutral silicone is needed? | Yes / No |
| Is there a natural stone, metal or mirror that requires a special product? | Yes / No |
| Was the old silicone completely removed? | Yes / No |
| Was the surface cleaned of salts, soaps and grease? | Yes / No |
| Was the joint dry before application? | Yes / No |
| Is the width and depth of the joint correct? | Yes / No |
| Was backer rod used where needed? | Yes / No |
| Was the silicone applied continuously without gaps? | Yes / No |
| Was the surface designed to not hold water? | Yes / No |
| Was it given time to mature before use? | Yes / No |
| Is there good ventilation to reduce mold? | Yes / No |
| Wasn't silicone used as a substitute for waterproofing? | Yes / No |
If several answers are "no" or "I don't know", the silicone may look good on the first day, but it will hardly last as well as it should.
If you have to keep one thing, keep it this: silicone in the bathroom is a detailing material, not a fix-it-all material. We choose the right type, acidic or neutral depending on the materials, we use sanitary anti-mold quality, completely remove the old silicone, apply to a clean and dry surface and give it time to cure. If there is hidden moisture, poor tub support or no waterproofing underneath, the best silicone will just delay the problem.
Bath silicones are essential, but must be used with proper technical logic. They are not all the same. Silicone acid can be great on ceramics, glass and porcelain, but is not always suitable for sensitive materials. Neutral silicone offers greater compatibility on metals, natural stones and special surfaces. The sanitary anti-mould version is the right base for damp areas.
Tanning is not avoided only with a more expensive cartridge. Avoided by proper application, clean and dry substrate, correct joint geometry, good ventilation and regular maintenance. If the silicone gets on top of old mold, moisture or soaps, it will fail. If the joint is too deep, too wide, or moves too much, it will tear. If the bathroom is not ventilated, it will tan faster.
For the owner, the practical question is not only "what silicone to put?". It is "for what material is it suitable, how will the surface be prepared and what problem is it supposed to solve?". If the answer is clear, the silicone will do its job properly. If the answer is "we put some silicone and we're done", then we're probably talking about a temporary patch.
In a proper bathroom, silicone is the last clean line of an already proper construction. When everything underneath is done right, this line can stay clean, flexible and functional for years. When there are mistakes underneath, that same line will be the first spot to blacken, open up, and reveal that the problem was never just the silicone.
Return to category.
Go to categoryReturn to the central guide.
Go to guide