
Bathroom Waterproofing & Moisture Protection
Return to category.
Go to categoryThe idea of renovating or waterproofing a bathroom without stripping the old tiles is very appealing. Less dust, less debris, less hassle, faster delivery and, in some cases, lower costs. For a homeowner who wants to avoid the mess of a complete rip-off, the “on top of existing tiles” solution seems almost ideal.
In practice, however, this solution is not a simple matter. Old tiles are usually smooth, closed and non-absorbent. This means that the new materials do not "grab" easily on them, if proper preparation is not done beforehand. A sealant applied directly to glossy tile, salts, soaps, greases, or old silicones may look good the first day, but peel off later as a film.
This is where special quartz adhesion primers and polyurethane or hybrid spreadable sealants come into play. The quartz primer creates a rough, "bitten" surface on smooth and non-absorbent bases, so that subsequent layers can be adhered. Technical leaflets for such products often refer to use on smooth or non-absorbent substrates, such as old tiles, marble or mosaics, before new tiling or coatings.
Polyurethane spreadables, on the other hand, can create a resilient waterproofing film as long as the product is suitable for the specific use and applied with the correct system. There are systems specifically for waterproofing wet spaces under tiles, but also transparent polyurethane solutions over existing tiles for cases where we want to preserve the image of the old cladding. Some manufacturers describe under-tile systems for wet areas with hybrid polyurethane membranes, while others describe solutions over existing tiles when these are stable and well anchored.
The critical point is that waterproofing over old tiles is not a solution for every bathroom. If the old tiles are hollow, if there is an active pipe leak, if the siphon has failed, if there are incorrect pours, or if the moisture has already penetrated deep into the substrate, the surface solution may temporarily hide the problem rather than solve it. This guide explains when the no-excision solution makes sense, what materials are used, how to do the procedure properly, and what to ask before agreeing to such an application.
Sealing over old tiles only makes sense when the existing paving is stable. The tiles must be well bonded, with no extensive voids, no delaminations and no deep cracks that indicate substrate failure. If the base already has a problem, the new membrane will press against a weak surface.
A bathroom may be suitable for such a solution when the tiles are old aesthetically, but technically stable. For example, the walls and floor are in good condition, but the owner wants to improve the waterproofing before sticking new tiles on top. In this case, proper preparation with a quartz primer and compatible sealant can provide a practical solution.
It can also make sense when we want to avoid stripping in a bathroom that is not actively leaking, but needs a refresh. The method reduces clutter, noise and time. However, it should not be used to avoid a necessary technical check. If there are signs of moisture, the cause must first be found.
The key is not to treat old paving as a "healthy substrate" just because it looks clean. It must be checked mechanically: if the tiles sound hollow, if there are cracks, if the joints are crumbling, if the base has loose spots or if the floor holds water. Without this control, the non-excision solution is risky.
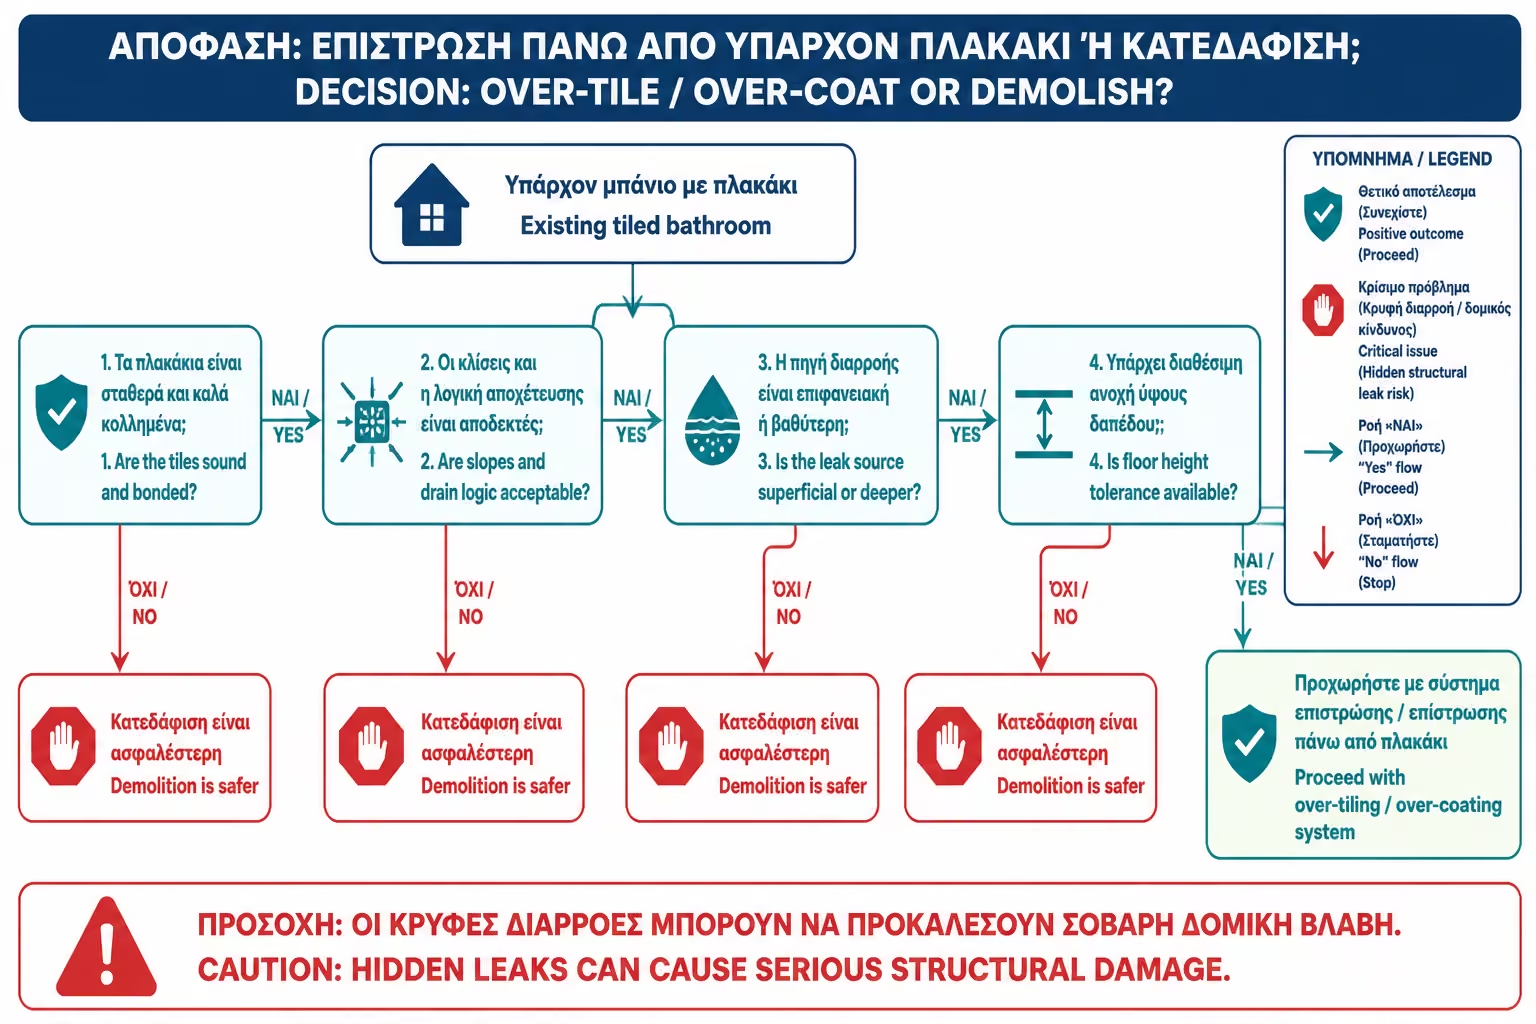
There are cases where waterproofing over old tiles is not the right solution. If there is an active pipe leak, surface sealing will not stop it. If the siphon has a bad connection, if it has become detached from the old seal, or if it smells strongly, the problem lies deeper. If the shower is leaking incorrectly and the water is pooling, the new membrane may seal the surface, but it will not drain the water properly.
It is also not a good solution when many tiles are hollow or have lost their adhesion. The new seal will depend on the old adhesive and the old substrate. If that fails, the new application will fail with it. The same applies if there are extensive cracks, swollen joints or intense moisture on adjacent walls.
Special attention is needed in showers that already "pour" water. If moisture appears only after use and the joints are worn, there may be room for surface repair. But if moisture is constantly present, even when the shower is not in use, pipes and hidden leaks should be checked first.
The most dangerous case is to run polyurethane spread over tiles that already have water underneath. A new impervious layer can trap moisture, cause blisters, odors or move the problem to other sides. Sealing should seal off healthy surface, not imprison an active problem.
Before deciding on any waterproofing over old tiles, an inspection should be carried out. The technician must tap the tiles to find hollow spots, check the joints, see the corners, silicones, siphon, supplies, battery and signs of moisture. If it is a shower floor, a drainage check must also be done.
If local hollow tiles are present, they may in some cases be removed and repaired prior to new application. But if the problem is generalized, the solution without excision loses its logic. It does not make sense to create a new seal on a substrate that is peeling.
Joints should be carefully evaluated. If they are loose, they must be removed and repaired. If they have mold or salts, they should be cleaned thoroughly. If they have cracks, they must be addressed before the primer and membrane. Quartz primer is not a joint repair material. It is an adhesion bridge.
Also, one must decide what the goal is. Do we want to stick new tiles on top of the old ones? Do we want to pass transparent protection and keep the existing image? Do we want to waterproof a shower floor or just walls? Each scenario requires a different system.
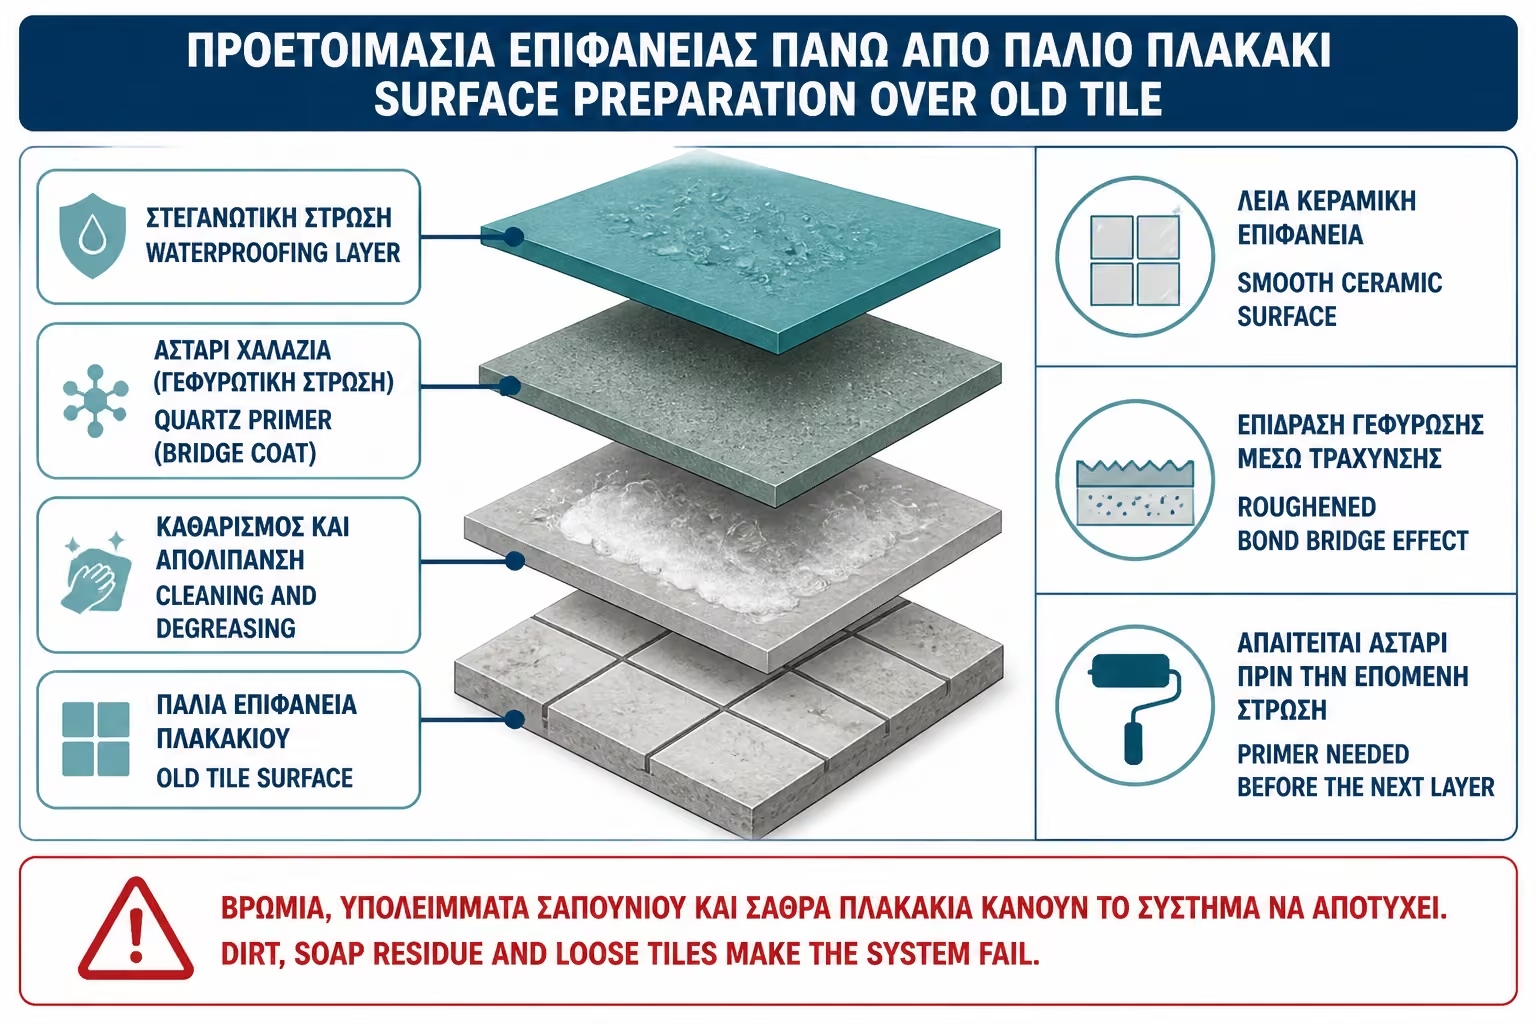
Old tiles in a bathroom have layers on them that are often not visible: soaps, salts, grease from cleaners, silicone residues, mold, dust and polishing products. If a primer or film is applied over them, the material does not stick to the tile. Grabs onto dirt.
Cleaning should be thorough. Old silicones are removed where there is failure, salts are cleaned, loose joints are rubbed, cleaning residues are washed off and the surface is allowed to dry. Some systems may require mechanical sanding or light opening of the surface for better adhesion, depending on the material's instructions.
On floors, cleaning is even more critical because there are residues from soaps and bodies stepping on them every day. In the corners, old silicone may have seeped into micro-gaps. If not removed properly, no new material will bond reliably.
A common mistake is to apply quartz primer over tile that has just been wiped. This may look good at first, but the grip is not secure. The actual preparation is more demanding than it seems.
Quartz primer is one of the basic materials in applications over old tiles. The tiles are smooth and non-absorbent, so the new materials do not have an easy mechanical "press". Quartz primer contains fine aggregates, usually quartz sand or selected granular materials, which create a rough adhesion surface.
The logic is simple: first the old tile is cleaned and prepared. Then the quartz primer is applied. After drying, the surface is no longer shiny and smooth, but is roughened to accept another layer, such as a sealant, tile adhesive or other system. Technical brochures for quartz primers often refer to use on smooth and non-absorbent substrates prior to tiling or press-on screeds.
But the primer does not work miracles. It does not glue detached tiles, does not self-seal, does not fill gaps and does not fix cracks. It is an adhesion bridge. If the base is bad, the primer will stick to a bad base. If the surface is dirty, it will stick to the dirt.
A suitable product for wet areas and the system to follow must also be used. Not all quartz primers are the same. Some are for plasters, some for tapers, some for tile on tile, some for indoor or outdoor use. The choice should be technical, not random.
Polyurethane spreads can be used in some applications over old tiles because they create a resilient, continuous waterproofing film. Depending on the system, they can be used as an intermediate waterproofing under new tiles or as a final transparent protection over existing cladding.
For application under new tiles, the polyurethane must be suitable for under-tile use and work with the tile adhesive to follow. Not every polyurethane membrane is suitable for sticking tiles on top. Some systems are explicitly described as under-tile applications for wet areas, with a specific sequence of layers and compatible elastic adhesive.
For transparent surface protection, special transparent polyurethane or aliphatic systems are used that keep the old surface visible. These can be useful when the tiles are aesthetically pleasing and stable, but the joints or surface need protection. Systems of this type are recommended in technical solutions over existing tiles, provided that the tiles are in good condition and firmly glued.
The important thing is not to use the word "polyurethane" as a guarantee of success. The product must be suitable for the specific scenario: under new tiles or as a final clear coat. In both cases, preparation is key.
When we talk about waterproofing over old tiles, there are two main directions. The first is to use the old tiles as a substrate and place new tiles on top. The second is to leave the old tiles visible and to pass transparent sealing protection.
In the first case, the process usually includes cleaning, adhesion testing, quartz primer, waterproofing system, corner tapes and then tile adhesive. The end result is new tile. The waterproofing acts as an intermediate layer under the new lining.
In the second case, the aesthetic effect of the old tiles remains. Here we do not use quartz primer which will create a rough and opaque surface unless a new coating is to be put in. Special transparent systems are used, usually polyurethane, with different preparation and different restrictions. Gloss, slip resistance, color change and maintenance should be considered.
The mistake is to confuse the two methods. It is not possible to apply a quartz primer and then expect the image of the old tile to remain. Also, a clear resin over old tiles is not the same as a complete new system under pavers.
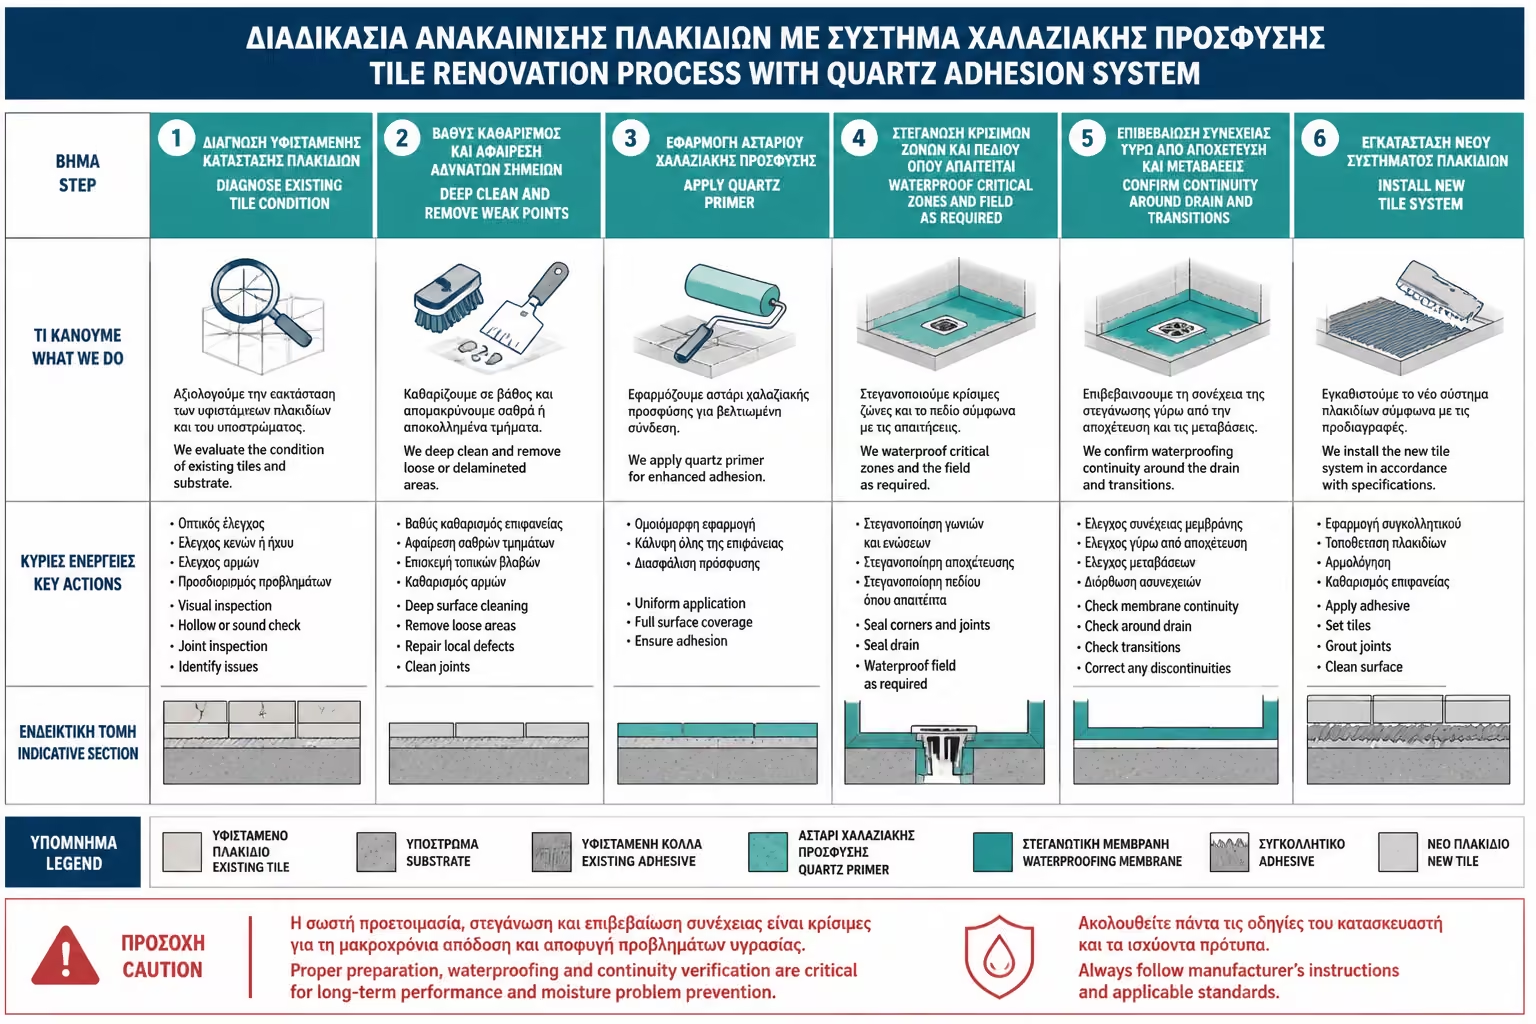
When the goal is to put new tiles on top of the old ones, the correct order of work is crucial. First a stability check is performed. Any tiles that are hollow or detached need to be addressed. Then there is deep cleaning and degreasing. This is followed by quartz adhesion primer to create a suitable rough surface.
The waterproofing system is then applied. This can be a cementitious, acrylic, polyurethane or other system, but must be compatible with the quartz primer and tile adhesive. Sealing strips are placed in the corners. Cuffs or special pieces are placed around battery supplies. There must be a suitable connection around siphons.
After sealing, the drying times must be observed. Only then can the tile adhesive be put in. The adhesive must be suitable for difficult or non-absorbent substrates and for the specific sealant. On large tiles, the demand for adhesion and full coverage is greater.
If any stage is omitted, the system becomes weak. For example, new tiles over old ones without a quartz primer or without proper adhesive can peel off. Sealing without tapes in the corners can crack. Polyurethane membrane without a compatible adhesive can create adhesion problems.
Clear polyurethane protection makes sense when the old tiles are in good condition, the owner wants to keep them, and the problem is mainly surface absorption from joints or microcracks. It is a solution that can be used in existing showers, floors or walls, under conditions.
The surface must be clean, dry and stable. Joints should be repaired where loose. Old silicones that have failed must be removed. If there is moisture under the tiles, application should be done with great care or avoided. A clear film can trap moisture if the substrate is not dried.
The aesthetic effect should be discussed before application. The surface may become glossier, appear "wet" or the joints may darken. On matte tiles, this may be undesirable. Also, the non-slip properties of the shower floor must be considered. A clear resin can change the feel of the old tile.
The obvious solution is not a complete waterproofing reconstruction. It is surface protection. It can help in the right case, but it should not promise a permanent solution when the problem is under the tiles.
Joints are one of the most critical points when working on old tiles. If new tiles are to be laid on top, the old joints still affect the flatness and stability of the surface. If transparent protection is to be applied, the joints remain the final visible surface and must be sound.
Loose joints must be removed and repaired. They should not just be covered with primer or resin. If the joint crumbles, the material above will press against a weak substrate. In shower floors, the joints receive water every day and must be stable.
In transparent applications, joint repair is particularly important. Resin should not be used to "fill" damaged joints without proper preparation. It can close the surface, but if the joint underneath is loose, the failure will return.
If the joints are very blackened or deeply infected with mold, they need careful cleaning and perhaps replacement. Waterproofing over an infected joint can trap the problem visually and hygienically.
Corners and silicones are places where surface solutions often fail when done sloppily. If there is old silicone that has blackened or peeled off, it must be removed. Do not put quartz primer or polyurethane over bad silicone. The new application must press on a clean and stable surface.
If new tiles are to be laid on top, the corners must be reinforced with sealing strips in the new system. The old silicone in the corners no longer has a role. Proper sealing continuity must be removed and re-established.
If it is a clear protection over existing tiles, the order of work matters. Usually the old silicones are removed, the surface is cleaned, the system is applied and finally a new rubber seal is made, according to the product instructions. Active joints should not be closed with rigid material.
The glass cabin, metal profiles and supports must also be checked. If there is water passing under profiles or holes that are not sealed, the surface membrane is not enough. The joints must be corrected.
The siphon is probably the most difficult part to renovate without stripping. If the problem lies in the connection of the siphon to the substrate or to the old waterproofing, the superficial solution is of limited value. It can seal the area around the grill, but it can't fix a bad joint under the tiles.
In linear siphons, the metal-plate joint is particularly critical. If there are micro-gaps, if the silicone has opened, or if water is passing around the body of the siphon, a serious check should be made. The solution may require a local opening, not just a smear.
If the drain drains slowly or smells, it must first be hydraulically checked. Sealing from above does not solve a blocked or poorly connected siphon. If the water stagnates because it doesn't drain properly, the new material will be constantly stressed.
In any case, before applying a system over old tiles on a shower floor, a water test must be done. If the drain is not working properly, there is no point in closing the surface without solving the cause.
Sealing over old tiles can reduce the ingress of water into the substrate, but it doesn't correct leaks. If the old floor holds water, it will continue to hold water. If there is a reverse slope to the bathroom entrance, the water will continue to move out. If water remains in front of the siphon, the new membrane will be strained at the same point.
This is especially important in walk-in showers. Many times the owner wants to "insulate from above" because he sees black joints or moisture. But if the cause is that the water stagnates every day, the solution must also deal with the geometry. In some cases, this means stripping and new cement mortar.
If new tiles are to be laid on top of the old, some minor flatness or slope correction can be done with suitable materials, but there are limits. A serious mistake cannot be corrected with tile adhesive alone. If a substantial change of slope is required, a technical study and possibly removal of old layers is needed.
Water is the strictest controller. If the slope is wrong, it will show again, no matter how good the sealant.
When we insulate and tile over old tiles, the final height of the floor is increased. This can create practical issues: doors that don't open, height difference with an adjacent space, level change around a siphon, difficulty on the base of the basin, on the vanity unit or in the cabin.
On the walls, the new thickness can affect rosettes, batteries, switches, sockets, cabin profiles and case finishes. If the old tile is left and a new one is added, the facilities may "deepen" in relation to the finished surface. On external batteries, this can be dealt with by extensions, but should be expected. In built-in bodies, it can be a more serious matter.
On the shower floor, the extra thickness can affect the siphon grate. If the siphon cannot be adjusted to the new height, the final runoff may be incorrect. This should be checked before deciding on the application.
The no-excision solution reduces debris, but it is not without consequences. Before starting, the new thickness of all layers must be calculated: primer, waterproofing, adhesive, new tile and joint.
The main advantage is speed. There is no need to completely strip tiles, so dust, debris, noise and time are reduced. In high-rise apartments, this can be important. It also reduces the chances of unanticipated damage being revealed by stripping, although this is not always an advantage; sometimes hidden damage needs to be revealed.
The second advantage is the cost in selected cases. If the substrate is sound and no heavy repairs are needed, the solution may be more economical than a complete rebuild. Especially when we want to renew the bathroom without changing the layout and without moving the plumbing, the method can be practical.
The third advantage is that it can reduce nuisance. In a residential house, a complete bathroom renovation is difficult. If the situation allows it, the operation on the old tiles can reduce the time that the bathroom remains out of use.
But all these advantages apply only when the old construction is suitable. If the bathroom has deeper problems, the "economy" can turn into a double cost: first the surface solution is paid, and then the removal.
The main disadvantage is that we cannot see what is under the old tiles. If there are old dampness, loose substrates, poor plumbing connections or problematic old glue, the new application can hide them. This is especially dangerous in showers that are already leaking.
Another drawback is the reliance on traction. The whole new system is based on the old tile and old adhesive being stable. If these come off, the new layer comes off too. That's why checking for hollow tiles is essential.
There's also the issue of height and finishes. Details around doors, siphons, batteries, cabins and furniture can become more complicated than it first appears. Sometimes the cost of these adjustments reduces the benefit of not dislocating.
Finally, the method requires very good application. If the cleaning, quartz primer, or membrane is done sloppy, failure can appear as new tile delamination, blisters, moisture, or joint cracks.
The cost of sealing over old tiles depends on the surface, the condition of the old tiles, the type of primer, the sealing system, whether new tiles or clear protection will be put in, the need for joint repairs, the area, the floor, access, whether VAT is included and whether the quote is for materials and labour.
The gut-less solution may be more cost-effective than a complete renovation, but it shouldn't be compared on price per square foot alone. The complete item must be compared: cleaning, repairs, primer, waterproofing, tapes, cuffs, new adhesive, new tiles or final clear film.
In a typical bathroom of about 5 sq.m. in the Greece of 2026, a simple to medium complete renovation can indicatively move around €3,200–5,500, while more demanding solutions with a walk-in shower, linear siphon, full waterproofing, large tiles and custom glass can reach around €6,000–7,500 or more. A solution over old tiles can reduce costs and time, but only if extensive repairs or plumbing interventions are not required.
| Factor | How does it affect cost? |
|---|---|
| Inspection and preparation of old tiles | The more repairs needed, the lower the financial benefit |
| Quartz Primer | Necessary for adhesion to smooth tiles before new layers |
| Polyurethane membrane | Higher cost than simple smears, but better elasticity in correct applications |
| Ribbons and cuffs | Small cost in relation to the risk they reduce |
| New tiles upstairs | They add glue, labor, height and trim |
| Transparent protection | It depends on product, preparation and anti-slip requirements |
A very low bid that simply says “insulation over tile” without cleaning, priming and detailing should not be compared to a complete technical application.
A proper quote should first clarify which scenario is being pursued: new tiles over old or transparent protection over existing. Then it should describe checking the old surface, cleaning, repairing joints, removing silicone where necessary and the type of primer.
If new tiles are to be put in, the quartz adhesion primer, sealant, corner tapes, supply cuffs, compatible adhesive and new thickness must be listed. If transparent polyurethane protection is to be applied, the system, preparation, layers, possible gloss change, anti-slip and the time the shower will not be used must be mentioned.
The offer must also say what it does not cover. If there is an active pipe leak, if the tiles are hollow or if the siphon has a problem, surface application should not be presented as a definitive solution. Honesty at the limits of the method is a sign of a serious technician.
Finally, it must be clear whether materials, labour, VAT, transport, space protection and final seals are included. Ambiguity in such tasks creates misunderstandings and technical gaps.
The owner should first ask if the old tiles have been inspected. How many are hollow? Are there cracks? Is there moisture underneath? Has a pipe or siphon leak been blocked? If this check has not been made, the application starts with an unknown risk.
Then he must ask which primer will be used. Is it quartz? Is it suitable for old tiles? Is it compatible with the sealant and adhesive? The answer "we will put a strong primer" is not enough.
Then he should ask about the sealant. Is it polyurethane? Is it under tile or finished clear film? If new tiles are to be put in, what adhesive will be used? If the old tile is exposed, will the gloss or slip resistance change?
Finally, he must ask what will be done to the corners, the silicones, the siphon and around the battery. These are the points where superficial solutions usually fail when done haphazardly.
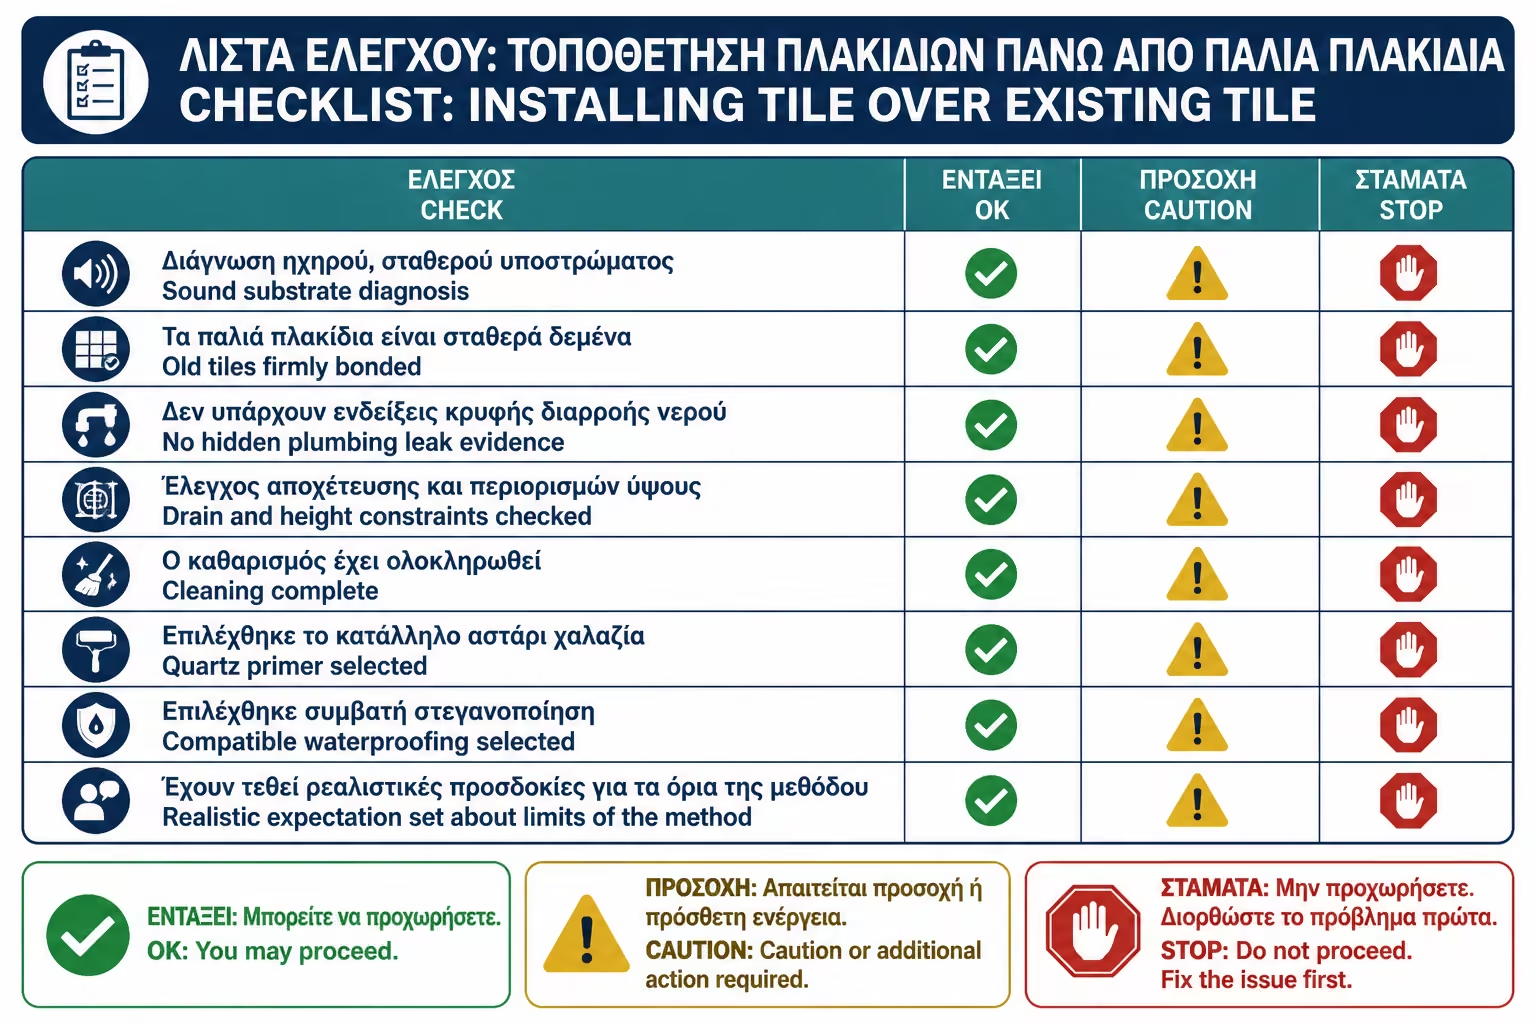
Before approving waterproofing over old tiles, it's worth putting the proposal through a hands-on check.
| Inquiry | Yes / No |
|---|---|
| Have the old tiles been checked for hollow or detached spots? | Yes / No |
| Has active leakage from pipes, battery or siphon been ruled out? | Yes / No |
| Are the old joints fixed or will they be repaired before application? | Yes / No |
| Will the old problematic silicones be removed? | Yes / No |
| Is a deep cleaning of salts, soaps and fats provided? | Yes / No |
| If new tiles are to be put in, will quartz adhesion primer be applied? | Yes / No |
| Is the primer suitable for smooth, non-absorbent tiles? | Yes / No |
| Is the sealant compatible with the primer and tile adhesive? | Yes / No |
| Are there tapes in the corners and cuffs in the facilities? | Yes / No |
| Can the siphon be properly integrated into the new seal? | Yes / No |
| Have drains and water ponds been checked? | Yes / No |
| Has the new floor height and the effects on doors/siphons/batteries been calculated? | Yes / No |
| If clear film is put in, has it been tested for gloss and anti-slip? | Yes / No |
| Does the offer clearly state materials, labour, VAT and technical stages? | Yes / No |
If several answers are "don't know", the no-excision solution has not yet been properly designed. The risk is not only in the hardware, but in that old problems may be covered without being fixed.
> If you have to keep only one thing, keep this: waterproofing over old tiles can only work when the old tiles are stable, clean and technically sound. Quartz primer is critical when laying new layers over smooth tiles, because it creates adhesion where there is none. But it doesn't glue loose tiles, fix leaking pipes, or fix faulty drains. Before you avoid stripping, make sure that stripping isn't exactly what the bathroom needs.
Sealing over old tiles is a real and useful technical option in renovation, but not for every situation. It can reduce time, waste and cost, as long as the existing surface is stable and properly diagnosed. Old tile is not automatically a good substrate. It must demonstrate that it is well bonded, clean and free of active moisture problems.
Quartz primers have an important role, because they create adhesion on smooth and non-absorbent surfaces. Without this bridge, new materials may not bond properly. Polyurethane spreads can provide resilient and continuous protection, either under new tiles or as a special clear surface solution, but only when the product is suitable and applied with the correct system.
The biggest pitfall is to use the method to hide a deeper problem. If there is a pipe leak, siphon failure, hollow tiles, trapped moisture or incorrect slopes, surface waterproofing is not a definitive solution. It can delay the extraction, but often makes it more expensive later.
For the owner, the right attitude is to ask for a clean technical proposal: old surface inspection, cleaning, quartz primer where necessary, compatible sealant, tapes, cuffs, siphon inspection and proper tile adhesive. If all this is planned, the no-excision solution can be practical and reliable. If not, it's just a new layer on top of an old unknown problem.
Return to category.
Go to categoryReturn to the central guide.
Go to guide