
Bathroom Waterproofing & Moisture Protection
Return to category.
Go to categoryDry construction has made a strong entry into bathroom renovations, because it provides quick, clean and flexible solutions. Plasterboards, cement boards and special wet room boards can be used to create false walls, hidden installations, built-in cisterns, alcoves, shampoo recesses, shelves and new layouts without heavy construction. On paper, the solution looks ideal: less dust, faster placement and better accuracy.
But in the area of the shower, dry construction does not forgive rough solutions. A drywall or cement board wall should not be treated as a simple wall that will simply accept tiles. The shower is a zone of direct and daily contact with water. There we don't just have water vapor or occasional humidity. We have water hitting the wall, rolling over joints, collecting in corners, going around batteries and testing every joint.
The biggest mistake is the confusion between "waterproof" and "waterproof". Green anthygra plasterboard has better moisture behavior than regular plasterboard, but that doesn't mean it can be left exposed to water behind tiles without full waterproofing. Even when a product allows paving in wet areas, several manufacturers or technical systems recommend additional tanking, i.e. a complete waterproofing system, for greater protection. British Gypsum, for example, states that moisture resistant plasterboard can accept tiles in wet use areas, but suggests considering a proprietary tanking system for added protection.
Cement board is clearly more suitable for heavy wet zones because it is inorganic, more resistant to moisture and does not rot like organic materials. Aquapanel systems are described by Knauf as suitable for demanding internal humidity conditions, with resistance to water, mold and wet environments. But this does not mean that the joints, screws, joints, corners and supplies are automatically watertight. The slab can withstand moisture, but the wall system needs regular waterproofing.
In this guide we will look at how to deal with dry building within the shower zone, what is the difference between dry plasterboard and cement board, how to seal joints and screws, what kind of waterproofing is required, where tapes and cuffs are needed and what the owner should check before tiling.
Drywall in the bathroom is used for many reasons. It can hide pipes, create flat surfaces, help install built-in cisterns, make alcoves and provide a faster solution than traditional building. In many renovations, especially in old apartments, it is a practical way to fix crooked walls or create a new layout.
But the bathroom is not a simple interior space. It has humidity, water vapour, water, cleaning agents and temperature changes. The shower area is even more demanding. There the dry construction must be done with a system: correct frame, correct plate, correct screws, correct grouting, primer, waterproofing, tapes and then tiles.
The sloppy logic of "put green drywall and tile" is dangerous in the immediate shower area. Tile and grout do not constitute complete waterproofing. If water gets through joints, around the battery or from a corner, the substrate behind the tile must be protected.
Drywall works great when applied as an integrated system. When treated as a quick "closure" of a wall, it can create problems that later require removal.
Green anthygro plasterboard is designed for areas with increased humidity, such as bathrooms, kitchens or utility areas. It behaves better than a simple plasterboard in a wet environment and reduces the risk of damage from water vapours. But this does not make it a waterproof plate.
The word "hygienic" means resistant to moisture, not suitable to receive direct water without protection. In the shower zone, where the water hits the wall every day, wet plasterboard must be treated with great care. If used, a full sealing system is required on top, with joint tapes, supply cuffs and a compatible membrane or spreadable system.
There are also differences between products and technical instructions. Some systems allow tiling over moisture resistant plasterboard under certain conditions, but this does not mean that it is the best choice for a direct shower zone in every project. In commercial showers, swimming pools or particularly demanding areas, more specialized wet room slabs or cement boards are usually used. British Gypsum itself distinguishes special solutions, such as Glasroc H TileBacker, for areas such as shower enclosures and swimming pools.
In a residence, green drywall may have a place in areas of the bathroom that receive water vapor or occasional moisture. In the immediate zone of the shower, however, especially behind tiles, it should not be used without normal waterproofing. If in doubt, cement board or special wet room board is usually a safer choice.
Cement board is a board with a cementitious or inorganic base, designed to have a much better resistance in a wet environment than plasterboard. It is not based on a plaster core with a paper lining, but on a more durable composition, often with glass mesh reinforcement. That is why it is considered more suitable for zones where there is direct exposure to water.
Systems such as Knauf Aquapanel Cement Board Indoor are used in demanding indoor conditions, with a description for resistance to moisture, mold and harsh environments. This makes cement board a much safer base for showers, walk-in structures, walls behind faucets, shampoo recesses and built-in details.
But it must be made clear: cement board does not mean that all joints are automatically watertight. Joints between plates, screws, cuts, corners and pipe passages must be sealed. The slab can withstand water, but the wall system must prevent water from getting behind the cladding.
Also, each manufacturer has its own instructions for grouting, tapes, screws, support distances and allowable tile weights. It is not enough to buy "cement board". It must be applied as a dry building system for wet areas.
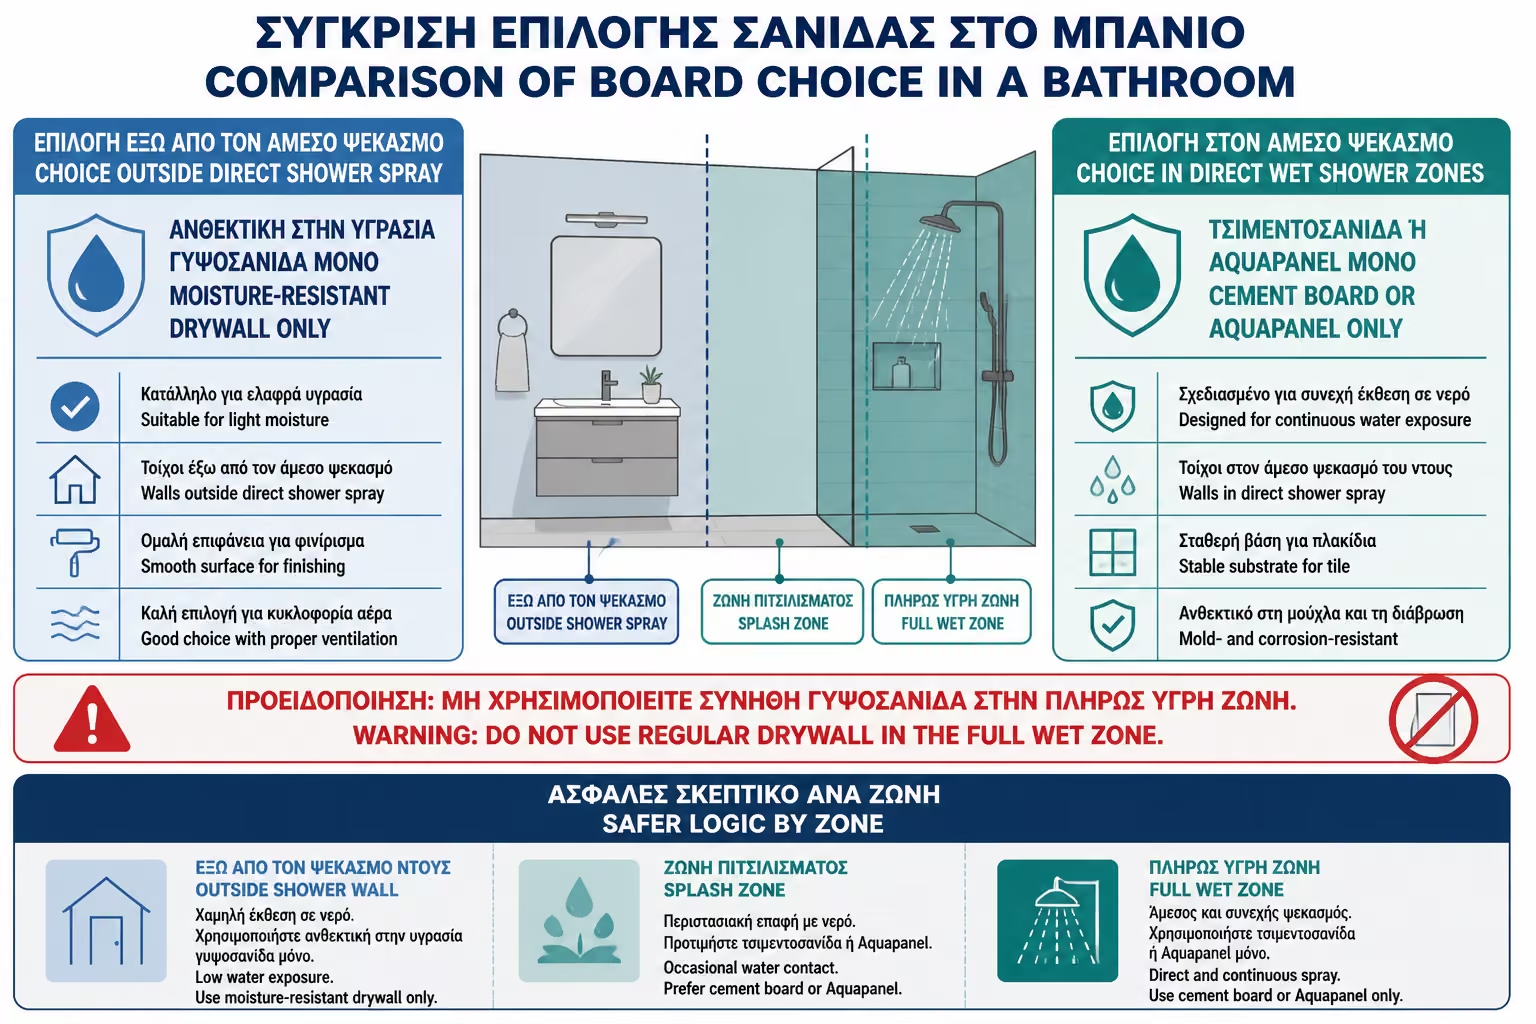
In a bathroom there are different danger zones. Not all surfaces are the same. A wall away from the shower can accept wet drywall and tile or paint suitable for a bathroom, as long as there is proper ventilation. A wall inside the shower however receives direct water and must be treated as a high stress wet zone.
In the immediate zone of the shower, cement board or special wet room board is usually a safer choice than dry plasterboard. If, despite all this, dry plasterboard is used, there must be a complete waterproofing system and a clear acceptance from the technical brochures of the materials to be used. It should not be a "because it's green, therefore it works" decision.
| Bathroom area | Possible plate choice | What needs attention |
|---|---|---|
| Wall away from shower | Thin plasterboard | Good paint/lining and ventilation |
| Area behind sink | Thin plasterboard or cement board | Splash protection and proper padding |
| Wall inside the shower | Cement board or special slab for wet areas | Full waterproofing, tapes, cuffs |
| Walk-in shower without cabin | Cement board / special system | Wider sealing zone |
| Shampoo indentations | Cement board or ready-made waterproof niche | Full sealing of all corners |
| Built-in battery | Cement board / wet room system | Seal around hidden body and supplies |
The right choice depends not only on the material of the slab, but on the system that will be built around it.
In dry construction, the quality of the wall starts with the frame. If the metal frame is weak, if the uprights are far apart, if the slab bends or if there is movement, the sealing above will be strained. A shower wall must be rigid, stable and suitable to accept tiles.
Wall warping or buckling is a serious problem. If the user leans against the wall, if a glass cabinet is attached, if shelves are inserted or if the weight of the tiles is large, the slab and the frame must withstand it. The waterproofing is not designed to work on a surface that moves like a thin sheet.
Reinforcements must also be provided in the places where heavy objects will be fixed: cabins, handles, seats, batteries, shelves. The slab should not be drilled later in a random spot and the support should be based on the slab alone.
In areas with built-in cisterns or hidden faucets, the frame must be organized along with the plumbing. Sealing does not fix a bad mechanical foundation. If the wall plays, the waterproofing will tire.
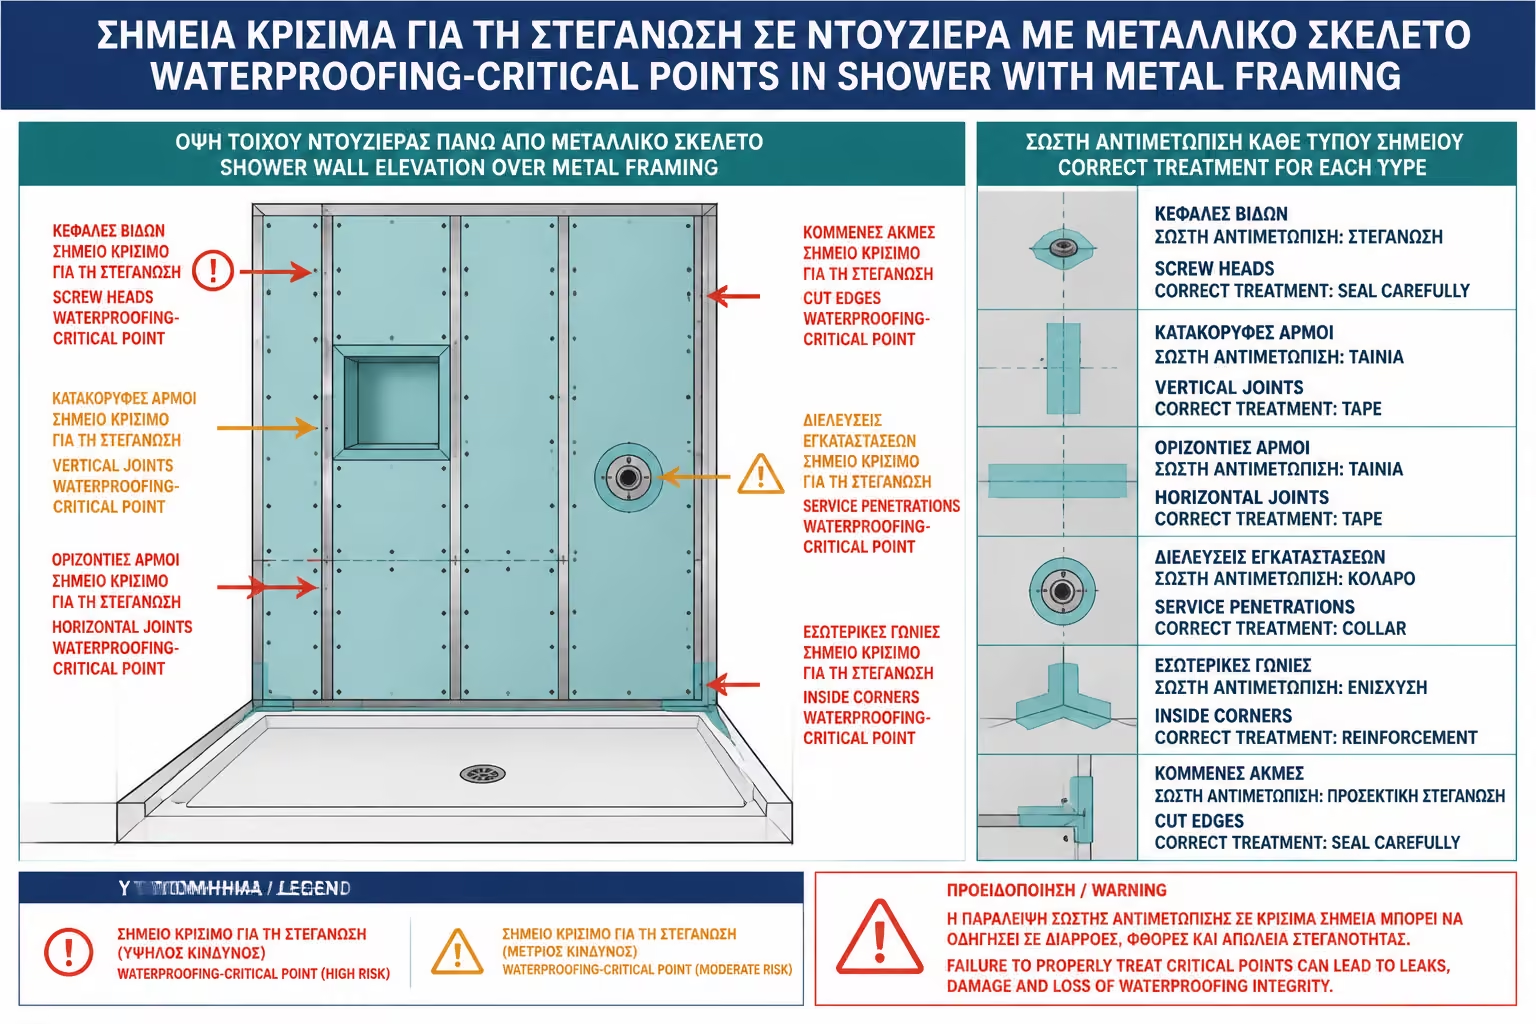
In dry construction, joints between boards and screw heads are critical points. Each joint is a break in the surface. Every screw is a potential moisture entry point if not properly covered. Any cut around a pipe, niche or support creates an edge that must be protected.
Joints must be grouted or grouted with materials provided by the slab system. No random interior grout is used within the shower zone. In cement boards, special joint tape and cementitious material are often required. In wet room plasterboards, the jointing material must be compatible with the subsequent waterproofing.
The screws must be suitable for the type of plate and the environment. They must not rust or damage the plate surface. The heads must be properly covered before sealing. If they are left exposed or if they have sunk too much and injured the plate, a weak point is created.
Cuts must be clean. Broken edges, unsightly holes around pipes and large gaps that will be "glued up" are dangerous practice in the shower area. The system must be stable before sealing, not hoping that sealing will hide construction defects.
The primer in dry construction has an important role. The surface of plasterboard, cement board or joints may have different absorbency. One pulls the paper or the surface of the slab, another the joint putty, another the cementitious material, another the cut edge. If the waterproofing is applied directly, it may dry unevenly or not set properly.
The primer adjusts absorbency and improves adhesion. In plasterboards, it helps stabilize the surface and prevent it from suddenly "sucking" the next material. On cement boards, a different primer may be needed, depending on the product and sealer to follow.
No primer should be used. A common paint primer is not necessarily suitable under a waterproofing and tile system. It must be compatible with the tile, with the sealant and with the tile adhesive that will follow.
In Aquapanel or other cement board systems, the manufacturer often gives instructions for joints, primers, adhesives and coatings. These instructions must be followed. Dry construction is not a place for improvisation of materials.
In the shower area, the drywall surface must be completely waterproofed before tiling. This means that we don't just protect the joints. We protect the entire zone that receives water. Walls, corners, outlets, recesses and low zones must be integrated into a continuous system.
The waterproofing should rise at least to about 2 meters in the shower zone, and in many cases to the full height of the paving. If there is an overhead shower, high water pressure, an open walk-in layout or a small bathroom where splashes get everywhere, the protection needs to be more generous.
Materials can be cementitious spreadables, acrylic or polyurethane liquid membranes, fleece membranes, or systems provided by the slab manufacturer. What is important is not only the hardware class, but compatibility and continuity.
In plasterboard, complete waterproofing is even more critical, because the core of the board must not receive water. On cement board, the slab can withstand moisture much better, but the joints and system behind it still need protection.
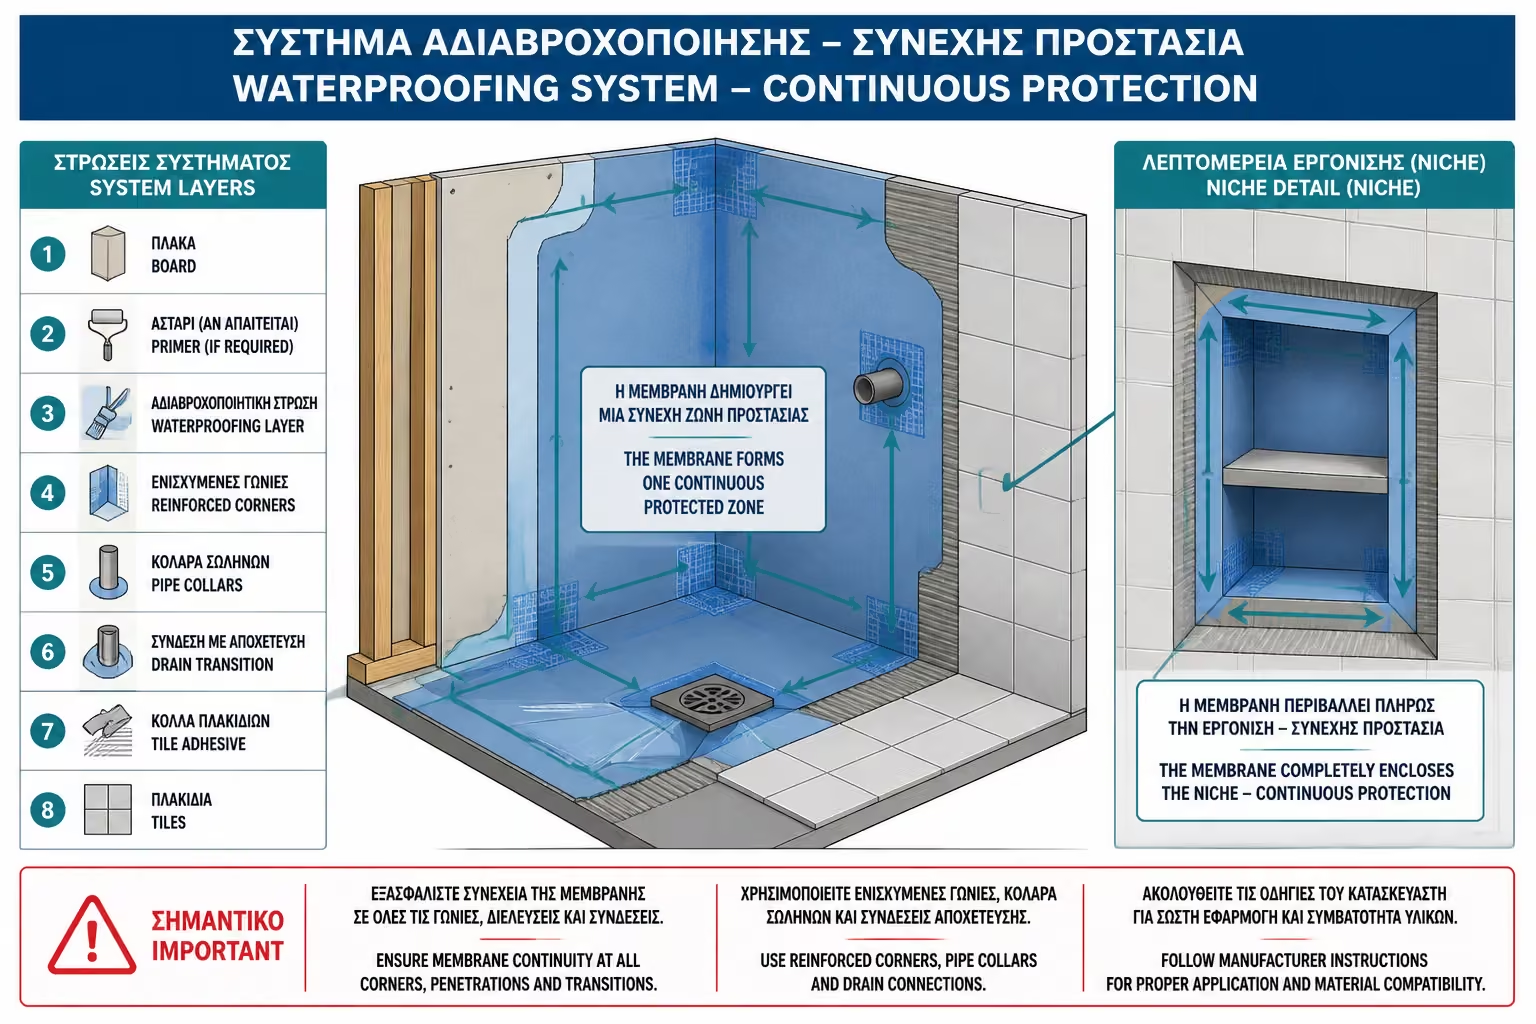
Joints between slabs and corners are the most sensitive points of dry construction. There, a simple pass of sealant is not enough. Joint tapes, corner sealing tapes or special pieces are needed, depending on the system.
At the plate joints, the tape helps to counteract micro-movements and create continuity. At floor-to-wall and wall-to-wall corners, sealing strips are essential because there different levels meet. If the waterproofing is simply rolled over the corner, there is an increased risk of cracking.
Particular attention is needed in the inner corners of a shampoo recess or around built-in elements. These spots have many small levels and water can stay longer. The tape must fit properly, without wrinkles, gaps or bubbles, and be completely covered by the sealant.
The common mistake is to trowel the joints, make them look visually closed and assume they are ready for tiling. Visually they may be ready. However, they are not waterproof if they have not been included in the waterproofing system.
In dry construction, water supplies and built-in batteries need special attention. Every hole in the plate is a break in the seal. If the waterproofing does not seal properly around the supply, water can seep behind the tiles and into the masonry void.
Sleeves or special gaskets should be used around piping, not just a bit of material around the hole. Battery rosettes are not a seal. It is a final cover. The real protection must be underneath.
In built-in batteries, the hidden body must be firmly fixed to the frame, tested for leaks before the surface is closed and incorporated into the seal. If the battery box or the gap around it is not properly sealed, moisture can seep into the wall.
In such applications, the cooperation of plumber, drywaller and sheeter is critical. If one leaves "holes" for the other to solve, weak points often remain.
Shampoo recesses are particularly popular in dry-build showers, because they can be created more easily within the frame. But it is also one of the most demanding sealing points. An alcove has a back, sides, top, bottom shelf and many interior corners. If it is not properly sealed, moisture can enter the inside of the wall.
The bottom shelf of the recess should be slightly inclined outwards so that water does not pool. This should be built into the build, not fixed with grout. All internal corners must be reinforced with tapes or special pieces.
In dry construction, a ready-made waterproof niche can be used, i.e. a prefabricated waterproof recess, which is integrated into the system. This can reduce the risk as long as its perimeter is properly sealed with the rest of the wall. If a recess is built from slabs, the quality of cuts, joints and waterproofing is even more important.
The alcove should not be treated like a small shelf. It's a little shower inside the shower.
When the drywall meets the shower floor, the joint must be done with special care. The bottom of the plate must not be in a position where it can draw water. The details of the base, the distance from the floor, the sealing tape and the joint with the cement mortar or the shower base must follow the system.
In a built-in shower, the floor waterproofing must go up the wall and connect to the slab waterproofing. There should be no break in the corner. If the floor has a fleece membrane and the wall is coated, a compatible connection between the two must be ensured.
In a prefabricated shower base, the base-to-wall connection is critical. If the wall is made of plasterboard or cement board, it must be protected from water flowing from the tiles to the base. Silicone in the end joint helps, but it shouldn't be the only defense.
In practice, many problems start low, where the wall meets the shower zone. This point should be designed before tiles and cabinetry are put in.
Dry construction has limitations on tile weight and cladding system. Any large and heavy tile cannot be selected without checking the capabilities of the slab and frame. Each system has specifications for maximum panel weight, frame spacing and appropriate adhesive.
Cement board systems such as Aquapanel are advertised as suitable for tiles in demanding wet applications, but the ultimate strength depends on the whole system: slab, frame, screws, joints, primer, adhesive and tile. If the frame is insufficient or the glue wrong, the plate alone is not enough.
The tile adhesive must be suitable for the substrate and the waterproofing that has gone before. If a wet film or fleece film has been inserted, the adhesive must be compatible with it. Especially with large porcelain tiles, the demand for adhesion and coverage is higher.
The owner must ask if the tile he has chosen is suitable for the particular drywall. It's not just a matter of aesthetics. It's a matter of mechanical safety and traction.
Mistakes in dry construction are insidious, because the wall closes quickly and everything is clearly visible. The problem occurs later when moisture finds a joint, screw, opening or edge.
| Error | Possible consequence | Correct approach |
|---|---|---|
| Using green drywall as if it were waterproof | Core moisture and wear behind tiles | Full waterproofing system or choice of cement board in the shower area |
| Simple putty on the joints | Cracks and water ingress in slab joints | Compatible joint material and tapes |
| Screws without proper cover | Local moisture ingress or corrosion | Suitable screws and full coverage before insulation |
| Omission of primer | Poor adhesion of the waterproofing | Primer compatible with slab and sealant |
| Waterproofing only at the joints | Unprotected slab surface | Complete sealing of the entire shower zone |
| No cuffs on benefits | Water behind rosettes and pipes | Special pieces around each crossing |
| Recesses without full sealing | Moisture inside the wall | Sealing of back, sides, corners and shelf |
| Insufficient skeleton | Movements, cracks and detachment of tiles | Correct frame and reinforcements before the wall is closed |
The most common scenario is visually correct paving over incorrectly prepared drywall. The bathroom looks flawless in delivery, but moisture works slowly behind the surface.
The cost depends on the type of slab, the frame, the surface, the reinforcements, whether there are niches or built-in elements, the type of waterproofing, the area, the access, the floor, whether VAT is included and whether we are talking about materials only or full work.
Drywall is usually more economical than cement board or special wet room systems. But in the immediate zone of the shower, the lowest cost may not be the safest option. Cement board has a higher material cost and is often more labor intensive, but offers a more secure foundation for a wet zone.
In a typical bathroom of 5 sq.m. in the Greece of 2026, where a simple to medium renovation can indicatively move around €3,200–5,500 and more demanding solutions with a walk-in shower, linear siphon, dry construction, custom niches and a glass cabin can reach around €6,000–7,500 or more, choosing the right slab and waterproofing is a smaller part of the total cost but critical for endurance.
| Factor | How does it affect cost? |
|---|---|
| Plate type | Thin plasterboard cheaper, cement board more expensive but safer in showers |
| Skeleton and reinforcements | More stiffness and supports increase cost but reduce risk |
| Waterproofing | Diaphragms, tapes, cuffs and special parts add cost |
| Niches and details | More angles and cuts mean more work |
| Built-in batteries | They want precise support and sealing |
| Large tiles | They require better frame, glue and flatness |
A dry-build quote that is too cheap because it uses the wrong slab or omits waterproofing in the shower zone is not really economical. It's a technical risk.
A proper quote shouldn't just say “drywall in the bathroom” or “cement board and tile”. It must state what type of slab will be used, in what zone, with what frame, what screws, how the joints will be made, what primer will be put in, what waterproofing will be applied and how corners, outlets and recesses will be sealed.
For a shower area, it must be clear that the surface will be fully waterproofed before the tiles are installed. Tapes at joints and corners, cuffs around supplies, waterproofing application height and compatible tile adhesive must be specified.
If a manufacturer's system is used, it is best to follow it as a system and not mix materials randomly. If materials from different companies are used, there must be technical compatibility.
The quote must also itemize materials, labour, VAT, stripping, plumbing, tiling and final sealing. So the owner knows what he is comparing and what he is actually paying.
Before the drywall is closed and tiles are put in, the homeowner needs to ask some very specific questions. First, what tile will be used inside the shower zone? Is it damp plasterboard, cement board or special wet room board? Why is she chosen?
Then, how will the joints be made? Will there be a special movie? What material will be used? Will the screws be covered? Will a primer be applied? Will the entire surface be sealed or just the joints?
It should also ask what will be done around the battery, supplies and any built-ins. Will there be cuffs? Will the piping be checked before closing? If there is a niche, how will the inner corners and the shelf be sealed?
Finally, he should ask to see or photograph the stage of waterproofing before tiling. This is also very useful for future work, because it will show where there are pipes, joints and reinforcements.
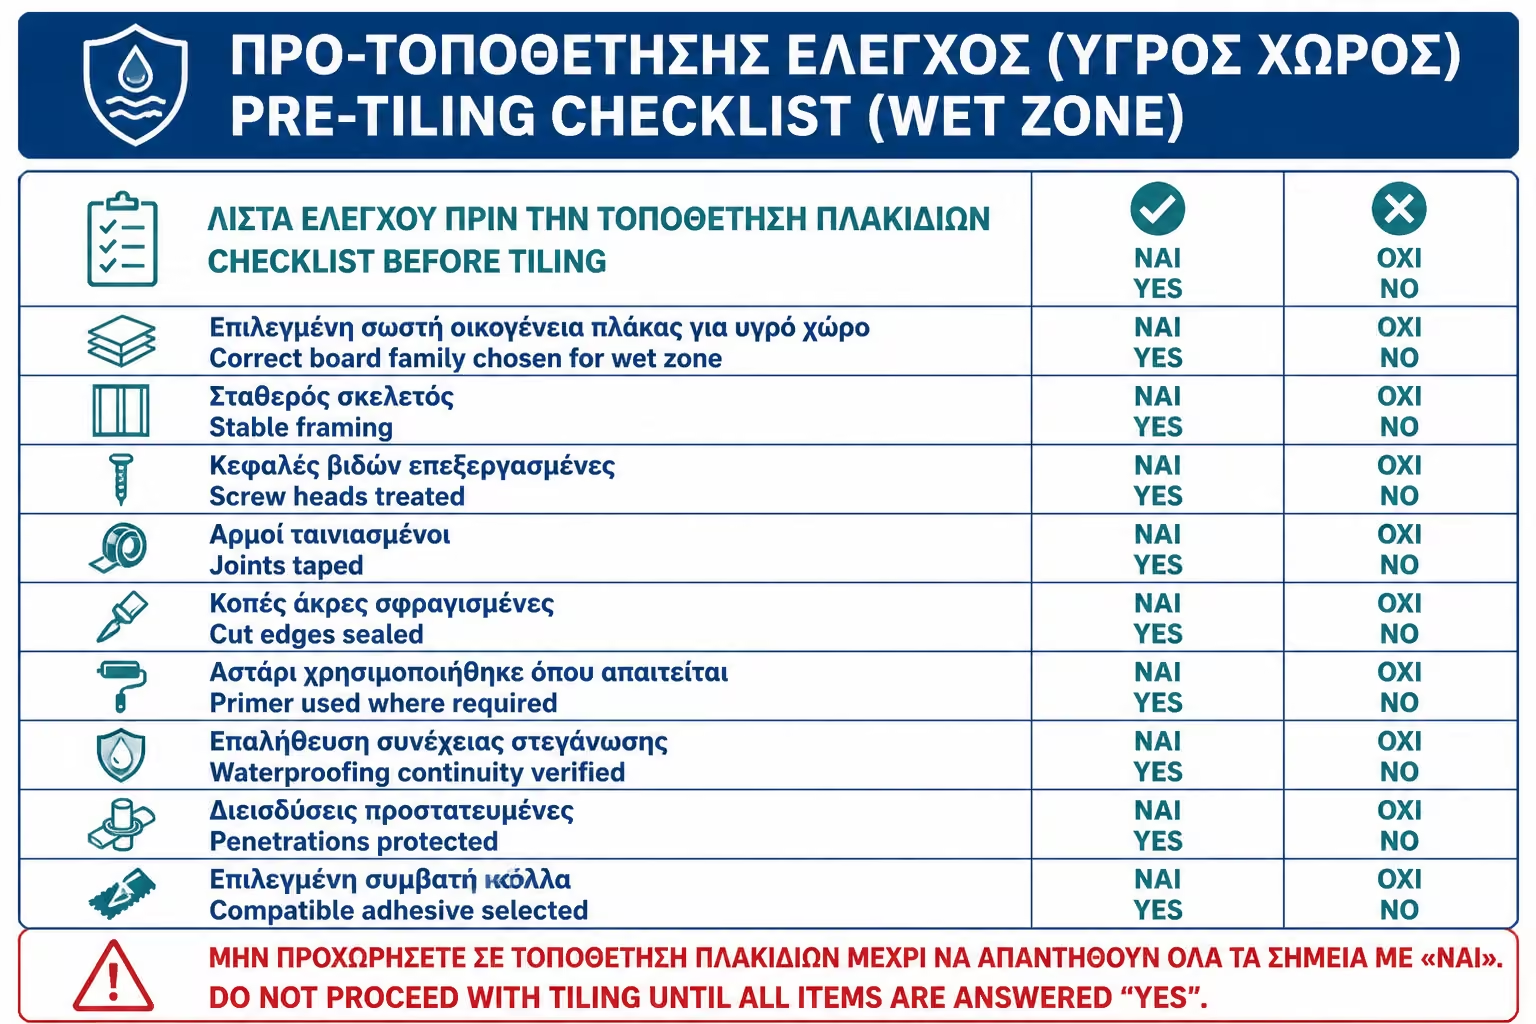
Before covering the drywall with tiles, it is worth doing a practical check. It is the last stage where mistakes are easily corrected.
| Inquiry | Yes / No |
|---|---|
| Is the plate in the shower zone suitable for direct wet zone? | Yes / No |
| If dry plasterboard is used, is full waterproofing provided? | Yes / No |
| Is the frame firm and not flexible? | Yes / No |
| Are there reinforcements where a cabin, handles or heavy parts will fit? | Yes / No |
| Are the board joints made with compatible material and tape? | Yes / No |
| Are the screws suitable and properly covered? | Yes / No |
| Has primer been applied where required? | Yes / No |
| Does the waterproofing cover the entire shower area and not just the joints? | Yes / No |
| Are there sealing strips in the corners? | Yes / No |
| Are there cuffs around supplies and piping? | Yes / No |
| If there is a niche, are all internal surfaces and corners sealed? | Yes / No |
| Has tile adhesive been checked for compatibility with waterproofing? | Yes / No |
| Has the drying time been observed before tiling? | Yes / No |
| Does the quote describe slabs, waterproofing, materials, labor and VAT? | Yes / No |
If enough answers are "I don't know", it's not time to put in tiles. It's time to ask for clarification, because then the problem will be hidden behind the final investment.
> If you have to keep one thing, keep it this: green plasterboard is not a waterproof shower solution by itself. In the immediate water zone, prefer concrete board or a special board for wet areas and ask for a complete waterproofing system: taped joints, covered screws, primer, spreadable or membrane, cuffs on the supplies and full protection of the corners. Do not let the tile and grout "protect" the drywall. The protection should already be there underneath.
Dry construction can provide excellent solutions in the bathroom, as long as it is treated with technical seriousness. Drywall, cement board and special wet room systems are not just interchangeable boards. They have different behavior, different strength and different sealing requirements.
In the immediate area of the shower, the fuse is located in the system. Correct slab, stable frame, suitable screws, correct joints, primer, full waterproofing, tapes, cuffs and compatible tile adhesive. If a link is missing, water can find its way behind the tiles and reach the inside of the wall.
The owner should avoid simple answers like "it's green, so it works" or "it's cement board, so it doesn't need anything else". The reality is more technical. Drywall needs protection. Cement board needs proper joints and waterproofing. Facilities and corners need special pieces. And all of this must be done before the tile goes in.
A properly sealed dry build can perform flawlessly for years. A sloppy dry construction inside the shower, however, can hide moisture inside the masonry, where the problem will show up slowly and be difficult to fix. In the bathroom, dry construction is only a good solution when it stays really dry on the inside.
Return to category.
Go to categoryReturn to the central guide.
Go to guide