
Bathroom Surface Materials & Finishes
Return to category.
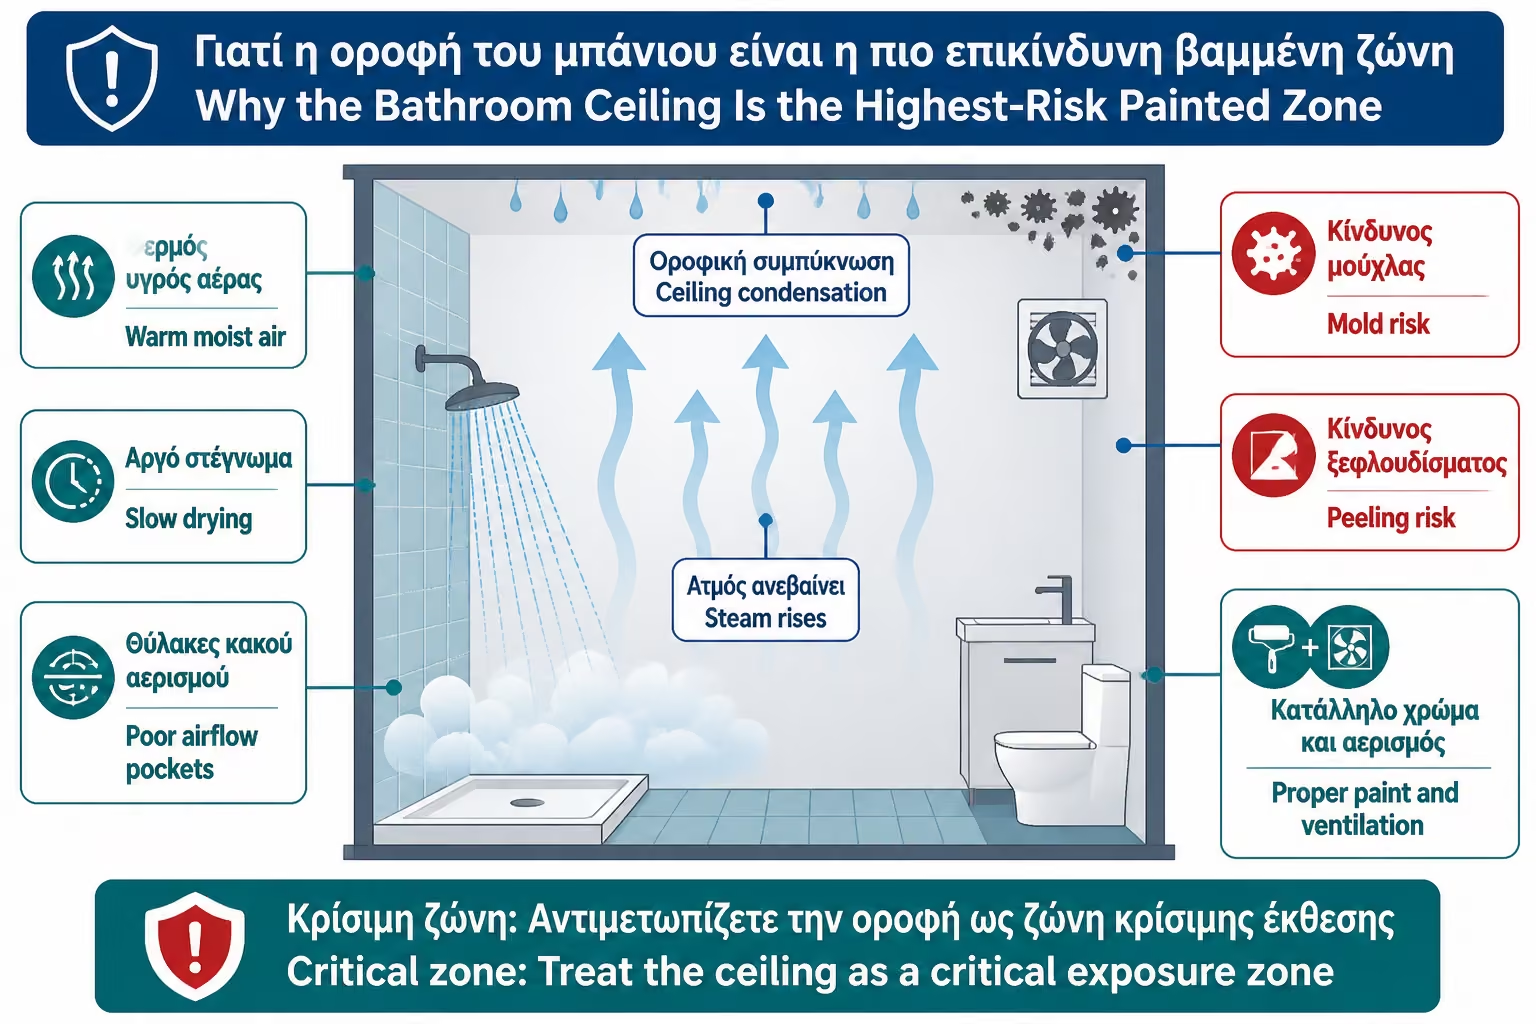
Go to categoryThe bathroom ceiling is one of the hardest spots for any color. It doesn't get stepped on, it doesn't rub like a floor, it doesn't take shocks. And yet, it's often the first spot to blacken, peel, or fill with small mold spots. The reason is simple: every hot shower sends water vapor upwards. There the water vapor meets a cooler surface, condenses into microdroplets and stays on the paint. If the room is not well ventilated, the ceiling and high corners remain damp for hours.
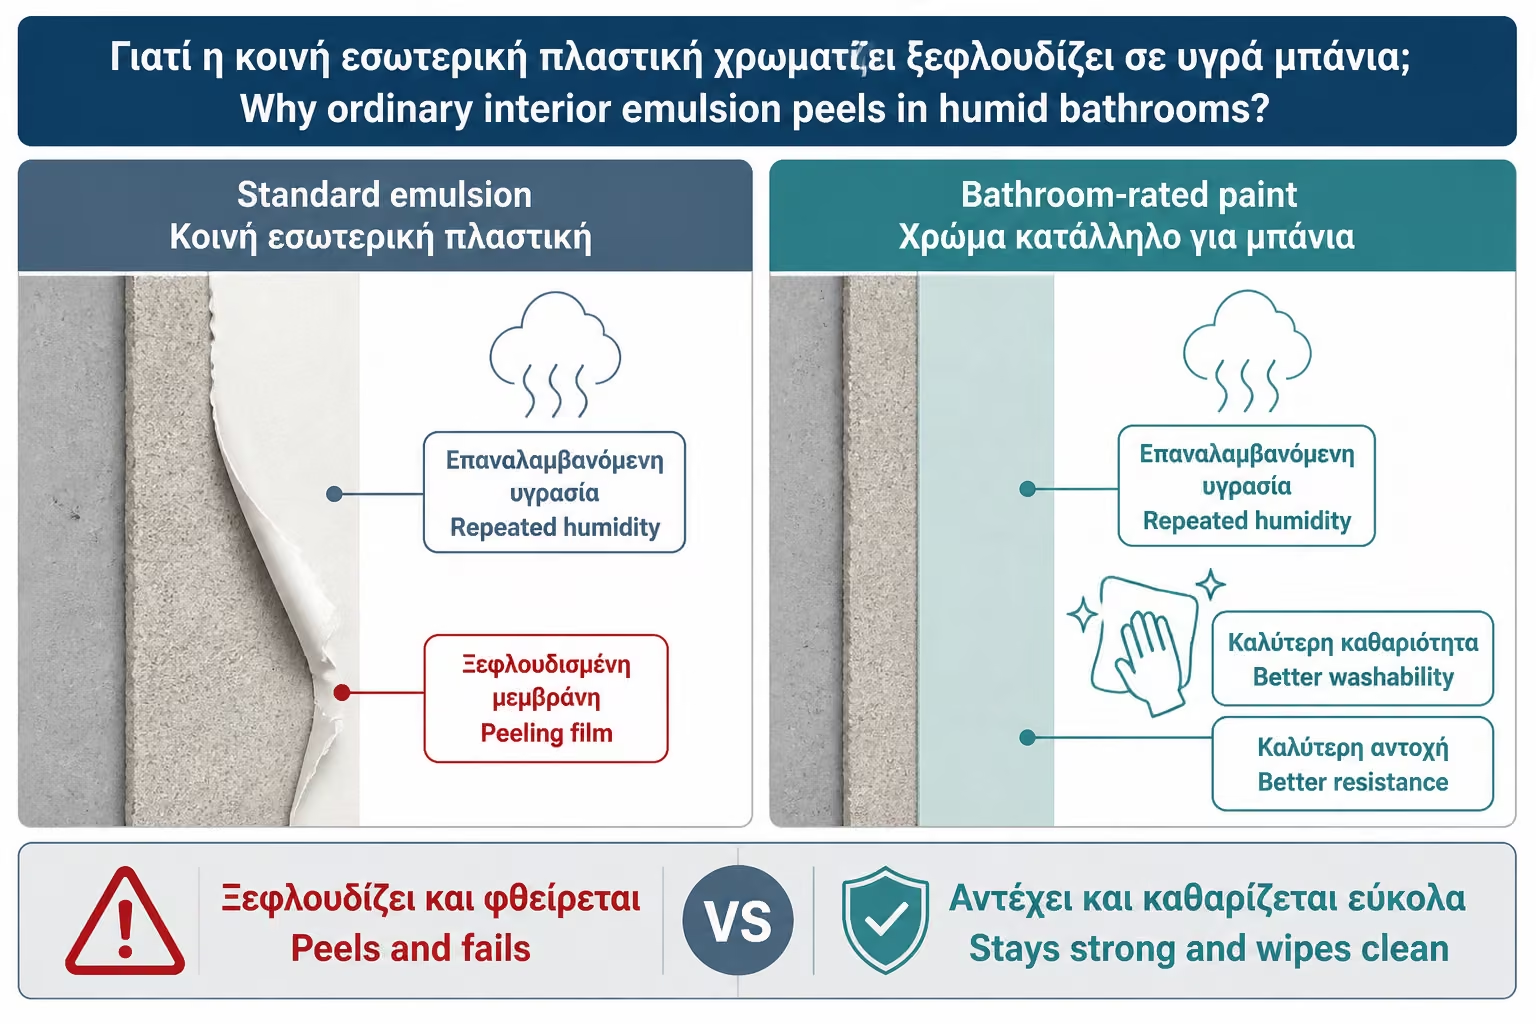
The classic mistake is to paint the bathroom with a simple interior plastic color, because "that's how we paint all the walls". In a bedroom or living room, this can work perfectly. In the bathroom, however, the paint needs to withstand humidity, water vapor, frequent cleaning and possible condensation. If the paint film absorbs moisture or lacks sufficient strength, it begins to swell, peel, turn yellow or allow mold to grow on its surface.
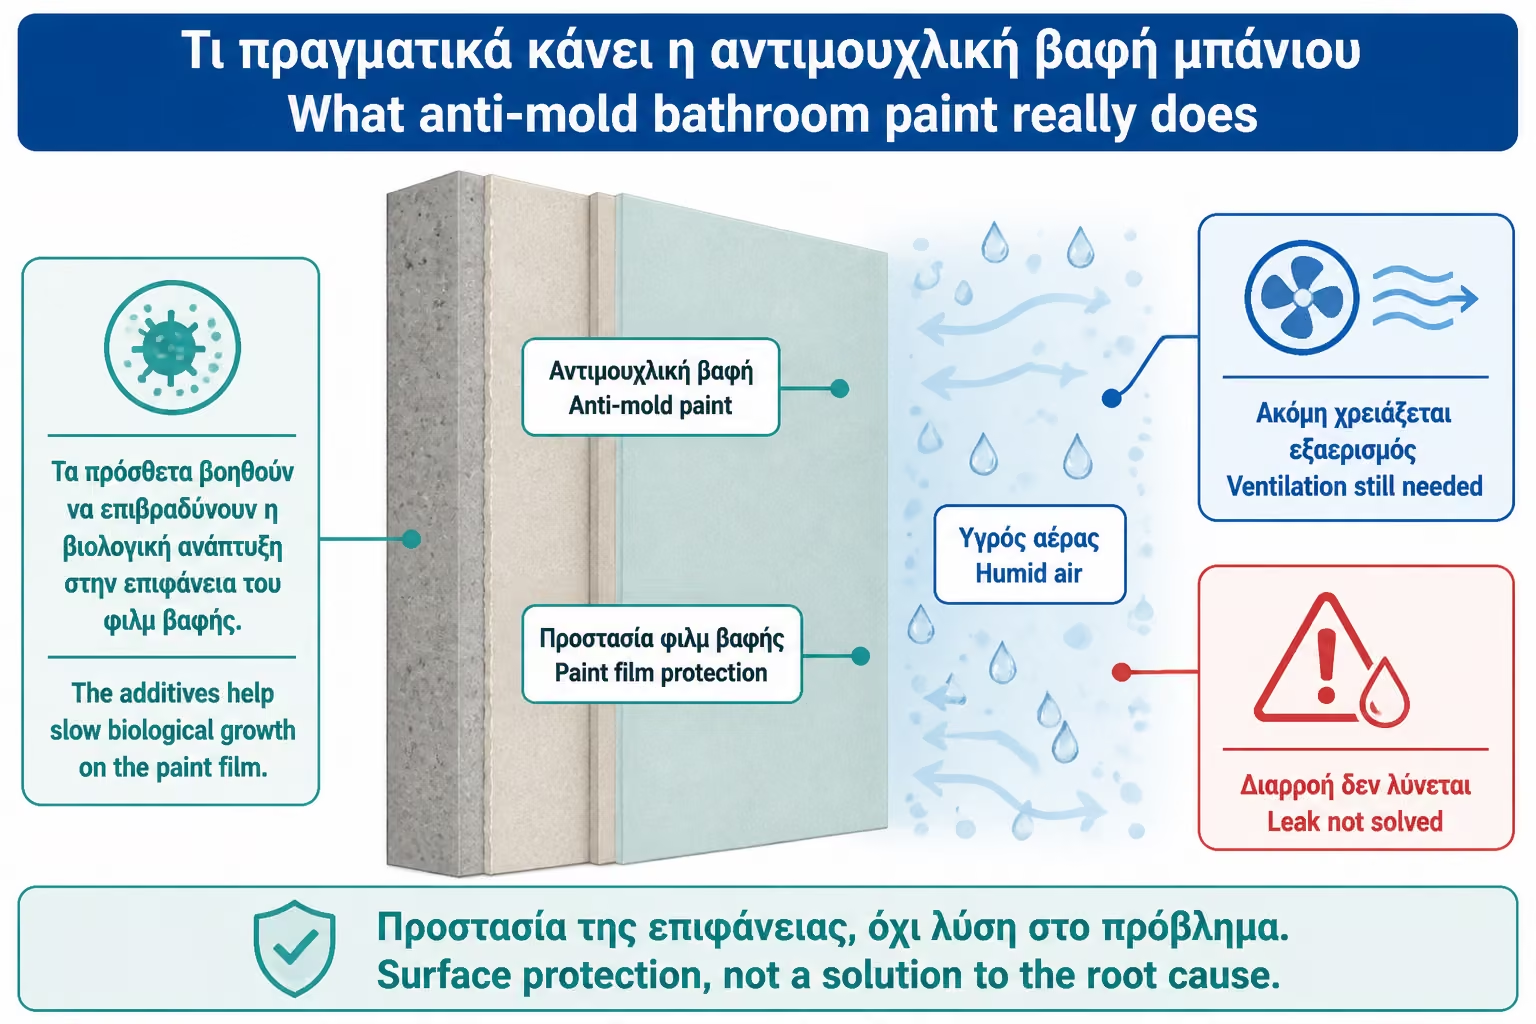
This is where anti-mould paints come in, i.e. special paints for areas with high humidity, such as bathrooms, kitchens, laundries, basements and rooms with frequent condensation. These products do not work because they "seal" the wall like a membrane. They work because they create a more durable film, better suited to a wet environment, and often contain biocidal/fungicidal additives that protect the paint itself from mold growth. Dulux, for example, describes Easycare Bathroom as a moisture and steam resistant paint, while the mold resistant technology protects the paint film from mold for five years.
But an important clarification is needed: anti-mold paint does not solve the cause of the mold. If the bathroom has no ventilation, if the ceiling stays cold, if there is a leak from above, or if condensation remains on the surface every day, even the best paint will be stressed. Zinsser says of Perma-White that the durable anti-mould film is designed to resist cracking, peeling and blistering for up to 7 years and to protect dry paint from fungal degradation, but this requires proper preparation, a clean surface and use according to the full technical system.
So the right goal is not "paint over the mold and it's over". The correct goal is: remove mold, find cause, improve ventilation and drying, repair swollen/peeling areas, apply proper primer where needed, and then apply bathroom paint. Only in this way does the anti-mould paint become a real protection and not a temporary camouflage.
Anti-mold paint is interior paint specially designed so that its dry film resists the growth of mold and fungi. It usually has more moisture resistance than a simple plastic, a better washable surface and additives that prevent or delay the growth of microorganisms on the painted surface.
Not all anti-mold paints are the same. Some are high strength acrylics, some are special bathroom paints with moisture and steam resistance, some are stain-blocking or renovation paints, and some have stronger anti-fungal protection for areas with persistent condensation. Benjamin Moore, for example, describes Aura Bath & Spa as a premium interior paint specially formulated for high humidity, with a mildew-resistant coating.
The word "anti-mold" should be read correctly. It usually means protecting the paint film from mold, not disinfecting a moldy wall or stopping moisture coming from construction.
Mold needs moisture, organic matter and time. In a bathroom, all these are easily present: steam, dust, soaps, cosmetics, dead cells, micro-pollutants and poor ventilation. Anti-mildew paint tries to make the surface less friendly to mold growth.
Fungicidal or biocidal additives are incorporated into the paint film and inhibit the growth of mold on it. They do not circulate in the air like a disinfectant and do not kill mold that is in the plaster. They work on the surface of the paint. Paint industry sources describe mold-resistant paints as products that contain biocides to inhibit the growth of fungi and bacteria on the paint surface.
With time, cleaning, moisture and stress, the protection diminishes. That is why companies often give time indications, such as 5 or 7 years, but these refer to normal conditions and correct application. In a bathroom without ventilation, the actual effect may be lower.
Many people think that if they apply anti-mold paint, the wall "closes" and moisture does not pass through. This is wrong. The paint is a top coat. It can be resistant to water vapor and washing, but it is not a substitute for waterproofing, plumbing repair or thermal insulation.
If there is a leak from a pipe, dampness from a roof, condensation due to a thermal bridge or swollen plaster behind, anti-mold paint does not solve the cause. It can delay the appearance of mold on the surface, but if moisture presses in underneath, the paint can blister and peel.
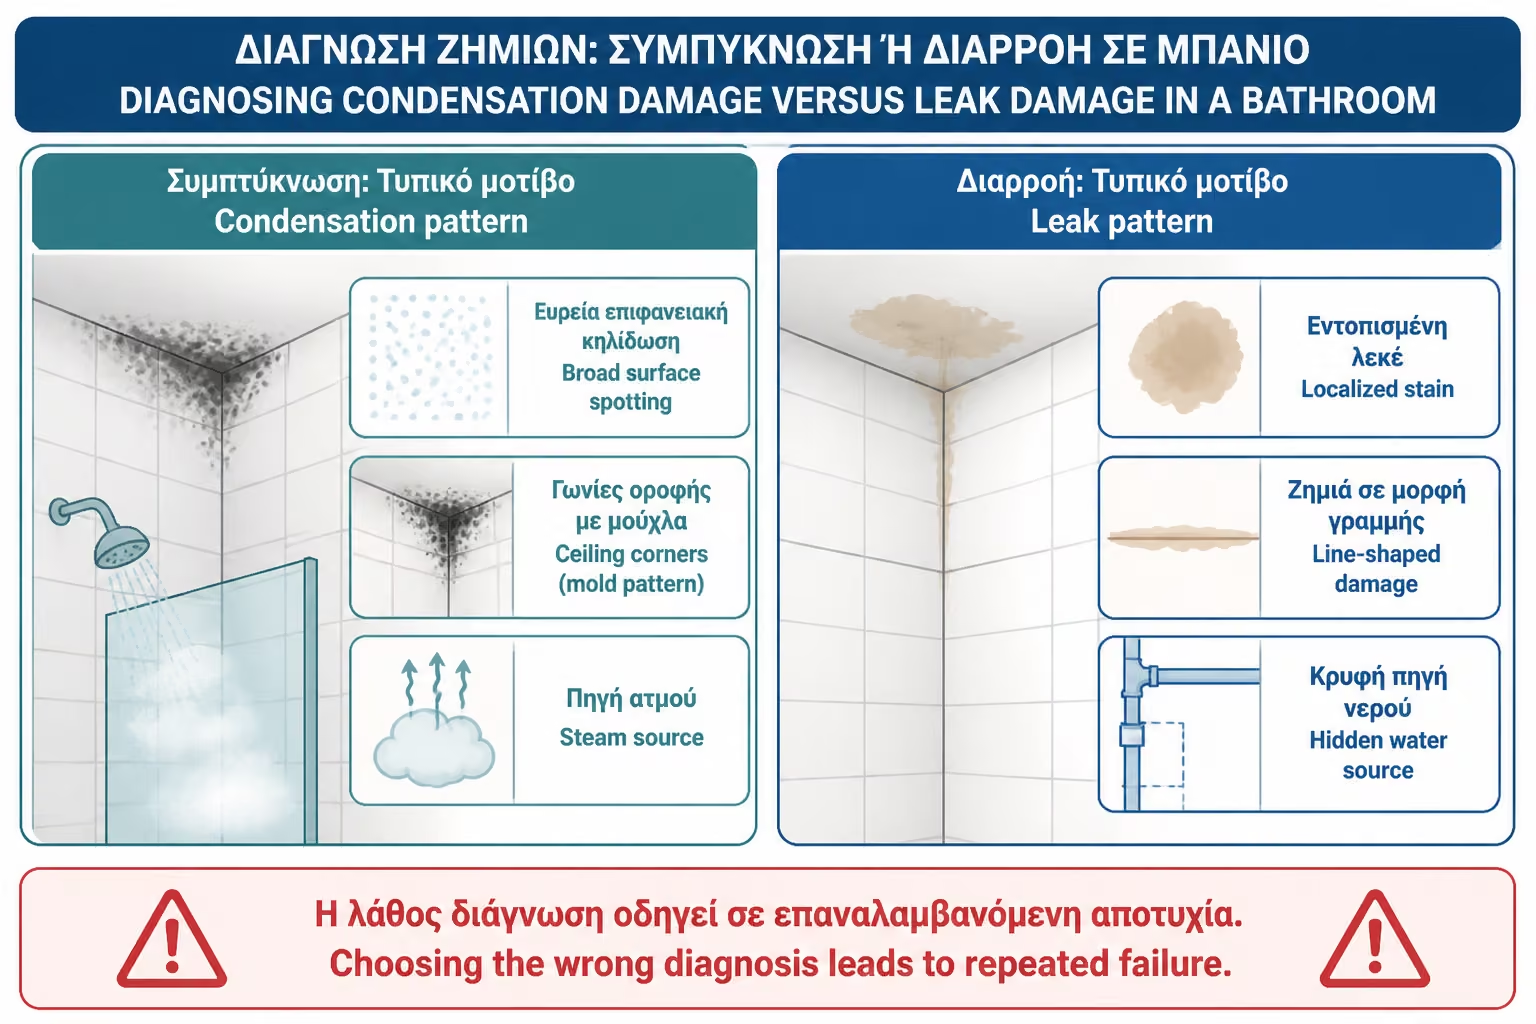
Correct diagnosis is critical. Another mold from condensation on bathroom ceiling. Other moisture from upper compartment leakage. Another peeling because we painted over old flimsy plastic. Paint should not be used to hide a problem that needs technical repair.
Simple plastic interior paint is not designed for constant moisture and vapors. If it is matte and of low strength, it can absorb moisture, soften its film, lose adhesion or allow mold to form on the surface. In a bathroom with a shower, this often happens on the ceiling and in the corners.
The problem is made worse when the previous surface was poorly prepared. If it was painted over dust, mold, salts, old peeling paint or moisture, the new coat will not adhere properly. With water vapor, it begins to swell. After a while, the paint peels off.
Also, plain plastic often doesn't wash well. When it collects soaps, dust and condensation, it is difficult to clean. If it rubs, it wears. A bathroom paint is usually more resistant to moisture, steam and cleaning, which is why it is more suitable.
The ceiling receives the most water vapor. If there is no good ventilation, it stays wet after every bath. The first spots of mold usually appear in corners, above the shower or around cold spots. There the surface temperature is lower and the condensation more intense.
For the ceiling we don't necessarily want glossy paint that will show every imperfection. But we want paint suitable for high humidity, washable, with anti-mold protection and a good film. Products like Benjamin Moore Aura Bath & Spa promote the idea that there can be a matte aesthetic specifically designed for high humidity environments, rather than always being limited to glossy surfaces.
In windowless Greek bathrooms, the ceiling should be treated as a technical surface, not just a decorative one. It needs proper cleaning, primer where needed and good anti-mold paint.
The bathroom walls have different zones. On tiles, next to a mirror or behind a sink, the paint mainly receives water vapor. Near a sink or bathtub it also accepts splashes. Over a shower or on a wall that gets wet often, the strain is much greater.
In zones with water vapor and mild splashes, a good anti-mould bathroom paint is the right choice. In direct water zones, paint should not be the primary protection. There, tile, panel systems, a wet-rated microcement build-up or another suitable finish is usually a better answer. Anti-mold paint can help on the ceiling and upper walls, but it is not a replacement for proper shower lining.
The spot that is often forgotten is behind furniture, mirrors and cupboards. If not ventilated, they create cold, enclosed zones where mold appears behind objects. Color helps, but air needs to circulate.
Traditionally, satin or semi-gloss colors were recommended for bathrooms, because they are more resistant to washing and moisture than classic mattes. The matte color hides imperfections, but in simple compositions it can absorb more and be more difficult to clean.
Today there are special matte paints for high quality bathrooms, but they must really be designed for high humidity. We don't take simple matte plastic and put it in the bathroom because it "looks pretty". If you choose matte, it should be a product that clearly states use in bathrooms/high humidity. Benjamin Moore says for Aura Bath & Spa that it is a matte finish especially for humid environments and provides a mildew-resistant coating.
For budget or formal solutions, a quality soft sheen, eggshell or satin bathroom paint is a safer choice, especially in family bathrooms with daily use.
It is applied when the surface is dry, clean and stable, after the existing mold has been treated. Do not apply directly to black spots, blown paint or wet plaster. If you paint over mold, it can hide it for a while, but the seeds and the cause remain.
It is applied after cleaning with a suitable anti-mold cleaner, removing loose paint, plastering where necessary, sanding and priming where there is a porous or uneven surface. If there are moisture stains, a stain-blocking primer may be needed before the final color.
It is also a good preventive choice in a new bathroom, especially on the ceiling and upper walls. There is no need for mold to appear first to use a correct bath color.
Mold should be removed, not covered. A suitable mold cleaner or fungicide solution is used according to the product instructions, with gloves, a mask and good ventilation. Let it act, clean, rinse where required and let the surface dry completely.
If the paint is swollen or peeling, it is removed until we find a stable base. We do not paint over peels. If the plaster is loose, it is repaired. If there are deep stains, a special stain primer may be needed before anti-mould paint.
Anti-mold paint acts as a protective final film. It is not a cleaner and it is not a substrate disinfectant.
A primer is needed when the surface is very absorbent, dusty, plastered, uneven or has old repairs. It is also needed when painting over stains, old glossy paint or a surface with questionable adhesion. The primer helps the final paint to grip evenly and not to "suck" differently at each point.
In an old bathroom, there are often patches: a bit of plaster, a bit of stucco, a bit of old plastic, a bit of peeling. If we apply a final color directly, we may have unevenness or future peeling. The primer consolidates absorption and improves adhesion.
Some anti-mould paints have very good adhesion and can be applied over old paints without a primer if the surface is stable. Zinsser says PermaWhite can be bonded to existing solvent-based or glossy paints and is ideal for flat paint, new drywall, cement block and concrete, but this does not negate the need for a clean, dry and stable surface.
Around the shower, the paint receives steam, splashes, hot water and cleaning agents. If the surface is not properly painted, moisture passes through the film, softens the old layer and starts peeling. It often starts from small imperfections, corners or places where the old paint has already lost its adhesion.
If there is plain plastic over old whitewash or bad old paint, the problem gets worse. The new layer sticks to a weak old layer. When she inflates, they all leave together. This is why the loose spots must be scraped down to a firm base.
In areas with direct water flow, the right solution is not just better paint. It's not to rely on paint as your primary liquid liner. The paint is for walls and ceilings, not for the inside shower where it needs to work like a tile.
Mold on the bathroom ceiling is often due to condensation. It appears in corners, above the shower, on cold surfaces, especially in winter. Usually there is no deep plaster swelling, but superficial black spots.
Leakage behaves differently. It can cause yellow/brown stains, swelling, spot-on peeling, moisture that won't dry, or marks that grow even without using the bathroom. If there is an overhead, pipe or roof leak, no anti-mold paint will solve the problem.
Before painting, observe when moisture appears. After a shower? Only in winter? Or constantly? The answer determines whether you mainly need ventilation or technical repair.
Anti-mold paint without venting is half the solution. If the area does not dry out, the mold will constantly press against the surface. A proper bathroom vent, ideally with a time delay or humidity sensor, can make a bigger difference than any paint.
After showering, the ventilation should be running enough to remove the moisture. The window, if present, must be opened. The door may be left ajar after use. Closed corners and places behind furniture must be ventilated.
The paint protects the surface. Ventilation reduces the moisture load. These two must work together.
If the bathroom has an external wall or ceiling under a roof without good thermal insulation, the surface can be very cold in winter. Water vapor condenses more easily there. Then the mold appears again and again, even if the color is good.
In such cases, anti-mold paint helps, but does not eliminate thermal bridging. It may be necessary to improve ventilation, thermal insulation, anti-condensation paint or technical study of the surface. Anti-condensation paints are in another category: they try to keep the surface a little warmer or reduce condensation, but even these have limits.
If mold only returns in a certain cold corner, don't immediately blame the paint. Maybe the problem is thermal.
| Criterion | Simple plastic color | Anti-mold / bathroom paint |
|---|---|---|
| Water vapor resistance | Limited | Designed for higher humidity |
| Mold resistance on the film | Little or no special protection | Contains anti-mold technology/additives |
| Washing/cleaning | Depending on the quality, often mediocre | Usually more washable/durable |
| Exfoliation in a bath | More likely | Less risk if done right |
| Suitable for bathroom ceiling | Not ideal | Yes, if it is for high humidity |
| Cost | Lower | Taller but more appropriate |
| Leak solution | No | No |
| Solution for poor ventilation | No | It helps, but it's not enough |
Plain plastic may seem economical, but if it peels off in a few months, it becomes more expensive.
| Bathing point | Recommended option | Comment |
|---|---|---|
| Ceiling over shower | Anti-mold bathroom paint of high resistance | Attention to ventilation and condensation |
| Ceiling WC without shower | Good washable paint or anti-mildew | Less moisture, but preventively worth it |
| Wall over tiles | Bathroom paint / moisture resistant | Ideal use |
| Wall with sink splashes | Washable anti-mildew satin/eggshell | Better cleanliness |
| Shower interior | Not a simple color | He wants a tile/panel/wet system |
| Wall with active leakage | No paint before repair | First cause solution |
| Old mold in corners | Cleaning + primer where necessary + anti-mould | No painting over the mold |
The choice of color should follow the use of the surface, not just the color we want aesthetically.
First we empty the space as much as possible and protect sanitary ware, tiles, mirrors and batteries. Then we clean the surface of dust, soaps, fats and salts. If mold is present, use a suitable mold remover and allow to dry completely.
Then we scrape all loose and peeling paint down to a solid base. We putty cracks and imperfections with material suitable for wet areas. Sand lightly, remove dust and apply primer where necessary. For moisture stains we use a suitable stain-blocking primer, not a simple primer.
After the primer has dried, we apply two coats of anti-mold paint, observing the times between the coats. We don't do a thick layer to finish quickly. Then let the paint cure before exposing it to strong steam or cleaning.
Duration depends on color quality, ventilation, use, condensation and cleaning. In a well-ventilated bathroom, a good anti-mold paint can last for years. In a bathroom without a window, with daily hot showers and poor ventilation, mold can return more quickly.
Companies often quote protection for a certain period of time, such as 5 years for Dulux Easycare Bathroom or up to 7 years of cracking/peeling/blistering resistance for Zinsser PermaWhite, but these indications do not mean a guarantee in every bad use condition.
Practically, if you see that the water condenses every day and stays for a while, the first "maintenance" is not a new coat of paint. It is better ventilation.
In the Greek market of 2026, anti-mold paint costs more than a simple plastic, but the difference is small compared to the cost of repainting, scraping, stuccoing and suffering if the simple paint peels off. For a typical bathroom, the amount required is not large, so it is not worth skimping on the final color.
Costs go up if mold cleaning, old paint scraping, stain priming, plaster repairs or ventilation improvements are needed. If there is active damp from a leak, painting should not be priced until the cause is resolved.
A proper quote should include not only "bathroom painting" but also mold cleaning, removal of loose material, priming where needed and the use of anti-mould paint suitable for wet areas.
The first mistake is painting over mold. Mold returns and often more quickly.
The second mistake is the use of simple plastic paint on the ceiling of a bathroom with a shower.
The third mistake is the omission of a primer on a loose, stuccoed or stained surface.
The fourth mistake is not solving the ventilation. If the area does not dry out, the problem will return.
The fifth mistake is painting before the surface is completely dry.
The sixth mistake is to think that anti-mold paint replaces tile or waterproofing in zones of direct water.
| Inquiry | Yes / No |
|---|---|
| Has the mold been completely cleaned before painting? | Yes / No |
| Has the moisture been identified as condensation or leakage? | Yes / No |
| Is the surface dry deep down? | Yes / No |
| Have all the peeling spots been scraped off? | Yes / No |
| Has a primer been used where there are stains or loose surfaces? | Yes / No |
| Does the color say bathroom/high humidity use? | Yes / No |
| Is there adequate ventilation in the bathroom? | Yes / No |
| Isn't a point of direct water flow painted as if it were a simple wall? | Yes / No |
| Will drying times be met between coats? | Yes / No |
| Will heavy steam be avoided until the paint cures? | Yes / No |
If most of the answers are yes, the anti-mold paint has a much better chance of working as it should.
> Anti-mold paint is not a cure for poor ventilation or leakage. It is the last layer of protection on a properly prepared surface. First we clean the mold, scrape off any flaking, dry well, prime where necessary and then paint with a bathroom product. If the ceiling turns black every winter, we are looking at ventilation and condensation. If it swells at a certain point, we are looking for a leak. The right color helps a lot, but only when we're not asking it to solve a manufacturing problem.
Mold-resistant paints are the right choice for bathroom ceilings and walls that are exposed to water vapor, condensation and frequent cleaning. They work by creating a more durable film and often incorporating fungicide/biocide additives that reduce mold growth on the paint surface. They are clearly more suitable than simple plastic paint in areas with high humidity.
But it is not a magic solution. They do not seal leaks, do not kill mold under plaster, do not replace ventilation and should not be applied over dirty or damp surfaces. If the bathroom does not dry, the mold will constantly try to return. If there is moisture from construction, the paint will peel, no matter how good it is.
The correct sequence is diagnosis, cleaning, drying, repair, primer and then anti-mould paint. If done this way, the bathroom ceiling and walls can stay clean and durable for many years. If we just brush a hand over the problem, we'll see it again — usually very soon.
Return to category.
Go to categoryReturn to the central guide.
Go to guide