
Bathroom Surface Materials & Finishes
Return to category.
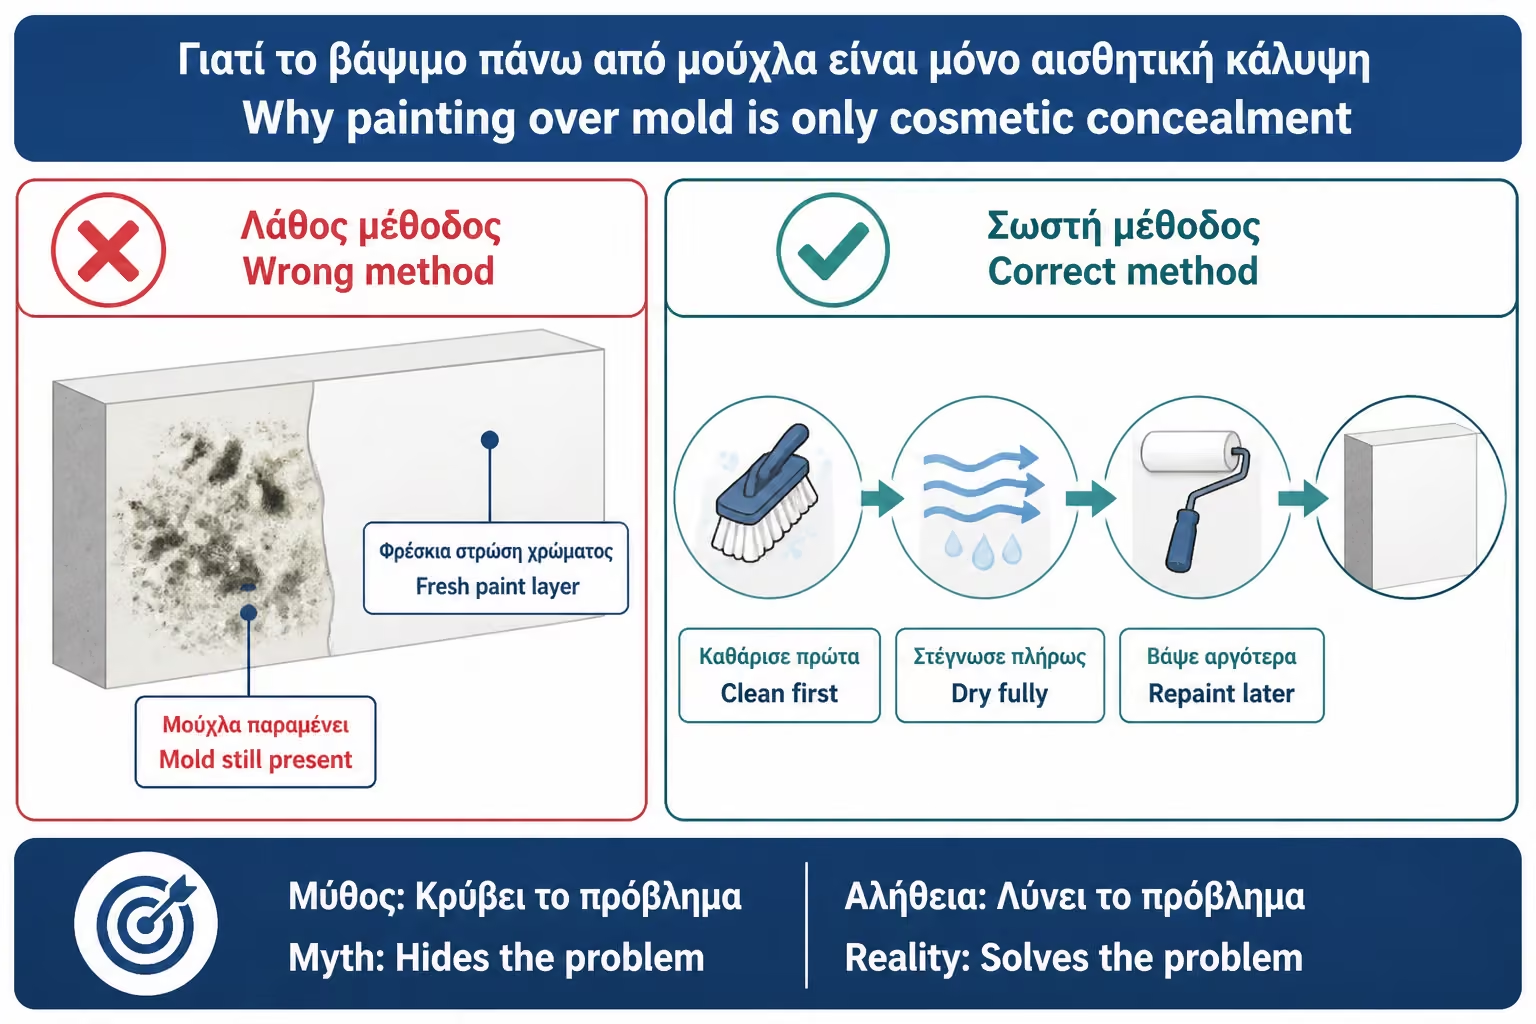
Go to categoryThe most common mistake in painting a bathroom isn't the wrong shade, or the wrong roller, or someone using one coat instead of two. It's that he paints over existing mold. The mold may have been visually covered for a few weeks, but it's not gone. It remains on the surface, in the pores of the old paint, in microcracks of the plaster or behind peeling layers. Once it regains moisture, it begins to appear again — this time under the new color.
The instruction is clear: we do not paint or seal moldy surfaces. The EPA states it directly: we should not paint or caulk over moldy surfaces; first clean the mold and dry the surface, because paint on mold is likely to peel. This is not just aesthetic advice. It is a basic rule of preparation.
Mold is not "stain" in the simple sense. It is biological growth. It may look like a black, gray, green or brown mark, but behind it is moisture, spores and organic material. If we simply paint over it, we remove neither the cause nor the microorganism. At best, we hide him temporarily. At worst, we trap moisture and dirt under a new coat of paint, which will later blister, crack or peel.
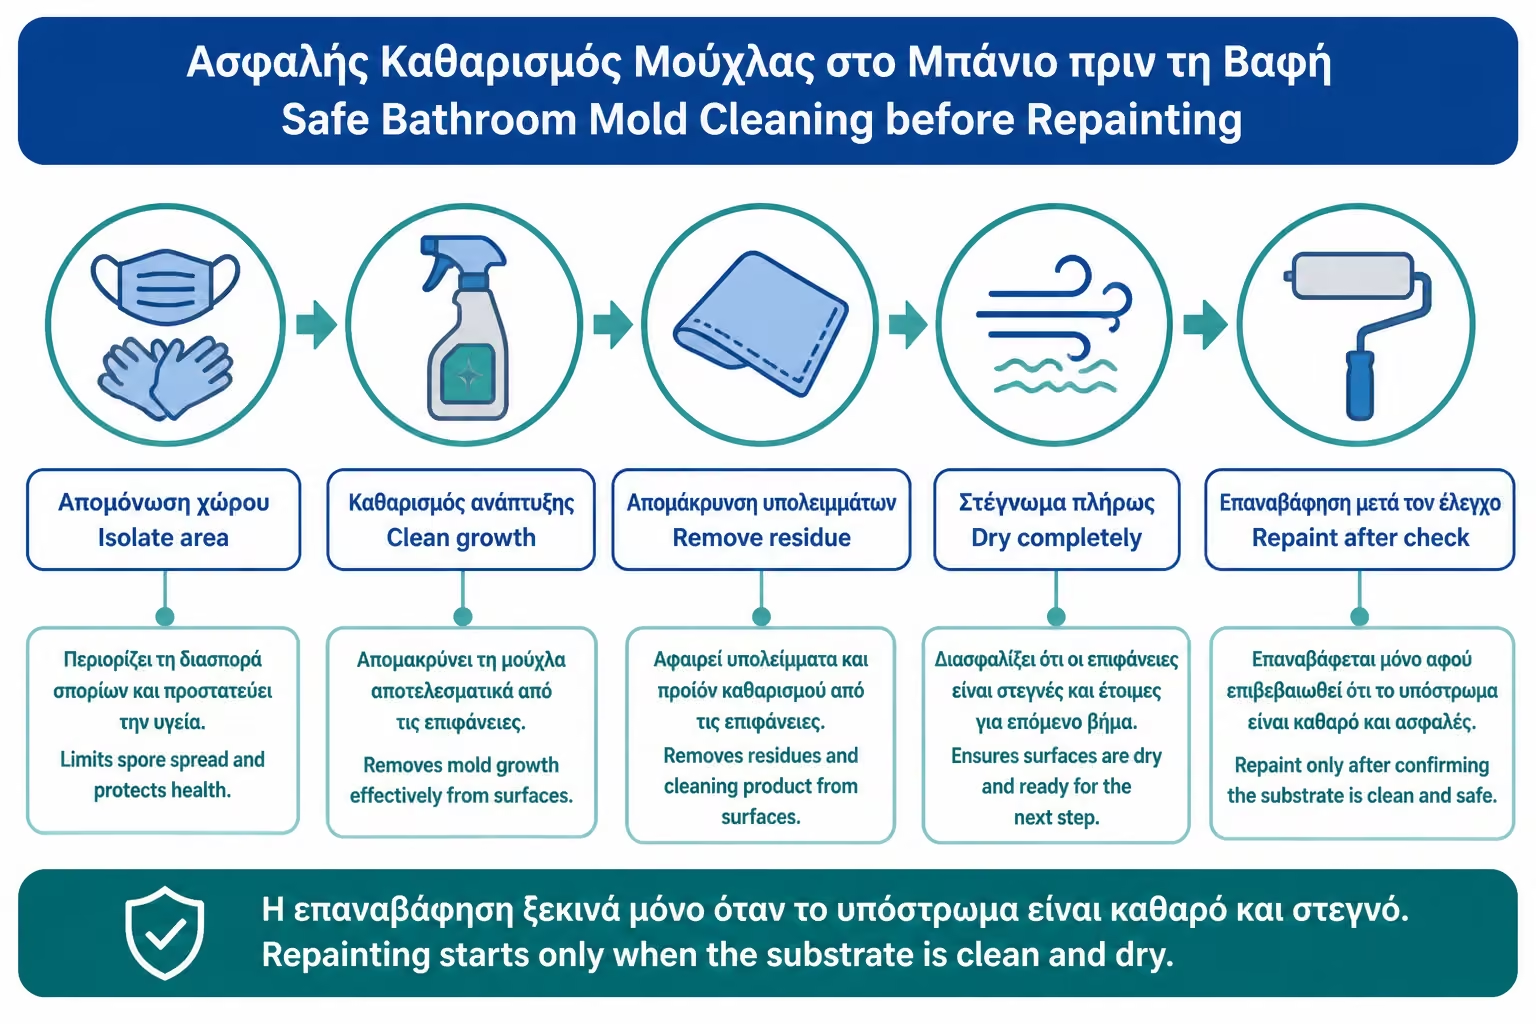
That's why the correct order is always the same: moisture diagnosis, mold cleaning, drying, substrate repair, primer where necessary and then anti-mold or bathroom paint. Not the other way around. Anti-mould paint is a preventive final protection. It is not a mold cleaner and does not replace a fungicide treatment.
Care should also be taken with the word "sterilization". In practice, in a home we cannot and do not need to sterilize in the strict medical sense. EPA notes that in most cases it is not possible or desirable to completely sterilize a space; a background of mold spores will remain but will not grow if the moisture problem is solved. So the goal is not "zero spores". The goal is to remove visible mold, inert/clean the surface as much as the material allows, allow it to dry completely, and stop the cause of the moisture.
When you paint over mold, you create a cosmetic cover over an active problem. Paint can hide black spots for a while, but moisture remains and mold can continue to grow under the film. Later you will see shadows, swelling, peeling or new spots coming through the paint.
The second problem is traction. The paint must adhere to a clean, stable surface. Mold, dust, salts and organic residues are a weak layer. If you paint over them, the paint sticks to the problem, not the wall. That's why it peels off quickly. The EPA sums it up practically: paint on a moldy surface is likely to peel.
The third problem is that you miss the opportunity to diagnose. Mold appeared for a reason: condensation, poor ventilation, a cold surface, a leak, moisture from the roof, a plumbing problem, or old faded paint. If you paint it, you hide the symptom and delay the repair.
Before you clean, you need to understand what you see. Mold usually has spots or small specks, it appears in damp corners, behind furniture, above the shower, around windows, on ceilings and on cold surfaces. It can smell damp or "cloaked". If you wipe it lightly, it can leave a dark residue.
A simple moisture stain from an old occurrence may be yellowish or brown, without surface growth. Salts may appear white or crystalline. Smoke or dust may blacken corners but is not related to mold. However, in a damp bathroom, black spots should be treated as possible mold until properly cleaned.
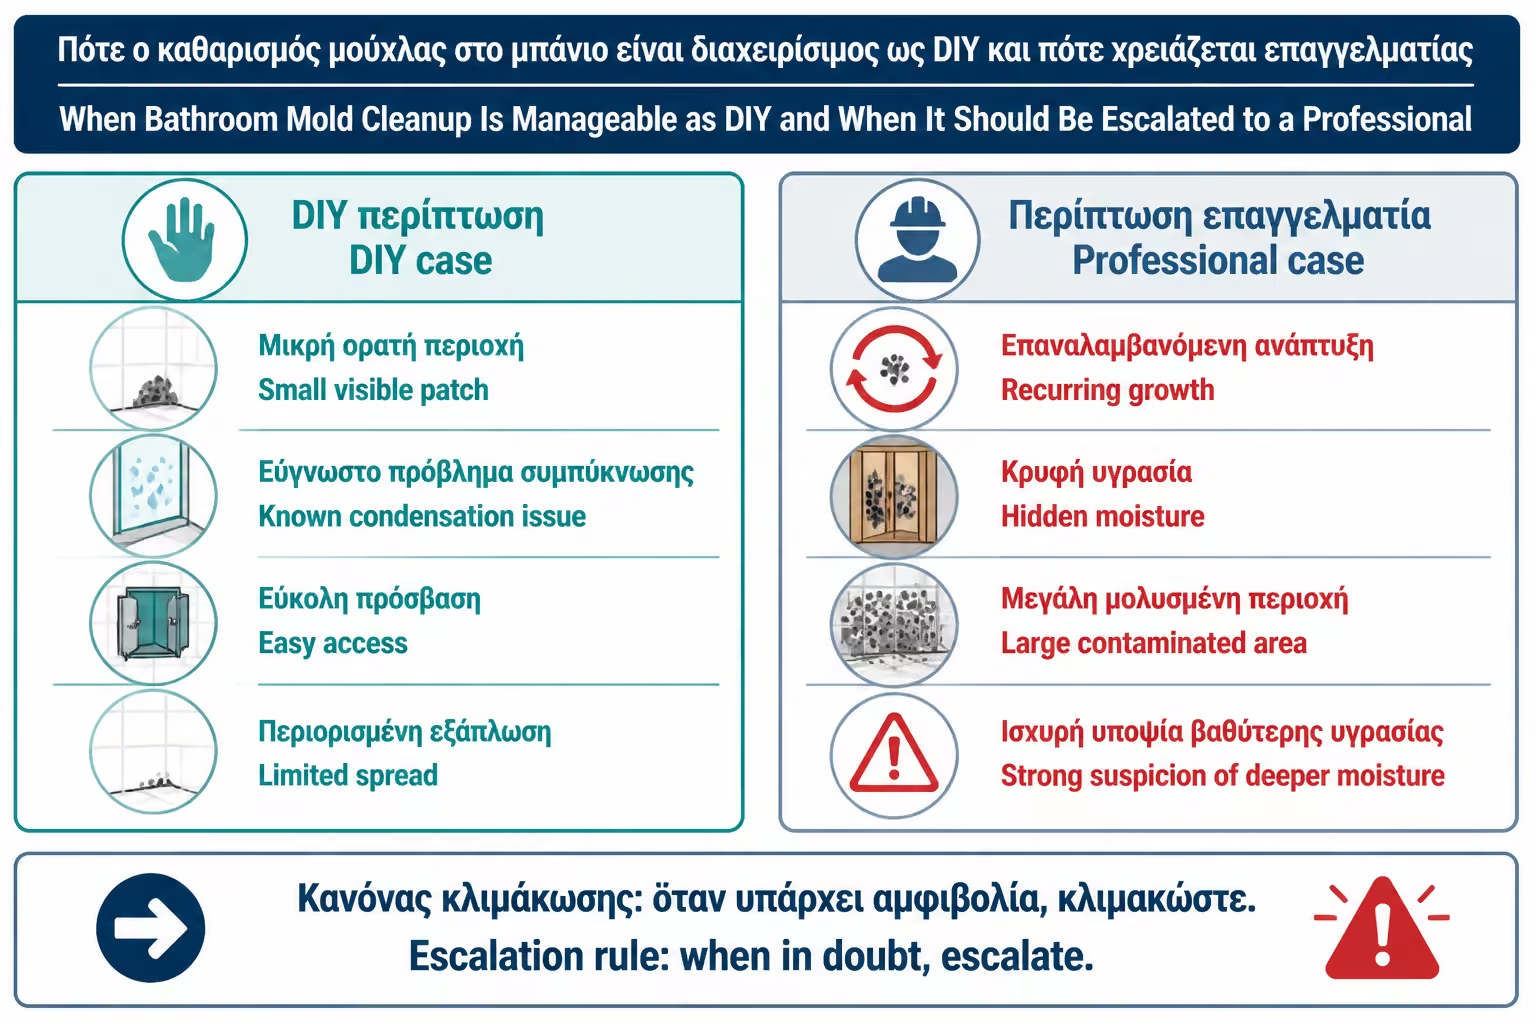
If the surface is large, if there is a strong smell, if the paint is bubbling, if the plaster is soft or if the mold returns a few days after cleaning, we are not talking about just a surface problem. A moisture diagnosis is needed.
Small surface mold spots on a ceiling or bathroom corner can often be cleaned DIY, with proper protective measures and good ventilation. However, if the mold covers a large area, if it has gotten into drywall, if there is a strong odor, if there is a leak, or if someone in the home has respiratory problems/allergies, it is safer to get a professional assessment.
The CDC gives general mold cleanup guidelines and emphasizes that what needs to be done depends on the extent of the water damage and where the mold is growing. In porous materials such as drywall, insulation, or loose plaster, the mold can be inside the material, not just on the surface. Simple spraying is not always enough there.
In bathrooms with black spots on the ceiling from condensation, DIY cleaning is often possible. In bathrooms with dampness above, swollen plaster or leaks, painting has to wait.
Mold needs moisture. If you don't get rid of the dampness, mold will return, even after a good cleaning and expensive anti-mold paint. In the bathroom, the most common cause is condensation: hot shower, cold ceiling, insufficient ventilation. Another common cause is bad silicone around tub/shower or joints that hold water.
More serious causes are a leak from a pipe, damp from the roof, a problem in the upper compartment, poor waterproofing or blown plaster behind. If there are yellowish stains, swelling, peeling in a certain place or moisture that is not related to the use of the shower, we suspect a leak.
Don't start painting before you answer: where did the moisture come from? If the answer is "I don't know", painting is a risk.
Before cleaning mold, wear gloves, goggles and a mask suitable for dust/spores, especially if you will be scrubbing. Open a window or use ventilation. Remove towels, mats, cosmetics and items that can be contaminated or soiled. Cover sanitary ware and floor.
If you use chemical cleaners, read the label. The CDC emphasizes that bleach should never be mixed with ammonia or other cleaners, and that windows or doors should be opened for fresh air when cleaners are used. The EPA gives the same critical warning: don't mix bleach with cleaners that contain ammonia, because toxic fumes can be produced.
Do not make "cleansing cocktails". One product at a time, as directed.
Fungicides or anti-mould liquids are cleaning/treatment products designed to kill or remove mold, fungus and algae from surfaces prior to painting. They can be sprays, concentrated liquids or ready-to-use products. Some are based on chloride ingredients, some with biocides, some with different chemistry.
For example, Zinsser Mold Killer & Remover is described as a water-based trigger spray for indoor use, ideal for bathrooms, kitchens and high humidity areas, and is intended to remove mold prior to decorating/painting. Products of this type are useful when we want to clean surface mold from a painted wall, plaster, tile or other surfaces, always according to the label.
They are not used to "rescue" flimsy plasterboard or deeply moldy plaster. If the material has deteriorated, it may need to be removed and replaced.
Bleach is often used to clean mold on non-porous or hard surfaces. It can remove stains and kill surface microorganisms. But it is not always the best solution on porous surfaces, and certainly should not be used indiscriminately or mixed with other products.
The CDC states that if bleach is used, it should not exceed 1 cup of bleach to 1 gallon of water, and reiterates that it should never be mixed with ammonia or another cleaner. The EPA also notes that if you choose disinfectants or biocides, you should ventilate the area and exhaust the air to the outside where possible.
On a painted bathroom ceiling, a special mold remover is often preferred over homemade strong bleach, because it is a more controlled product and has instructions for surfaces before painting.
Start with a dry visual inspection. If the paint is peeling, first remove the loose pieces carefully, without spreading dust. If the mold is superficial on top of solid paint, spray or apply the fungicide product as directed.
Allow the product to act as long as the manufacturer specifies. Don't wipe it off right away if the instruction says contact time. Then clean with a sponge or cloth. A soft brush may be needed in difficult areas. Avoid vigorous dry scrubbing that disperses spores into the air. If rinsing is required, rinse with clean water and wipe dry.
Allow the surface to dry completely. This can take longer than it looks, especially on a bathroom ceiling or old plaster. If there is moisture in the material, painting should not be started.
In commerce and in everyday language we often say "sterilization" or "disinfection" of the wall. Technically, in a residential bathroom, the goal is to clean and inactivate surface mold, not complete sterilization. EPA makes it clear that it is not possible or desirable to completely sterilize an area in most cases; spores will remain but will not grow if the moisture problem is solved.
This is of practical importance. We don't need to overuse chemicals until there is "nothing". It needs proper cleaning, removal of visible mold, drying and control of the cause of moisture. Excessive use of cleaners can damage surfaces, leave residue or create inhalation hazards.
The best anti-mold strategy is not more chemical. It is less moisture.
If the mold is on solid paint, clean with fungicidal liquid and gentle mechanical action. But if the paint has swelled, peeled or softened, it must be removed until a stable base is found. There's no point in using cleanser on peels that will go away with the first scrub.
If the underlying plaster is hard and dry, it can be plastered/primed after cleaning. If the plaster is soft, crumbly, crumbling, or has a strong odor, deeper moisture is present. It needs repair, not simple painting.
Beware of dry scrubbing moldy surfaces. It can spread spores. First an appropriate product/wet process is applied, then loose materials are removed with protection and cleaning.
The surface should be thoroughly dry, not just dry to the touch. In a bathroom without good ventilation, the ceiling may appear dry but retain moisture. If you paint too soon, moisture is trapped and the new paint can blister.
After cleaning, allow the area to be well ventilated. Use a fan, open window or dehumidifier if needed. Do not take a hot shower in the area before painting. If the wall was heavily damp, wait longer and check again.
In doubtful cases, a technician can use a hygrometer. Especially on spill stains or blown plaster, drying time can be days or even weeks after the cause is repaired.
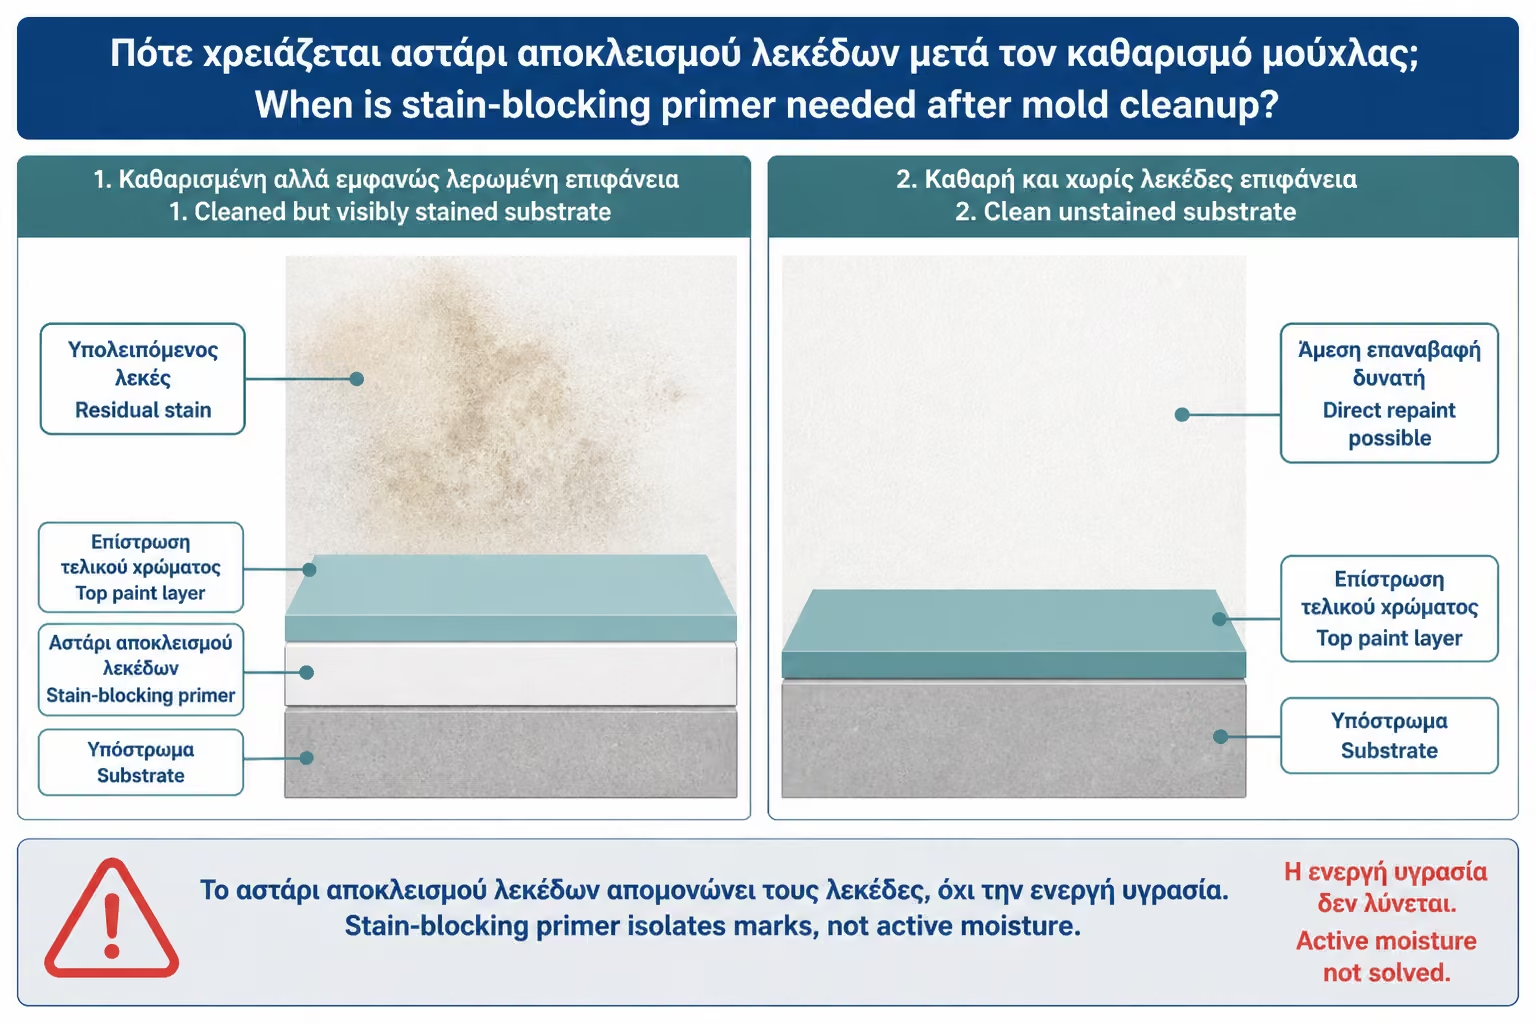
After the mold is cleaned, stains may remain. These stains are not necessarily active mold, but they can "come through" the finished paint, especially if they are dark or if the wall has old dampness. Stain-blocking primer may be needed there.
Anti-mildew paint is not always a good stain blocker. It may have anti-fungal protection, but won't close tough stains. If there are brown/yellow stains from old leakage, black shadows that have been cleaned but remain, or unevenness from old peeling, a special stain primer before the final color gives a cleaner result.
After the primer, anti-mould or bathroom paint is applied, not simple low strength plastic.
There are primers with anti-microbial/anti-mold properties and there are finishing paints for the bathroom. It's not always the same. A mold-killing primer can be used in some cases over cleaned/residual stains, according to the product's instructions, while a bathroom paint protects the finished film from future mold growth.
Caution: even products advertised as mold-killing primers should not be used as an excuse to ignore moisture. KILZ, in a guide to mold & mildew primer, states that painting directly onto mold is not recommended and that priming uncleaned mold doesn't just magically kill it; the surface must be properly cleaned first.
In practice, for a mold bath: cleaning/fungicide, drying, repair, primer where necessary, final anti-mold paint.
If the paint is bubbling and there is a black surface underneath, mold may have grown under the paint. This happens when moisture is trapped under old coatings or when it was previously painted over mold. In this case, surface spraying is not enough.
The swollen layers must be removed until a stable surface. After cleaning, drying and evaluation of the substrate. If the material underneath is loose, it is removed and repaired. If it's drywall and it's moldy deep down, a section may need to be replaced.
"Closing" with new paint over an old blown layer is a guaranteed failure.
Do not paint over black spots. Don't spray a little cleaner and paint after 10 minutes. Do not mix bleach with ammonia, toilet cleaners, de-salters or other products. Do not rub dry mold without a mask and ventilation. Do not use plain plastic paint on a bathroom ceiling with a history of mold.
Don't ignore the cause. If the mold always appears in the same place, there is a reason. If you clean and paint every year, the problem is not the color. Is it the humidity, the ventilation or the surface.
Don't think mold is "dead" because it's discolored. Some products whiten the stain quickly, but the proper process requires cleaning, action time, residue removal, and drying.
| Case | Correct handling | When do we paint? |
|---|---|---|
| Small black spots on ceiling | Fungicide cleaner, drying, ventilation control | When completely dry |
| Mold in a corner with condensation | Clean + improve ventilation/thermal behavior | After drying and stabilization |
| Bloated paint with mold underneath | Removal of loose layers, cleaning, repair | After a stable base |
| Brown stain from spill | Leak detection/repair, drying, stain-blocking primer | Only after the cause is resolved |
| Mold on drywall in depth | Possible part replacement | After technical restoration |
| Recurring mold every winter | Condensation control, ventilation, maybe thermal insulation | After the humidity is reduced |
| Mold behind furniture/mirror | Cleaning, ventilation behind object | After drying |
The table shows that paint is the last step, not the first.
| Product | Role | What doesn't it do? |
|---|---|---|
| Fungicidal cleaner / mold remover | Cleans and inactivates surface mold | Does not repair moisture from behind |
| Chlorine in proper dilution | Can clean surfaces, with care | Never mix with other cleaners |
| Stain-blocking primer | Seals stains after cleaning | It does not kill active mold by itself |
| Anti-mold primer | Helps in special substrate cases | It does not replace cleaning and drying |
| Anti-mould final paint | Protects new paint in a wet environment | It does not solve a leak or poor ventilation |
| Simple plastic color | General interior painting | It is not a suitable solution for a moldy bathroom |
Proper preparation combines products. There is no one box that does it all.
The correct procedure does not always fit in an hour. On the first day there is a diagnosis, mold cleaning, lint removal and drying. If the surface is simple and dries quickly, it can be used as a primer and first coat the next day. If there is moisture in depth, you have to wait.
In a bathroom with minor surface mold, a weekend may be sufficient: Saturday morning cleaning, Saturday afternoon drying/repairs, Sunday priming and painting, if product times allow. In a blown ceiling or leak, it is not enough.
Haste is the enemy. "Dry to the touch" does not mean ready to paint if the substrate has retained water.
In the Greek market of 2026, cleaning mold before painting is a small cost compared to repainting the same ceiling in a few months. Fungicide cleaners, masks, gloves, cloths and a good anti-mildew paint cost more than a simple paint job, but the difference is small compared to redoing the job.
Costs go up when there's loose plaster, leaking stains, a need for stain-blocking primer, drywall repair, or vent installation. But these are not "extra luxuries". It is often the real solution.
In a proper quote, ask for it to clearly show: mold cleaning, slop removal, priming where needed, final anti-mold paint and, if required, ventilation improvement.
The first mistake is to paint over mold because they think the anti-mold paint will kill it. That's not his role.
The second mistake is to clean with many different chemicals together. This can be dangerous, especially with bleach and ammonia or acidic products.
The third mistake is not drying the surface enough.
The fourth mistake is not scraping off old peeling paint.
The fifth mistake is not solving the ventilation.
The sixth mistake is to use simple plastic paint because it was "surplus from the living room".
| Inquiry | Yes / No |
|---|---|
| Have you identified why the mold was created? | Yes / No |
| Have you ruled out an active leak? | Yes / No |
| Are you wearing gloves, mask and goggles? | Yes / No |
| Is the area well ventilated during cleaning? | Yes / No |
| Are you using a cleaner/fungicide according to the label? | Yes / No |
| Don't mix bleach with other cleaners? | Yes / No |
| Has all loose and peeling paint been removed? | Yes / No |
| Is the surface completely dry before primer/paint? | Yes / No |
| Has a stain-blocking primer been used where there are stains? | Yes / No |
| Is the finished color bath/humidity friendly? | Yes / No |
If most of the answers are not “yes”, it is not yet time to open the color.
> Mold is not a stain that we hide. It is a symptom of humidity. Before painting, clean it with a suitable fungicide, remove loose paint, allow the wall to really dry and find out why it appeared. If it was condensation, improve ventilation. If it was a leak, fix the leak. Only then does anti-mould paint make sense. Otherwise, you're just painting over the problem — and the problem will return.
Painting over mold is the No.1 mistake in DIY bathroom painting. It may give a temporarily clear picture, but technically it is wrong. The mold must first be cleaned, the surface dried, the cause of the damp treated, and only then primer and paint applied.
Liquid fungicides are useful preparation tools, but must be used with caution, ventilation and protective gear. We don't mix cleaners, we don't use bleach carelessly and we don't think we've permanently "sterilized" the wall. Mold spores are always in the environment; what makes them grow is moisture.
The right solution is a system: cleaning, drying, repairing, priming, anti-mould paint and ventilation. If this order is followed, the paint can last. If not, the mold will return — often along with blistering and peeling of the new paint.
Return to category.
Go to categoryReturn to the central guide.
Go to guide