
Bathroom Surface Materials & Finishes
Return to category.
Go to categoryIf there is one point in painting old tiles that does not forgive sloppiness, it is the adhesion primer. You might choose an expensive tile color, apply two or three careful coats, get a nice shade and a perfect roll. However, if the color has not caught properly on the glossy enamel of the tile, the effect is temporary. It will start to chip, lift at the edges, peel around joints or peel when taped, silicone or cleaner sticks.
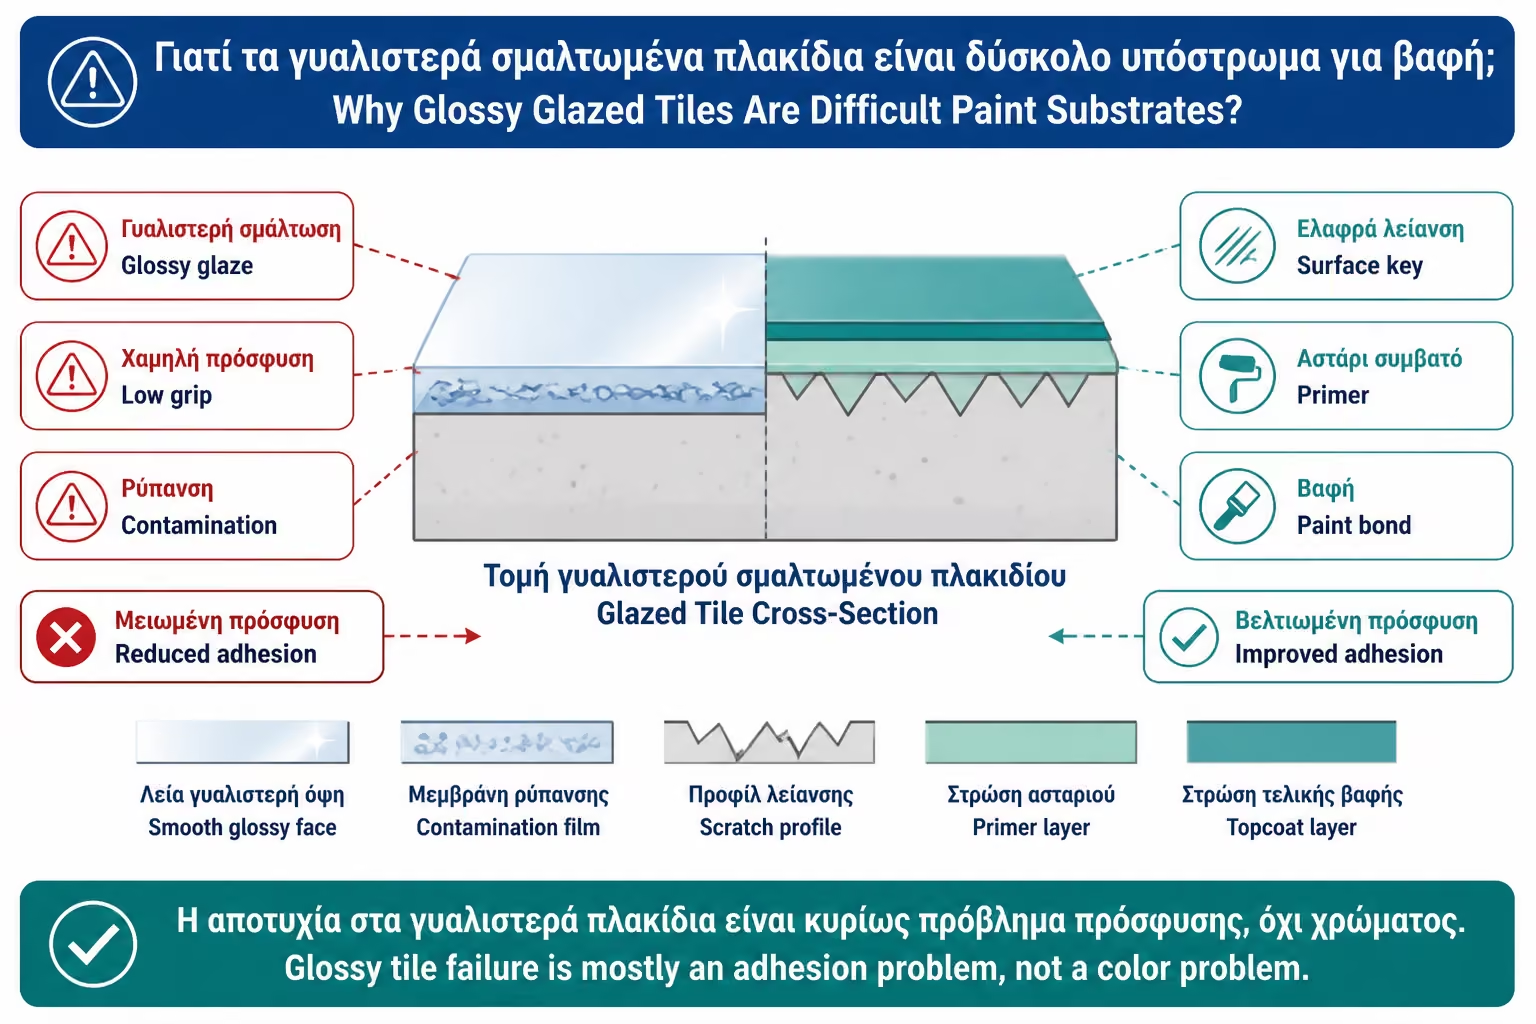
Glossy tile is inherently a difficult surface to paint. It is smooth, dense, low absorption and often glazed. Unlike plaster or wood, it does not "suck" the paint. The paint sits on it like a film. In order for this film to hold, it must have either chemical adhesion through a special system or a mechanical “key” through friction/roughness or, ideally, a combination of both. This is why primers for glossy surfaces are so important.
The phrase "no paint sticks to a glossy tile without a primer" is correct as a rule of thumb, but requires technical precision. There are special tile paints and tub & tile kits that claim to be applied without a separate primer because the system has built-in adhesion or is two-component. Even then, however, they require thorough cleaning, degreasing, frequent sanding/deglossing and strict timings. For most common paint systems, especially on old glossy bathroom tiles, the right adhesion primer is the difference between "looking good today" and "lasting after months of use".
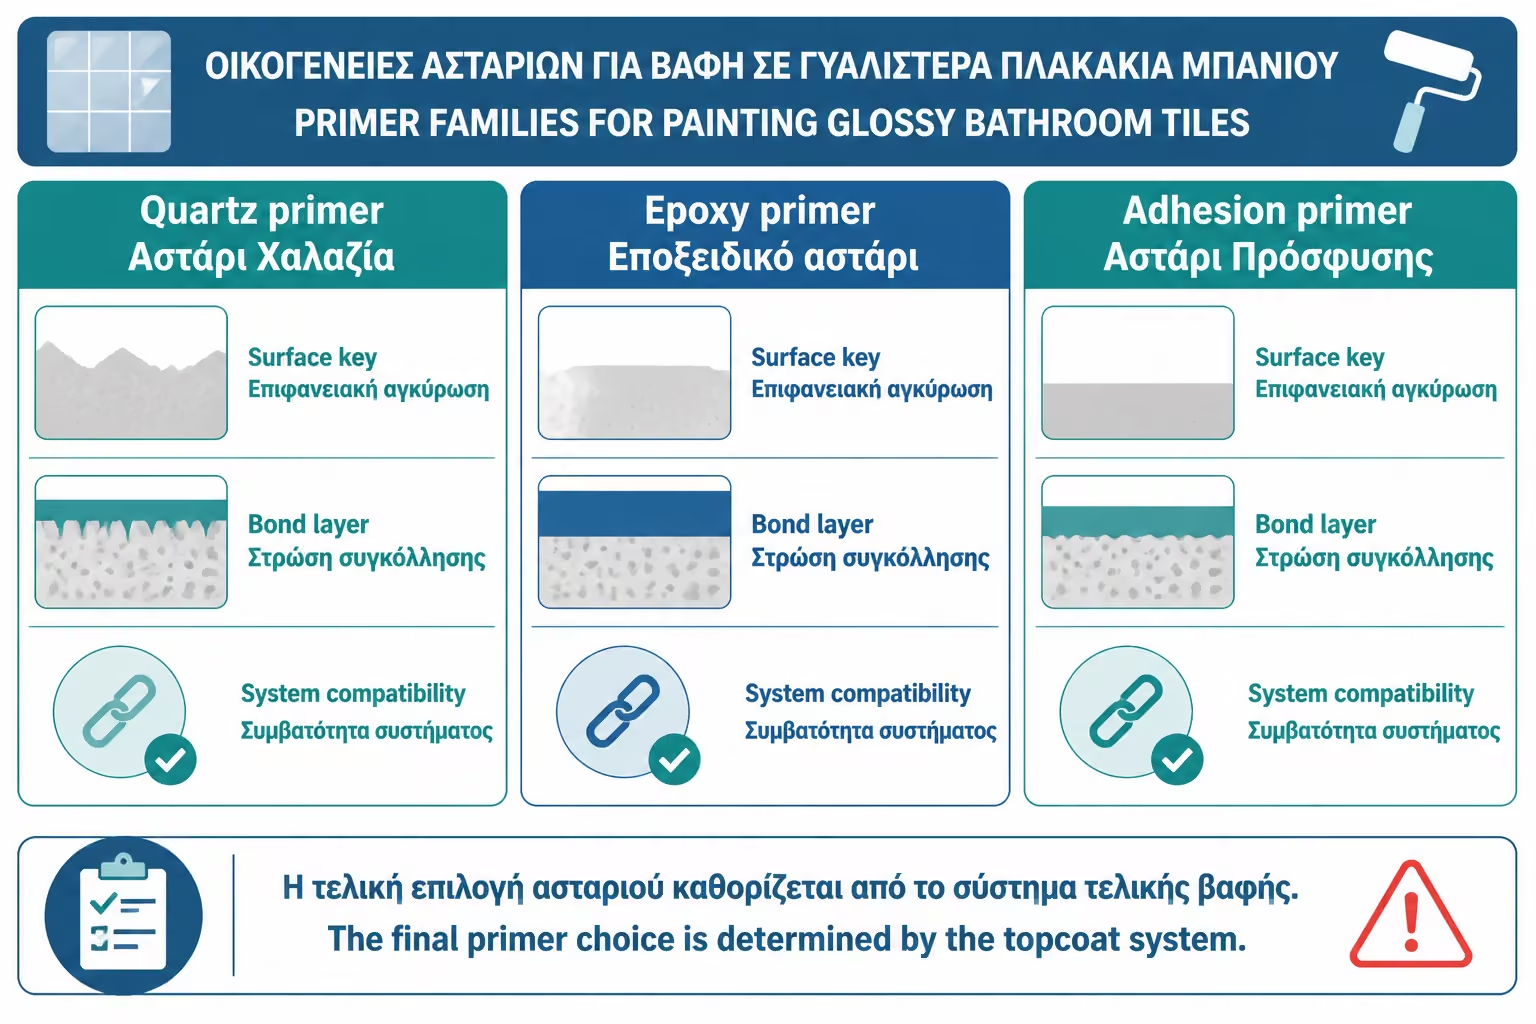
Primers for such surfaces are roughly divided into three practical families: adhesion primers for glossy surfaces, quartz/rough adhesion bridge primers and two-component epoxy primers. For example, Zinsser describes Bulls Eye 1-2-3 as a water-based stain-blocking sealer and adhesion primer that adheres to glossy surfaces without pre-rubbing or deglossing, according to its data sheet. Mapei describes Eco Prim Grip Plus as a multi-purpose bonding primer for smooth and low absorption substrates, ideal for laying over existing tiles. There are also two component epoxy tile primers that are claimed to be suitable for glazed tiles, glazed brickwork and smooth concrete floors.
The point is not to put "some primer". It is to choose the right primer for the final system to follow. Another primer is needed before tile adhesive on old tile. Another before microcement. Another before acrylic enamel paint. Other before epoxy or polyurethane coating. If we mix incompatible products, we may create a weak intermediate layer. And then the paint won't peel off the tile; the system will peel off from the wrong primer itself.
Glossy tile has a glazed or very dense surface. It is made to not get dirty easily, does not absorb water, cleans and resists soaps, salts and stains. All of these are great for bathroom use, but bad news for paint. The color needs something to "hold". Glossy tile has the exact opposite property: it repels adhesion.
On a porous surface, such as plaster, the paint penetrates slightly and is mechanically anchored. On glossy tile, it doesn't penetrate. If the surface is not cleaned and prepared, the paint spreads over soap scum, salts, body oils, cleaning residue or polishing film. It may look pretty the first week, but it has no real traction.
That is why the problems first appear on the edges, in the joints, around batteries, behind a sink, near silicones or where paper tape sticks. There the paint film is mechanically caught and begins to lift.
The adhesion primer is the intermediate layer that connects the difficult surface to the finished paint. One side of it should adhere to the glossy tile. The other must accept the final color or coating. If it works properly, it creates an adhesion bridge.
In some primers, the adhesion is primarily chemical/resinous: the material is designed to bond to smooth surfaces. In others, such as quartz primers, adhesion is also improved mechanically because the primer leaves a rough, aggregated surface onto which the next material can grip. In epoxy primers, adhesion and strength result from two components curing into a stronger film.
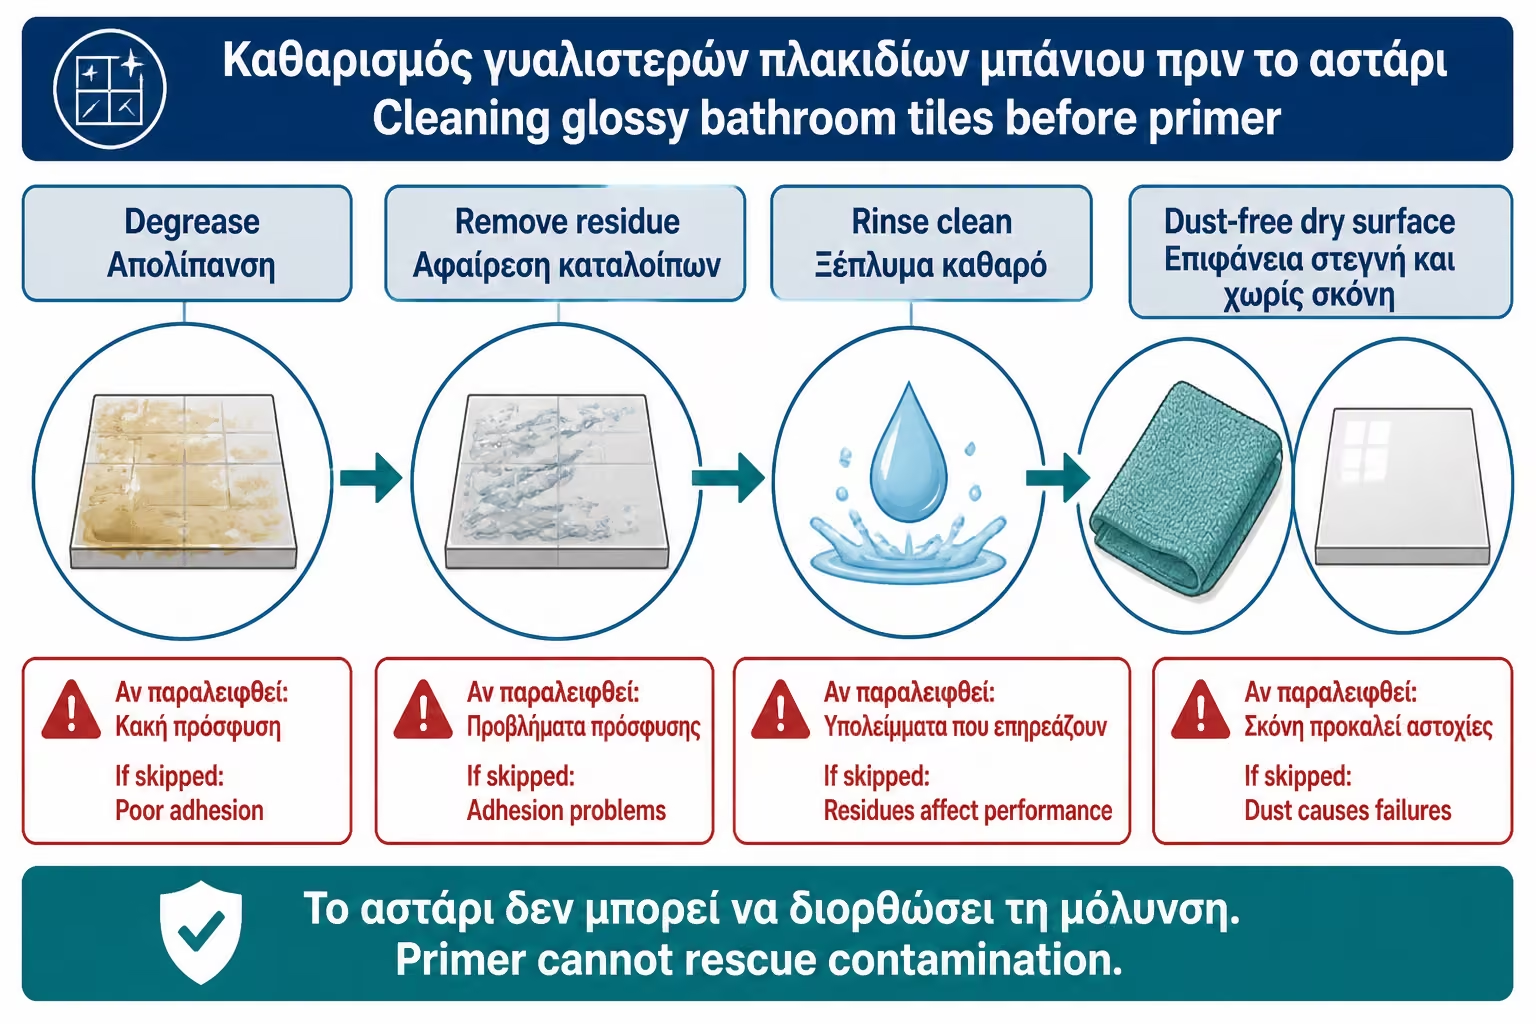
Primer should not be used as a "magic" material on dirt. If the surface has soaps, silicone or salts, the primer will stick to them. Then it will come off with them. The sequence is always cleaning, degreasing, sanding where needed, dusting/wiping and then priming.
The quartz primer is an adhesion primer containing fine-grained aggregates, usually quartz or silica sand, in a resinous base. When dry, it leaves a rough surface. This roughness creates a mechanical key for the next material.
Quartz primers are widely used on non-absorbent and smooth surfaces such as old tiles, terrazzo, mosaic, smooth cementitious surfaces or painted substrates, especially before tile adhesives, plasters, trowels, microcement or renders. Mapei states that Eco Prim Grip Plus is suitable for improving adhesion on smooth and low-absorbent substrates and ideal for tile-over-tile applications. Similarly, quartz acrylic primers are described as primers for smooth non-absorbent surfaces and "ideal for tiles".
For clear tile painting, quartz primer is not always the first choice, as it can leave an overly rough texture, especially if you want a smooth glaze. It is excellent when the next material is press, glue, plaster or thick coating. For thin tile paint with a smooth finish, a thinner adhesion primer or epoxy primer may be needed, depending on the system.
Epoxy primer is usually two-component. Resin and hardener are mixed, applied within a certain working time and creates a strong adhesion layer. It is used on demanding surfaces, floors, industrial applications, coatings and cases where we want higher mechanical and chemical resistance.
In glossy bathroom tiles, epoxy primer makes sense when following an epoxy or polyurethane coating, floor coating, tub & tile system or other high-demand paint that requires it. There are technical products declared as two-component water-thinned epoxy primer for glazed tiles, glazed brickwork and smooth concrete floor.
It is not always necessary for a simple WC wall to be painted with a special tile paint. There it might be too much. But if we are talking about a floor, a high-stress zone or a coating that must withstand cleaning agents and moisture, the epoxy primer can be the most technically correct base, as long as it is compatible with the final color.
There is also the category of general adhesion primers, such as those used on glossy paints, PVC, metal, glass, tiles or other difficult substrates. These do not necessarily have a quartz texture. They create a thin layer of adhesion and allow the final color to set.
Zinsser Bulls Eye 1-2-3 is a typical example of such a primer, as its technical material mentions adhesion to glossy surfaces without sanding or deglossing. Nevertheless, in a bathroom with old tiles, soaps and salts, light scrubbing and deep cleaning remain practically very important. The fact that a product "sticks" to glossy surfaces does not mean that it sticks to a dirty glossy tile.
This category is often suitable for walls and vertical surfaces that will be painted with a special tile color or durable enamel, as long as the manufacturer of the finished color allows such a primer.
Some tile paints and tub & tile kits state that they do not need a separate primer. This may be the case for this particular product because it has its own adhesion chemistry. But it should not be generalized. "no primer needed" on a particular box does not mean any tile color needs no primer.
Even when no primer is required, preparation is required. Cleaning, degreasing, mold, silicone and scale removal, sanding/deglossing where the product specifies, and complete drying. If these are omitted, the adhesion will be weak.
For the owner the rule is simple: if the system says “no primer”, follow the system procedure exactly. If it doesn't say it clearly, don't assume. Use a compatible primer.
Grinding or deglossing reduces the gloss and creates micro-roughness. This helps a lot. But it is not always enough. On highly polished tiles, on a sink/tub, on a floor or in wet areas, mechanical roughing alone may not be enough.
The primer adds a chemical and resinous bridge. Sanding opens the door, the primer gets between the surface and the paint. If you only sand and paint with the wrong color, the result may last a little better than completely unprepared, but it's still a risk.
Conversely, primer without cleansing and scrubbing where necessary is also a risk. Proper traction is a system, not a step.
Before any primer, the tiles must be thoroughly cleaned. In a bathroom, this means removing soaps, scale, mold, silicone, body fat and detergent residue. Glossy tiles may look clean but have an invisible film that prevents adhesion.
The process usually involves a strong degreaser, descaling where permitted, a good rinse, drying, light sanding and dusting again. If there is silicone, it is removed. No paint or primer sticks reliably to silicone.
If the tile has old polishes, waxes or sealers, they must be removed. The primer is not designed to stick to a coat of polish. It wants a real tile surface.
For walls that will receive microcement, press, adhesive, plaster or a thicker coating over old tiles, quartz primer is often an excellent choice. It creates a rough substrate and helps the next cementitious or thick layer to grip. For example, Eco Prim Grip Plus type products are just right for smooth low-absorbent substrates and tile-over-tile applications.
For thin coat paint where a smooth final film is desired, quartz may be too rough unless the system allows for it. There you can choose adhesion primer for glossy surfaces or epoxy primer.
For floors, surfaces with chemical/mechanical stress, paint with an epoxy or polyurethane coating, or higher strength applications, an epoxy primer makes more sense. The critical thing is always the compatibility with the final coating.
Acrylic or alkyd/acrylic tile enamels usually need very good adhesion to the surface. If the product calls for a primer, it should not be omitted. If it says to apply directly to tile, the preparation is exactly as it says.
On glossy tiles, a suitable adhesion primer can significantly increase the reliability of the system, especially in old bathrooms. But random wall primer should not be used. A simple plaster plastic primer is not a gloss tile primer. Not designed for non-absorbent glazed surface.
The owner should ask: does the primer say it is for glossy, ceramic, tile, glass, PVC or non-porous surfaces? If not, it's probably not the right product.
Epoxy paints and two-component coatings often have their own primers or require specific preparation. We do not arbitrarily combine epoxy finish paint with any acrylic primer. There may be incompatibility, poor adhesion or chemical reaction.
If the final system is an epoxy coating, ideally we use a primer of the same system or a primer that the manufacturer declares to be compatible. On the floor, this is even more important. Mechanical stress and humidity do not forgive weak interlayers.
Epoxy primer requires proper mixing, working time, ventilation and adherence to repainting times. If too much time passes, it may need a light sanding before the next coat. If passed early, solvent or moisture may be trapped.
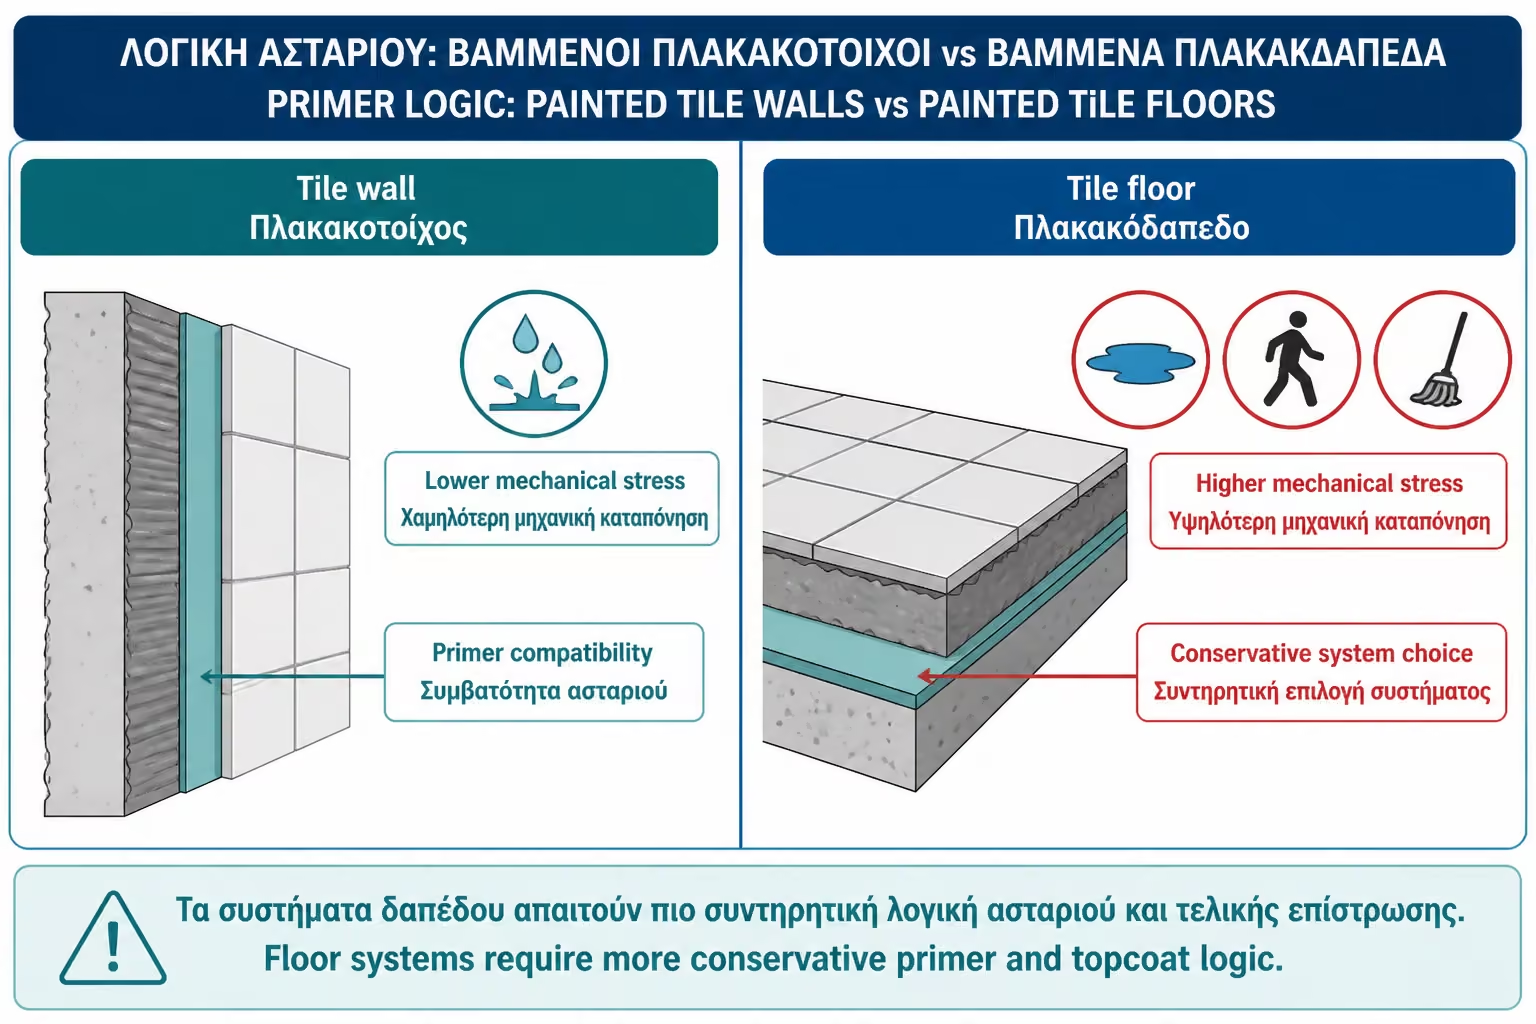
The wall is mainly wet, splashed and cleaned. The floor has treads, friction, weight, mats, dust, water and cleaners. So the floor primer must be much more durable and compatible with floor coating. A primer that is acceptable for a tile wall may not be sufficient for a bathroom floor.
On the floor, the primer must hold not only the color, but also the mechanical stress. If adhesion fails, the paint will first come off in traffic routes, in front of a sink, around a sink or under rugs. There the solution is a floor-rated system, not a simple tile wall primer.
For DIY flooring, the choice should be even more conservative: special floor primer + special floor coating or avoid floor painting if you don't want frequent maintenance.
The shower area is the most difficult to paint. If we are talking about a wall that receives daily hot water, soaps and salts, a general primer is not enough. A system is needed that clearly indicates use in a wet/shower area. If the system does not write it, the use is a risk.
In such zones, even the best primer can fail if there is moisture behind the tiles, old silicone, salts in the joints or poor sealing. Paint is a surface coating. It does not make the shower a new watertight construction.
For a shower floor, the risk is even greater. Standing water, slip resistance and constant friction make painting very demanding. There I would rarely suggest simple DIY painting as a serious solution.
The primer is applied to a clean, dry, degreased and lightly sanded surface, when the system requires it. Mix well and apply with a roller or brush suitable for its texture. Quartz primers want an even dispersion of the grains, no "pools" and no spots without aggregate. Epoxies require proper mixing of the two components.
The layer should be thin and uniform. Too thick a primer can create a film that is slow to dry or remains weak. Too little primer leaves bare spots. On glossy tiles, exposed spots can be the start of peeling.
Before the final color is applied, the repainting time must be observed. If you apply color early, performance is reduced. If you wait too long, light sanding may be necessary, depending on the product.
| Use | Possible primer | Comment |
|---|---|---|
| Painting a tile wall with acrylic tile paint | Adhesion primer for glossy/non-porous surfaces | We want a smooth end result |
| Painting with epoxy/acrylic tub & tile kit | Primer only if requested by the system | Many kits have their own chemistry |
| Tile floor painting | Epoxy or floor-rated adhesion primer | Not a simple wall primer |
| Microcement on tile | Quartz adhesion bridge primer | We want a rough surface |
| New tiles on top of old tiles | Quartz/bonding primer for tile-over-tile | In combination with a suitable adhesive |
| Polyurethane or epoxy coating | Compatible epoxy primer system | We follow a manufacturer |
| Shiny old enamel on a wall | Adhesion primer for glossy surfaces | With cleaning and possible deglossing |
| Shower zone | Only primer belonging to a wet-area system | High risk if we improvise |
The table shows that “adhesion primer” does not mean one product for all applications.
| Criterion | Quartz primer | Epoxy primer | Adhesion primer for gloss |
|---|---|---|---|
| Basic function | Creates rough adhesion bridge | Strong chemical/mechanical base | Thin layer of adhesion |
| Perfect for | Adhesives, plasters, microcement, tile-over-tile | Coatings, floors, demanding applications | Painting smooth surfaces |
| Texture | Rough | Smooth to semi-smooth | Smooth |
| DIY convenience | Moderate | More difficult | Higher |
| Resistance | Good as a bridge to later materials | Very high | Depending on the product |
| Suitable for thin enamel | Not always, because of texture | Yes, if compatible | Often yes |
| Suitable for flooring | Only if the system allows it | Often better | Only if it is floor-rated |
| Risk of error | Excessive roughness/wrong final finish | Wrong mix/times | Misuse under heavy strain |
The selection should start from the end system, not the store shelf.
The first mistake is to use plain wall primer for plaster over glossy tile. Not designed for non-absorbent surface.
The second mistake is the omission of cleaning. No primer sticks properly to soap, silicone, salts or grease.
The third mistake is the use of quartz primer under thin smooth paint without it being provided by the system. It can leave a texture that shows in the final result.
The fourth mistake is the use of acrylic adhesion primer under an epoxy coating without a compatibility check.
The fifth mistake is painting before the primer is completely dry.
The sixth mistake is to think that the primer makes the paint suitable for a shower or floor, while the final color is not suitable.
In the Greek market of 2026, the adhesion primer is a small part of the total cost of a DIY tile painting, but a huge part of the technical success. A simple adhesion primer costs more than an ordinary wall primer, quartz primers are medium in cost, while two-component epoxies are more expensive and more demanding.
Economy in primer is almost always wrong. If the paint peels, it will need to be removed, sanded, cleaned and repeated. The cost of correction is much greater than the cost of proper preparation.
For a small bathroom wall, buying a good primer may seem excessive. In practice, though, it is what protects the whole project. If you are not willing to pay for the right primer, it is usually better not to paint glossy tile at all.
A proper tile painting quote should not just say “priming and painting”. Must state type of preparation: cleaning, degreasing, sanding/deglossing, silicone remover, gloss tile adhesion primer and final color/system.
It must also state whether the primer is quartz, epoxy or adhesion primer, and why it was chosen. If it is a floor, it must state floor-rated system. If it is a shower, it must state wet-area suitability. General phrases like "a strong primer will be put in" are not enough.
If the craftsman says that "the color will set on its own", ask for the technical brochure of the product. If indeed the product is direct-to-tile, it will say so. If it doesn't say it, it needs a primer.
| Inquiry | Yes / No |
|---|---|
| Are the tiles solid, with no hollows or broken spots? | Yes / No |
| Has the old silicone been completely removed from the corners? | Yes / No |
| Has degreasing and removal of soaps/salts been done? | Yes / No |
| Has it been lightly sanded or deglossed where needed? | Yes / No |
| Is the surface dry and dust free? | Yes / No |
| Does the primer say it's for glossy/non-porous/tile surfaces? | Yes / No |
| Is the primer compatible with the final color? | Yes / No |
| If you are painting a floor, is the primer suitable for floors? | Yes / No |
| If you use epoxy primer, is the ratio and pot life maintained? | Yes / No |
| Do you know the repaint time before the final color? | Yes / No |
If the answers are not clear, the painting starts with a weak base.
> The most expensive tile paint won't last if it has nowhere to grip. The tile's glossy glaze is designed to repel water and dirt — so it repels paint, too. For a wall with tile paint, request an adhesion primer for glossy/non-porous surfaces, unless the paint itself indicates direct-to-tile application. For microcement or new adhesive layer, look at quartz primer. For flooring or epoxy coating, look for epoxy primer compatible with the system. And in all cases: first cleaning, then sanding, then primer. Not the other way around.
The adhesion primer is the most critical step in painting gloss tiles. Tile is not plaster. It doesn't absorb, it doesn't give a natural hold and it doesn't forgive dirt or sloppiness. If you paint directly on the glossy enamel without a compatible system, the result may look beautiful for a while, but technically it is weak.
The correct choice of primer depends on the final material. For thin wall paint, we often want adhesion primer for glossy surfaces. For microcement, adhesives or thicker cementitious linings, quartz primer is often the right bridge. For floors, epoxy and demanding coatings, epoxy primer may be the most durable choice. In any case, we follow the technical brochure and do not mix arbitrary systems.
The primer does not protect dirty, wet or loose tiles. It doesn't make plain color suitable for a shower. It does not replace cleaning, scrubbing and proper times. But it is the layer that makes the rest of the system have a chance of success. If you want your tile painting to last, don't start with the color. Start with traction.
Return to category.
Go to categoryReturn to the central guide.
Go to guide