
Bathroom Surface Materials & Finishes
Return to category.
Go to categoryPainting old tiles is one of the most tempting DIY solutions for a bathroom that looks tired, old or out of date. If the tiles are solid but the color is reminiscent of the 80s or 90s, if there is no budget for a complete renovation, or if the house is a rental and you want a quick aesthetic change, painting can transform the space with much less dust, noise and cost than stripping.
The promise is seductive: a "new" bathroom in a weekend, without demolition, rubble, tile removal and many exhausting days of work. In many cases, that is realistic, as long as we are talking about walls or other lightly used surfaces, and as long as the materials and preparation are chosen correctly. Special tile paints and bathroom coatings are now sold with instructions for ceramic surfaces, while some products say that a separate primer is not needed, provided the tiles are clean, dry and properly prepared. Rust-Oleum, for example, states in its bathroom tile paint guidance that the tiles must be completely dry, damaged joints repaired, and that no separate primer is required for that specific Bathroom Tile Paint.
But painting tiles must be approached realistically. It is not the same as new paving. It does not have the durability of a fired porcelain tile, nor the durability of an epoxy floor or a properly installed panel. It is a coating on an old surface. If the base is dirty, shiny, greasy, soapy, full of salts or with blackening joints, the color will not last. If a floor with heavy traffic or an area inside the shower that receives water daily is painted, the risk of damage is much greater. Renovation guides point out that painting tiles is an economical and quick fix, but it doesn't always hold up well to continuous exposure to water, such as in showers, and lifespan is highly dependent on humidity, use, material and preparation.
This does not mean that we should reject the solution. It means we have to use it properly. Painting old tiles is great for bathroom walls out of direct water flow, for WC, for old kitchen tiles, for rentals, for a temporary upgrade or for an aesthetic refresh until a regular renovation takes place. It is most dangerous on bathroom floors, shower floors, areas with standing water, worn tiles or areas where we frequently clean with harsh chemicals.
In this guide we will see when it is worth painting tiles, what materials are needed, what colors and primers to choose, how to properly prepare, what is the step-by-step process, what a realistic program can fit into a weekend and what mistakes you should avoid if you want the result to last.
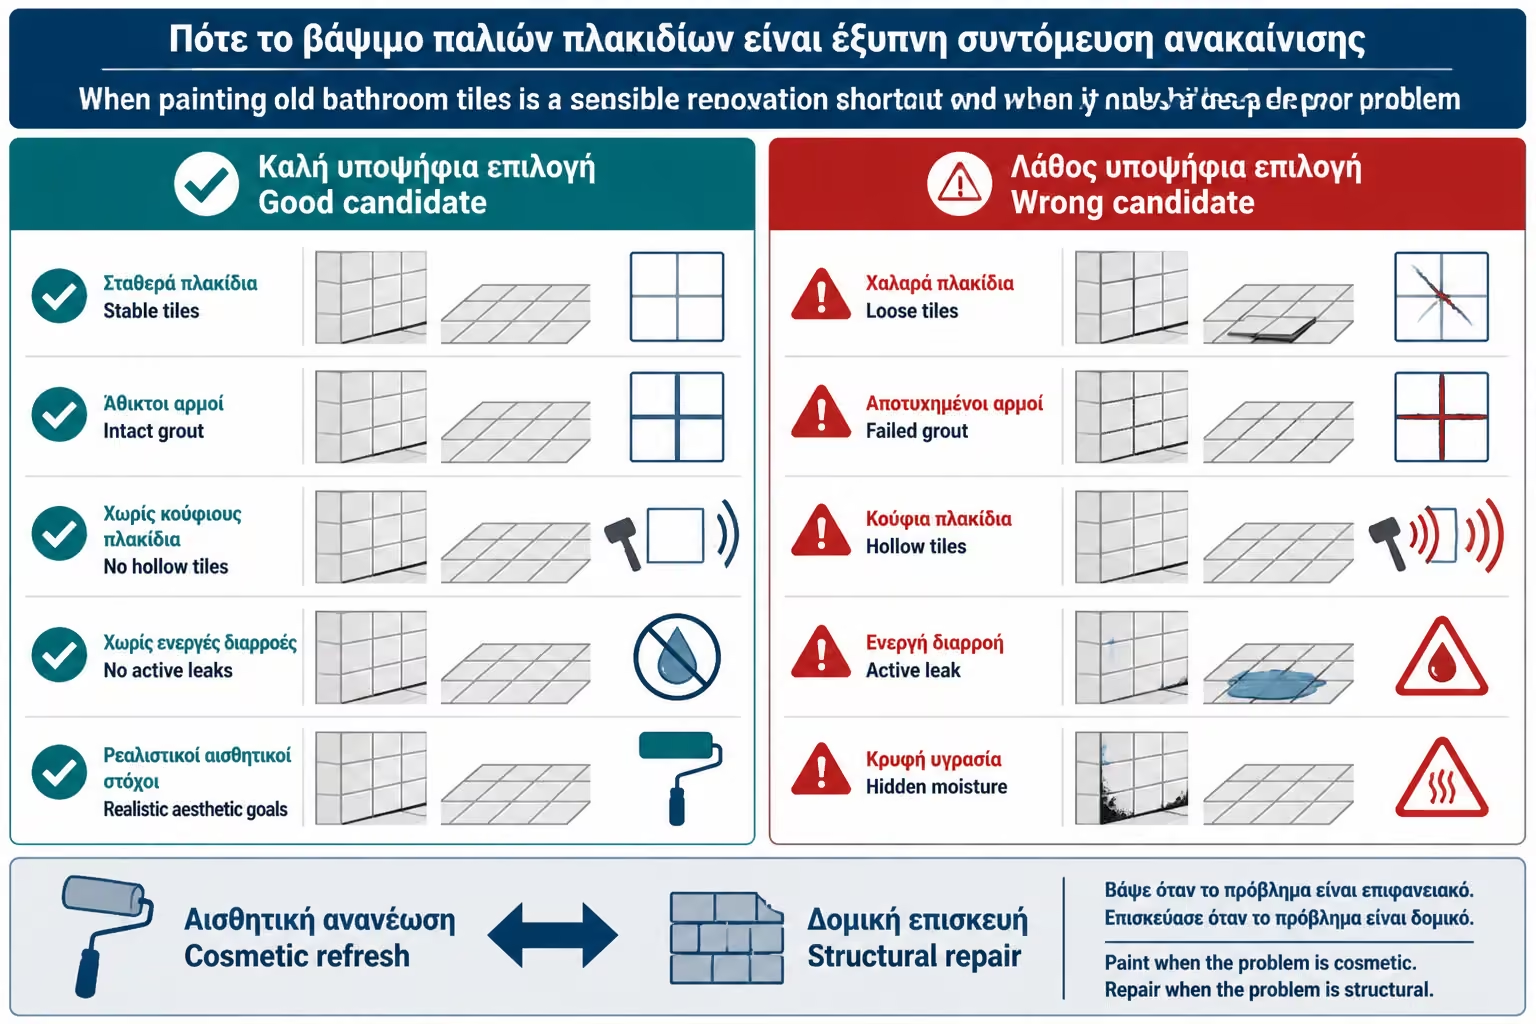
Painting old tiles is worth it when the tiles are solid, well bonded and in relatively good condition, but you don't like the look of them. If the problem is aesthetic, the color can give an impressive change. If the problem is technical, such as moisture, peeling, cracks, hollow tiles or swollen joints, then painting is not a solution. It's camouflage.
It is especially valuable on bathroom walls that do not receive direct daily water flow. For example, a wall behind a basin, a side wall, old tiles up to the middle of the wall or a guest WC. Also worth it in old kitchens, splashbacks and areas where humidity is controlled.
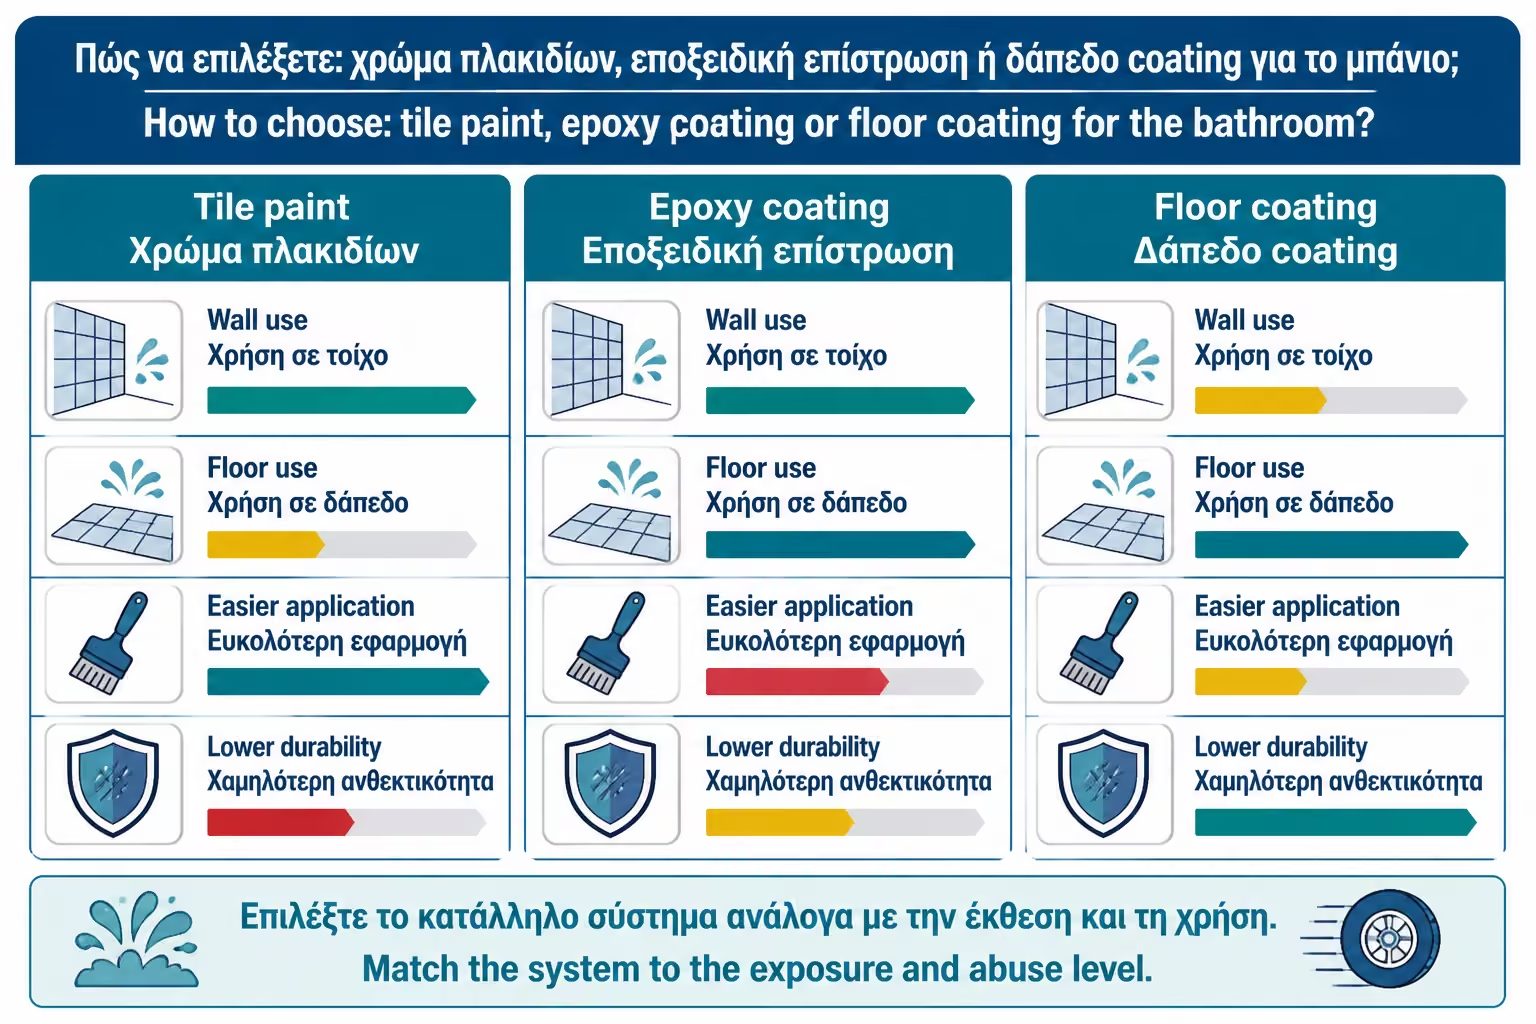
On the floor, the choice needs more attention. There are special floor coatings and tile floor paints, but wear and tear from shoes, cleaning, scrubbing, moisture and bath mats is significant. Some guides report that painted tile floors are more of a temporary improvement and can last anywhere from months to a few years, depending on traffic, humidity, material and preparation.
It is not worth it when the tiles are hollow, broken, detached or when the joints are loose. If the substrate has a problem, the paint will follow the problem. It is also not worth it when there is moisture coming from behind, black mold on the joints or leakage. These are solved first.
It is not the best choice for the inside of the shower cabin, especially on the floor or wall that receives continuous water. There the paint will receive daily stress, soaps, salts and cleaners. If you want a solution for a shower, more technically safe options are new tiles, panels, microcement with a proper system or special wet-area systems, not simple DIY painting.
It's also not worth it if you expect a result equal to a factory tile. The paint will change the look, but the texture of the joints will remain, the old unevenness will show if not repaired, and the surface will be a painted coating, not a new ceramic material.
For a proper DIY tile painting you will need degreaser cleaner, scale remover where allowed, sandpapers or sanding pads, microfiber cloths, paper tapes, protective nylon, gloves, mask, low pile microfiber roller, good brush for cuts, paint disc, special adhesion primer if needed, special tile paint or epoxy/polyurethane system, and possibly clear protector topcoat for floors.
We don't use simple plastic wall paint over tiles. It will not have proper grip or durability. We want a product specially designed for tiles, ceramic or glossy surfaces. In some systems the primer is separate. In others, the product states that it is applied without a primer, but only with strict preparation.
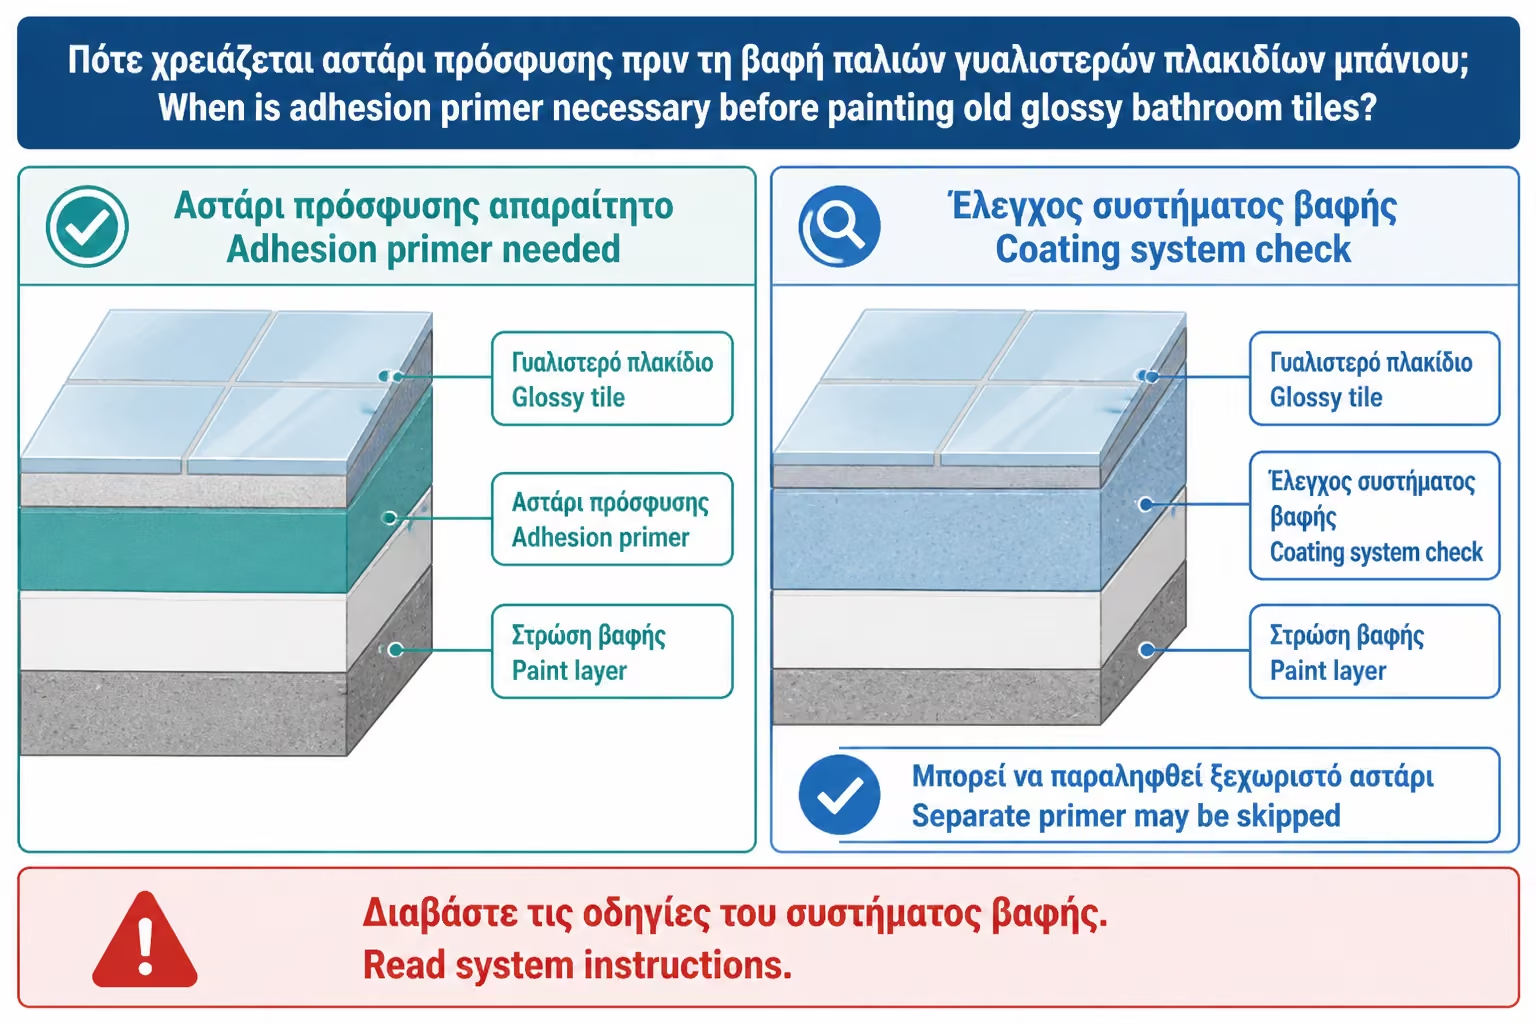
If the tiles are very glossy or if the paint you choose does not have its own built-in adhesion system, a good adhesion primer is critical. Products such as Zinsser Bulls Eye 1-2-3 are touted as adhesion primers that adhere to tough and glossy surfaces such as glass and tile without pre-scraping required in some applications, although in the bathroom light scrubbing and thorough cleaning remains safer practice.
For bathroom walls, a special tile paint or renovation paint for tiles may be sufficient, as long as the surface does not receive continuous water. For more demanding surfaces, such as floors, you need a product that explicitly declares use on floors or tile floor coating. It is not enough to say "for tiles" if it is intended only for walls.
Epoxy or two-component systems usually offer better chemical and mechanical resistance, but are more demanding to apply. They have a specific working time, need good mixing and odors/ventilation. Newer water-based renovation coatings are more DIY-friendly, but may have less durability in very hard use.
In any case, we read the technical brochure: is it allowed in a bathroom? Is it allowed on the floor? Is it allowed in the shower? Does it need a primer? Does it need an additive? How many hours between hands? When is it water resistant? When full use? The Dulux Renovation Range, in an application guide, states for tiles and worktops at least two coats, with a minimum time of 8 hours before the next coat, after adding the special additive.
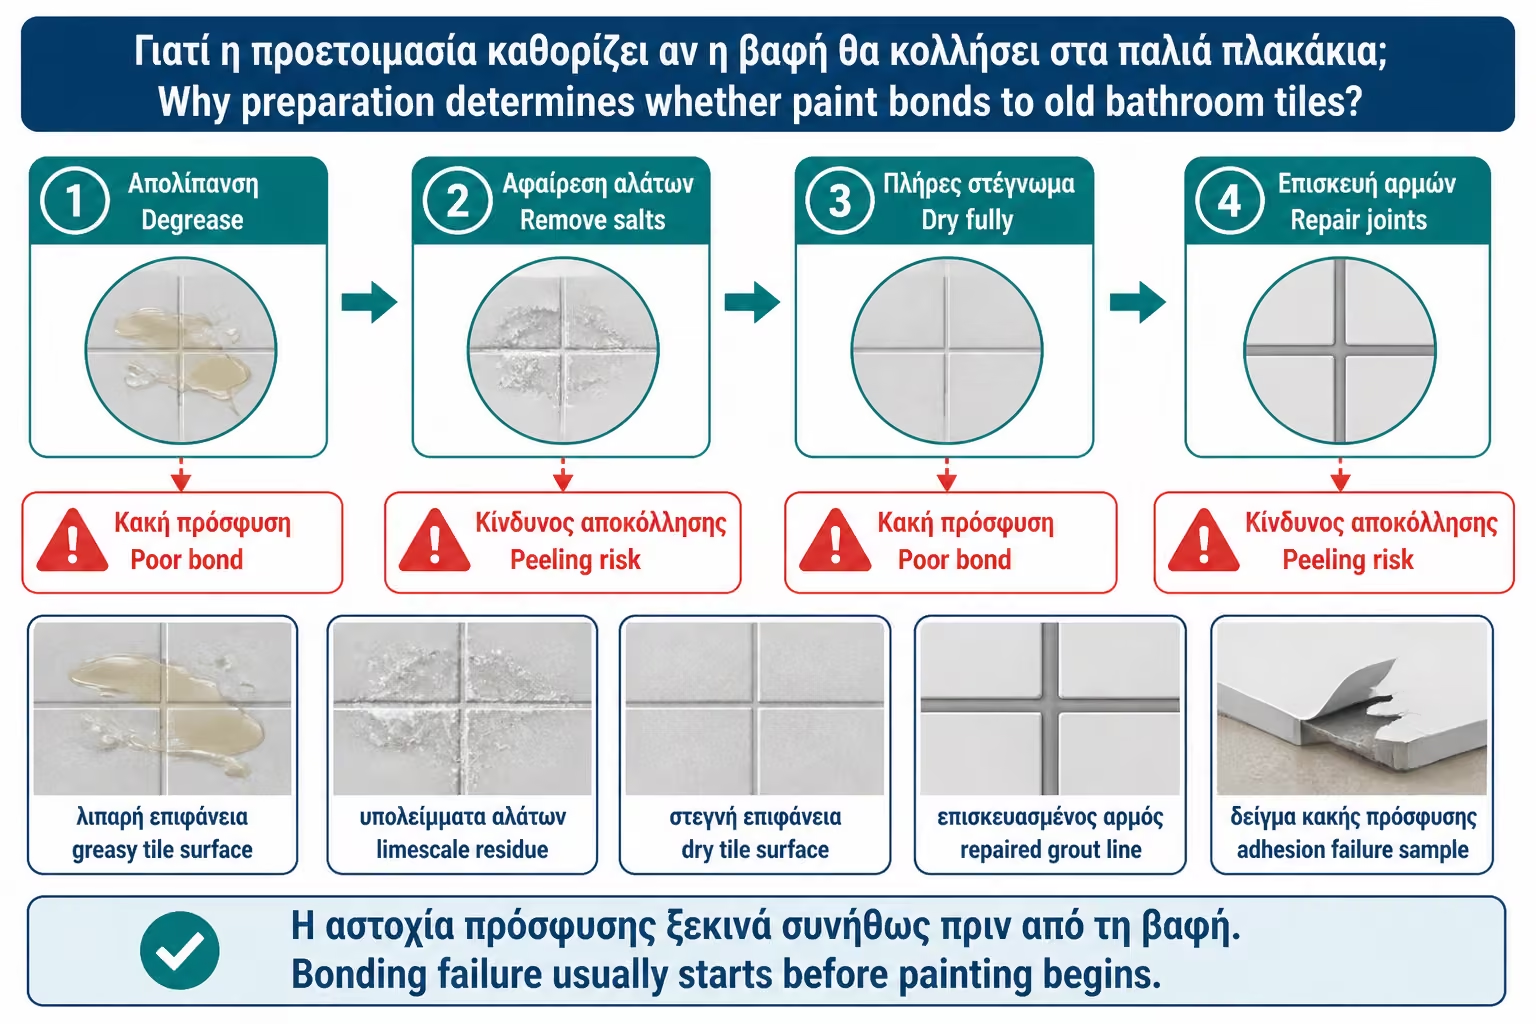
Tile painting almost always fails from poor preparation. The tile is smooth and often shiny. It has years of soaps, salts, cleaners, body fat, silicone, mold and water vapor on it. If you paint over them, the paint won't stick to the tile. It will stick to a dirty layer that sooner or later will go away.
Proper cleaning is deep. First, soaps, grease and dirt are removed. Then salts are treated, always with a product compatible with the tile. If there are natural stones nearby, be careful with acidic cleaners. Then we rinse and dry. The tile must be completely dry before sanding, priming or painting.
The joints should also be cleaned. If they have mold, we don't paint over it. If they are flimsy, they are repaired. If there are silicones in the corners, they are usually removed and re-inserted after painting, because the paint does not adhere properly to the silicone.
Before painting, check the joints. If pieces are missing, if they are crumbling, or if they have deep black mold, they need to be repaired. Fresh grout must be cured before painting. If you paint over fresh grout, you may trap moisture or lose adhesion.
The old silicone in the corners, around the bathtub, sink and cabinet, should be removed. Silicone does not paint reliably with most systems. If it stays, the paint around it will "cut", peel off or leave an ugly line. After painting and full curing, new sanitary silicone in the correct color is re-inserted.
This stage is boring but crucial. A painted bathroom with old blackened silicones does not look renovated. It looks sketchy.
Many products state that no sanding or primer is needed in certain conditions. However, in old bathrooms, a light sanding with a fine sanding pad is usually a safe practice, unless the product prohibits it. We don't want to scratch the tile deeply. We want to dull the glossy surface to increase mechanical adhesion.
After sanding, the dust must be completely removed. Wipe, microfiber, maybe a slightly damp cloth and dry completely. If dust is left, the primer or paint will stick to the dust. This is as bad as painting over grease.
On glossy tiles, sanding is even more important. On matte tiles, less may be needed, but cleaning is still necessary.
Primer is necessary when the paint system calls for it or when the surface is particularly difficult to adhere to. Old glossy tiles, strongly glazed surfaces, tiles that have polishes or areas with different absorption are candidates for adhesion primer.
If the tile color is a one-step product that states that no primer is needed, follow the manufacturer's instructions. You don't accidentally add primer if the system doesn't want it, because you might create an incompatibility. But if the system is primer + topcoat, do not skip the primer. It is the adhesion bridge.
The primer must be completely dry before painting. If painted early, it may trap moisture or fail to develop adhesion. Times vary by product, temperature and humidity.
Before painting, we protect everything: countertop, sink, basin, faucets, mirror, cabinet, floor, door, switches, skirting, profiles and everything that should not be painted. The tape must be of good quality and removed at the right time so that it does not lift the paint.
We want clean lines in the corners. If there are joints that will be resealed with silicone afterwards, it's a good idea to know in advance where the paint will end. The silicone is applied at the end, on a completely dry and cured surface.
Also protect the ventilation. If sanding or painting, an open window or fan is needed. In two-component products, ventilation is even more important.
The first coat should not be thick. The desire to cover the old color at once is a big mistake. Fat hands make runs, roll marks, uneven drying and reduced durability. Better two or three thin hands, according to the instructions, than a heavy one.
Use a small, low-pile microfiber roller for a smooth surface. Brush first around corners and difficult spots, then roll. Work in small zones and keep a "wet edge" so no joins show. Don't go over the same spot multiple times when it starts to pull.
If the old tile has a strong pattern or dark color, the first coat can look disappointing. This is normal. Coverage comes with subsequent hands.
The second coat is applied after the repainting time given by the manufacturer. In some systems it can be 6–8 hours, in others more. Dulux, as mentioned, gives a minimum time of 8 hours before repainting for the Tiles & Benchtops range.
Before the second coat, check for dust, hair, drips or spots that need a light rub. If there are runs, they are gently corrected after they are dry, not while they are fresh. Then we pass a second thin hand.
A third coat is needed when the old color is still visible, when the shade is very different or when the product recommends it. Don't paint endlessly without times. Paint needs layers that dry properly.
On walls, many specialty tile paints do not require a separate topcoat if the system is self-contained. On floors, stencil designs or abrasive surfaces, a clear protective topcoat can increase durability. But it must be compatible with the color and suitable for floors/bathrooms.
We do not use any varnish over tile paint. It may yellow, peel or react with the paint. If the system has its own clear coat, we use that. If it does not provide for it, we ask the supplier or follow the technical brochure.
On the bathroom floor, topcoat does not make the solution equivalent to tile. It reduces wear, but the surface remains painted.
One of the most common mistakes is to think that because the paint is "dry to the touch", it can be used normally. The paint has a surface drying time and a full curing time. Full resistance to water, cleaning and abrasion may take several days.
If you use the bathroom too early, if water falls, if tape gets stuck, if you clean aggressively or if you step on the floor before its time, the surface can be damaged. Some guides for painting floor tiles state that up to a week may be required for full curing before normal use, depending on the product and conditions.
This should be calculated on the "weekend". You can finish painting in two days, but you probably shouldn't use the bathroom normally on Monday morning, especially if you painted a floor or an area with water.
A realistic schedule starts on Friday night with emptying, cleaning and silicone removal. On Saturday morning, there is a second deep cleaning, repairs, scrubbing and masking. In the afternoon or afternoon, primer is applied, if necessary. In the evening, the first hand can enter, depending on the times.
On Sunday, a second coat is applied and, if required, a third or topcoat, always according to the repainting time. The new silicone should not be put in until the paint has dried sufficiently and is ready to receive a final seal. In many cases, silicone and reattachment are better done on Monday or the next day, not rushed on a Sunday night.
So "within a weekend" means that the visual change can be completed. It does not mean that the space is fully water resistant and use immediately.
Walls are a safer fit. They accept less friction, less impact and less mechanical stress. If it is not in the direct water zone, the effect can last quite well with proper preparation.
The floor is much more difficult. It is stepped on, cleaned, rubbed, accepts mats, water, shoes, dust and possible scratches. If you paint a floor, you must use a product for floor tiles, wait for it to fully cure and accept that it may need maintenance or renewal. Floor painting is ideal as an economical refresh, not as a permanent decade solution.
In a heavily used bathroom, the floor is best refinished with LVT/SPC, new tiles, microcement or panels where appropriate if you want longer life.
Technically there are special systems for bathtubs, showers and wet zone tiles, usually epoxy or two-component. But for DIY, the shower cabin is the most demanding application. The surface receives daily water flow, temperature changes, soaps, salts and cleaning agents. If the preparation is not perfect or the product is not specifically suitable, the paint can peel off.
If the goal is to paint the wall outside the direct shower, the solution is much safer. If the goal is to paint the tiles inside the cabin, you need a product that explicitly mentions use in the shower area, rigorous preparation and full curing time. Even so, you have to see it as a solution with a limited duration compared to new tiles or panels.
On a shower floor, paint is even more risky due to standing water, non-slip and constant friction. It's not the first choice.
The cleanest result is usually monochrome. White, off-white, light grey, greige, sage, blue-grey or beige can completely change the image of the bathroom. Light colors make the space brighter. Dark ones give intensity, but show salt and scratches more easily.
Stenciling on a floor or an accent wall can give an impressive result, but it increases the difficulty. It needs a steady hand, proper drying, patience and frequent topcoat. In a small WC it can look great. In a bathroom floor for daily use, care is needed because the thin patterns can wear out in traffic areas.
A very good strategy is to paint the old tiles in a neutral color and upgrade the space with new silicone, new mirror, lamp, battery, accessories and wall paint. Often these make the result look more complete than a complex stencil.
The painted surface needs gentler cleaning than the tile. Avoid wire sponges, abrasive powders, very strong anti-salts and harsh scrubbing. Use a soft cloth, mild detergent and a good rinse. If there is hard water, wipe the drops so that no salts remain.
On floors, avoid rubber-backed mats that can stick or hold moisture on the paint. Do not drag heavy objects. If a small scratch appears, correct it in time with the same system.
Maintenance is part of the solution. If you want a surface that cleans aggressively like porcelain, painting is not the right choice.
In the Greek market of 2026, painting old tiles is clearly more economical than complete stripping and new tiling, especially if done DIY. Cost depends on specific paint, primer, tools, cleaners, tapes, protectors, possible topcoat and surface. For a small WC or bathroom wall, the cost of materials can be relatively low. For a floor or large bathroom, good systems and extra hands add to the cost.
If it is outsourced to a professional, the labor costs go up, but it can be worth it if the surface is difficult or if you want a more uniform result. In any case, painting is a lower cost solution, not as durable as new materials.
The possibility of renewal after years must also be considered. The low initial price is an advantage, but the duration is very dependent on usage.
| Surface | Appropriateness | Comment |
|---|---|---|
| WC wall without shower | Very good | Ideal DIY application |
| Bathroom wall out of direct water | Good | It needs proper cleaning and primer where needed |
| Kitchen splashback | Good | Beware of greases and cleaners |
| WC floor | Average to good | Only with floor coating and topcoat where required |
| Master bath floor | With care | Water wear, mats, cleaning |
| Wall inside the shower | Risk | Only with product suitable for shower area |
| Shower floor | Usually not | Very high stress |
| Broken/hollow tiles | No | First technical repair |
The painting helps to see painting as a tool for aesthetic renewal, not as a cure-all.
The first mistake is insufficient cleaning. The paint comes off because it didn't stick to the tile, but to soap, grease or salts.
The second mistake is skipping primer when the system requires it. On glossy tiles, this can destroy the adhesion.
The third mistake is fat hands. They create runs and a weak surface.
The fourth mistake is the premature use of the bath before the paint has matured.
The fifth mistake is painting over silicone or mold.
The sixth mistake is applying the wrong product to the shower or floor.
| Inquiry | Yes / No |
|---|---|
| Are the tiles strong, without hollow spots? | Yes / No |
| Are the joints firm and clean? | Yes / No |
| Has the old blackened silicone been removed? | Yes / No |
| Has the surface been degreased and descaled? | Yes / No |
| Has it been lightly sanded where required? | Yes / No |
| Is the product suitable for bathroom tiles? | Yes / No |
| If you are painting a floor, is the product suitable for floor tiles? | Yes / No |
| Do you know if it needs a primer or an additive? | Yes / No |
| Have you calculated drying and curing times? | Yes / No |
| Have you accepted that the solution is refresh and not new paving? | Yes / No |
If most of the answers are “yes”, DIY painting has a much better chance of success.
> If you want to paint old bathroom tiles, don't start with the color. Start with traction. Clean deeply, remove salts, greases and silicones, scrub lightly, use primer when the system calls for it and apply thin hands with correct times. Do not paint over damp, moldy or hollow tiles. And avoid the shower zone if the product is not specifically suited for continuous contact with water. Tile painting succeeds when treated as a coating system, not a simple pass of paint.
Painting old tiles can dramatically change a bathroom without clutter, without falling apart and at a much lower cost than a complete renovation. It is ideal for WC, walls outside of direct water, rental, temporary upgrade or aesthetic refresh. With the right choice of product, good preparation and patience over time, the result can be impressive.
But it is not a solution for every case. It does not fix technical problems, it does not replace a tile, it does not love the constant moisture of the shower and it does not withstand unlimited abrasion like a factory ceramic surface. The floor and shower area need special attention. Lifetime depends on cleaning, use, product, primer, topcoat and curing.
If you look at it as a smart, economical and aesthetic upgrade, painting tiles can be a great DIY project. If you see this as the equivalent of a complete renovation, you will be disappointed. The secret is to do little things, but do them right: a clean base, a proper system, fine hands, time to mature, and realistic expectations.
Return to category.
Go to categoryReturn to the central guide.
Go to guide