
Bathroom Surface Materials & Finishes
Return to category.
Go to categoryThe old bathtub is often the heaviest part of a bathroom. The tiles can be changed, the faucets replaced, the mirror modernized, and the lighting upgraded, but if the tub is yellowed, has lost its shine, has scratches or small dents, the whole space looks tired. The same goes for an old sink: it may be sturdy, but the worn surface makes it look dirty even when it's clean.
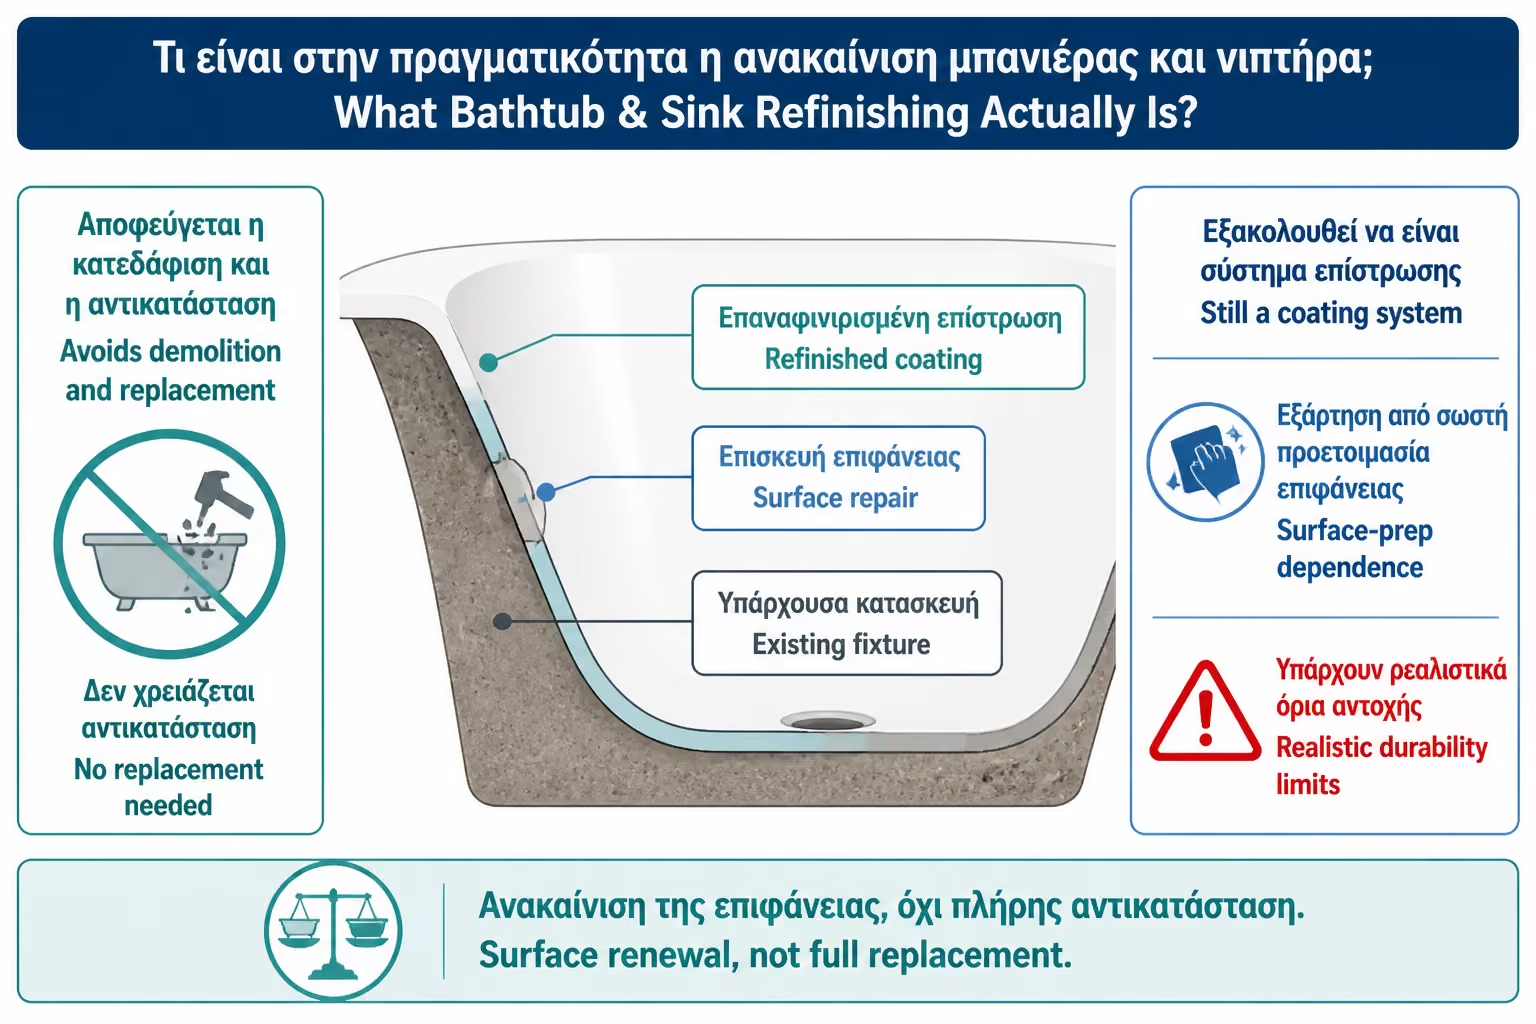
Enameling, also known as refinishing, reglazing or resurfacing, is the process in which the existing bathtub or sink surface is cleaned, prepared, repaired and coated with a new specialist finish. The aim is to restore a white, smooth, glossy and clean-looking surface without having to remove the fixture itself. It is a very popular solution for old cast-iron or steel tubs, porcelain sinks, fiberglass or acrylic tubs, and bathrooms where full replacement would mean demolition, tiling work, plumbing changes and debris.
One point needs to be clear from the start: home refinishing is not the same thing as factory enameling. The original porcelain or enamel of the tub was fired at very high temperatures in the factory. Home refinishing is a surface coating system. It can produce an impressive result and several years of service, but it does not turn the old tub into brand-new factory porcelain. Technically, it is high-quality resurfacing, not a full rebirth of the fixture.
There are DIY kits on the market, usually two-component epoxy-acrylic or epoxy enamel, but also professional applications with special bonding agents, primers, spray guns and higher performance coatings. Rust-Oleum Tub & Tile Refinishing Kit, for example, is described as a 2-part epoxy acrylic for refinishing ceramic tile, porcelain, fiberglass, acrylic, cast iron and steel tubs and sinks, instructed to dry 3 days before exposing to water. Krylon also has 2-part epoxy enamel for porcelain, glass, fiberglass, ceramic tile and other glossy non-porous surfaces, for use in tubs, sinks, tiles and showers.
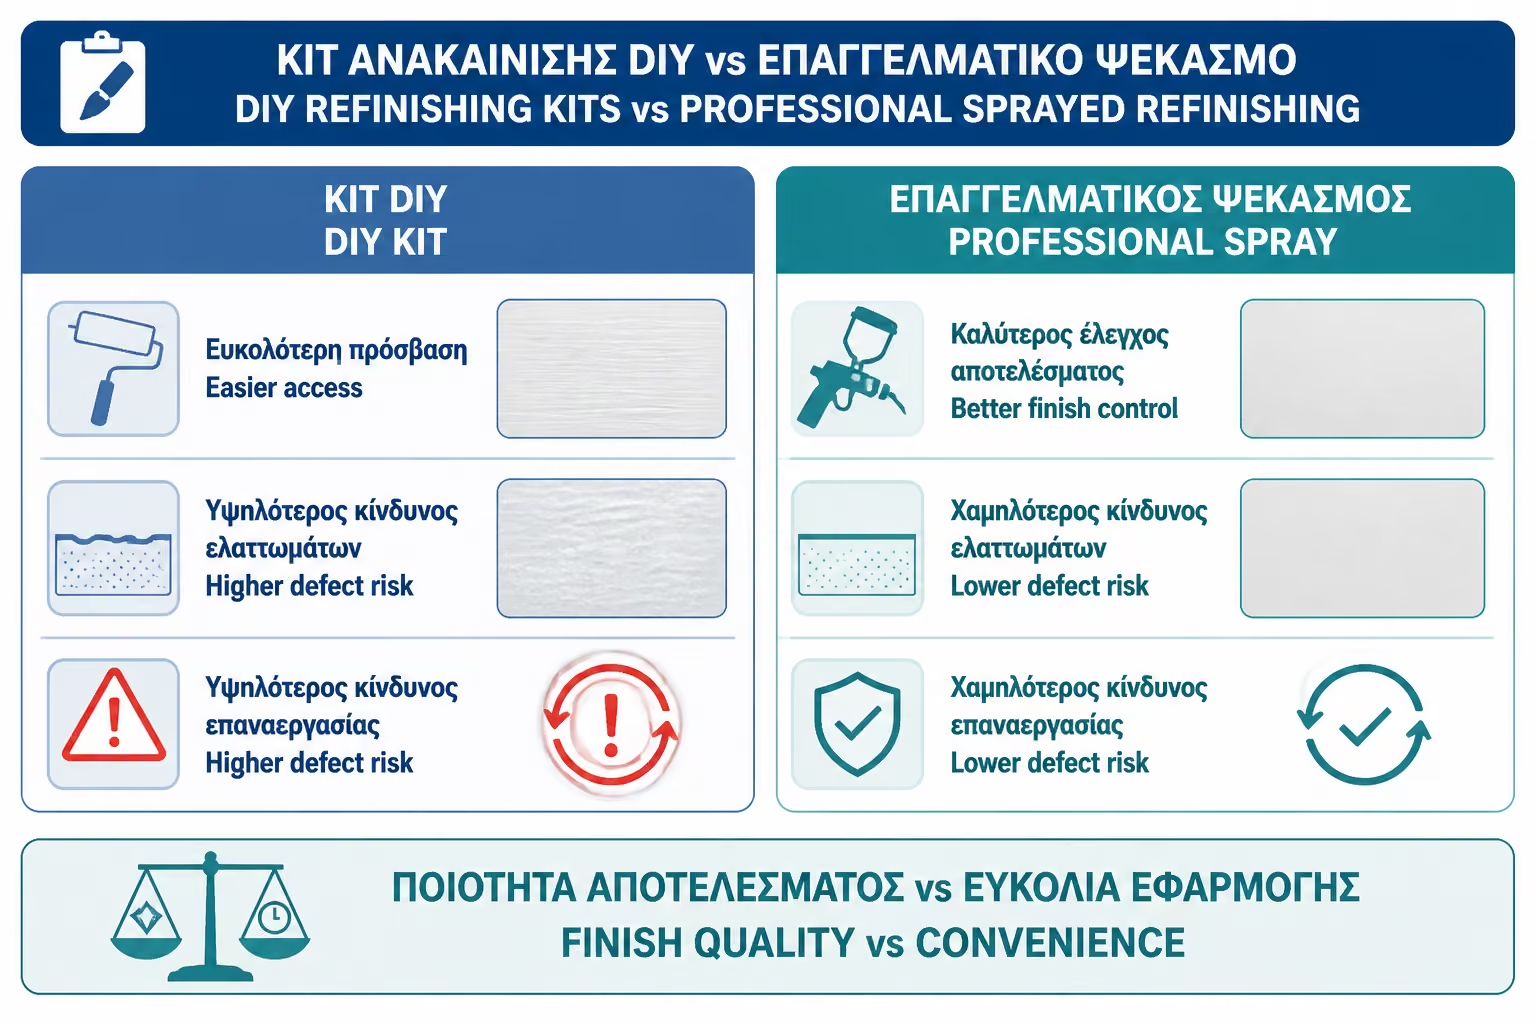
The question "can I do it myself?" has a real answer: yes, it can be DIY, but it is not easy to paint. It requires strict preparation, strong ventilation, protective agents, proper mixing, quick and clean application, and full curing time. DIY solutions can be successful on minor or moderate damage, but usually don't give the same smooth, even, and long-lasting durability as an experienced handyman spraying a professional system. Cost and maintenance guides state that professional enameling usually gives a better, smoother and more durable result than DIY kits, while DIY kits are cheaper but less durable.
Enamelling is the renewal of the surface of an existing sanitary ware without removing it from its place. The bathtub or sink is deep cleaned, sanded or chemically prepared, small bumps and cracks are repaired, a primer or bonding agent is applied and then a special coating is applied, usually epoxy, epoxy-acrylic, polyurethane or another professional system.
The goal is to create a new smooth surface over the old one. The surface becomes white again or in another shade, shines and is easier to clean. The result can be impressive, especially on old bathtubs that are structurally sound but aesthetically worn.
The process should not be confused with simple painting. The bathtub accepts hot water, soaps, cleaners, body, friction, shampoo and thermal changes. So the coating must be special for such use. Plain wall paint or general purpose enamel is not suitable.
It is worth it when the tub or sink is structurally sound but aesthetically worn. That means surfaces that have yellowed, lost their shine, picked up surface scratches, small chips, discoloration or an outdated colour that no longer suits the bathroom. It is especially worthwhile on good-quality old cast-iron bathtubs, which are heavy, sturdy and difficult to replace.
It's also worth it when replacement would create a lot of disruption. A built-in bathtub often does not come off without damaging tiles, drywall, plumbing and silicones. If the rest of the bathroom is acceptable, glazing can give a clean look without a complete renovation.
It is not worth it when there are serious cracks, deep rust, leaks, instability, loose fiberglass, damaged substrate or other problems that are not merely superficial. The Spruce notes that refinishing makes sense when the defects are still minor, while serious rust, major cracks and deeply set stains may leave replacement as the only sensible solution.
Porcelain, cast iron, steel, acrylic and fiberglass bathtubs, as well as porcelain or ceramic sinks, can usually be renewed. DIY kits and professional products often mention such surfaces. The Rust-Oleum Tub & Tile kit mentions use on ceramic tile, porcelain, fiberglass, acrylic, cast iron and steel tubs/sinks.
Suitability depends on material and condition. A porcelain cast iron tub with surface wear is a good candidate. An acrylic tub that bends, has deep cracks, or delamination is more difficult. A sink with minor dents can be repaired, but a sink with a deep crack may need to be replaced.
It should also be checked if the surface has already been repainted. If it has an old failed enamel that is peeling off, the new job becomes more difficult, because the old coating has to be removed or stabilized.
The DIY kit has a cost advantage. You buy a special tub & tile refinishing kit, prepare the surface and apply the product with a roller, brush or spray, depending on the system. It can be a good solution for a small bathtub, sink, rental or temporary upgrade.
The professional has an advantage in preparation, equipment, finish and endurance. It usually uses stronger cleaners, repair materials, bonding agent, professional spraying and final polishing. Miracle Method describes its process as cleaning with special two-stage cleaners for soap scum, mineral deposits and body oils, repairing chips/cracks and applying a bonding agent before the final coating.
If you want a "like new" effect, especially in a daily use master bathroom, the craftsman is a safer choice. If you want an affordable refresh and are willing to accept possible imperfections, DIY can make sense.
Durability depends on system, preparation, use and maintenance. Professional companies report long life with proper care. Miracle Method states that enameling can extend the useful life of fixtures by 15–20 years or more with proper care and maintenance. Other sources are more conservative about general reglazing, stating that DIY or standard reglazing can last a few years and that professional application is usually superior.
The difference is that we are not talking about a single product or a single process. Another basic DIY epoxy kit with roller, another professional spray system with bonding agent and polishing. Another bathtub in a single person home, another family bathroom with daily hot showers, kids, toys, cleaners and heavy use.
Realistically, a good DIY can give a decent result for some years if done right and gently maintained. A good professional refinishing can last much longer. But no enamel should be treated like indestructible factory porcelain.
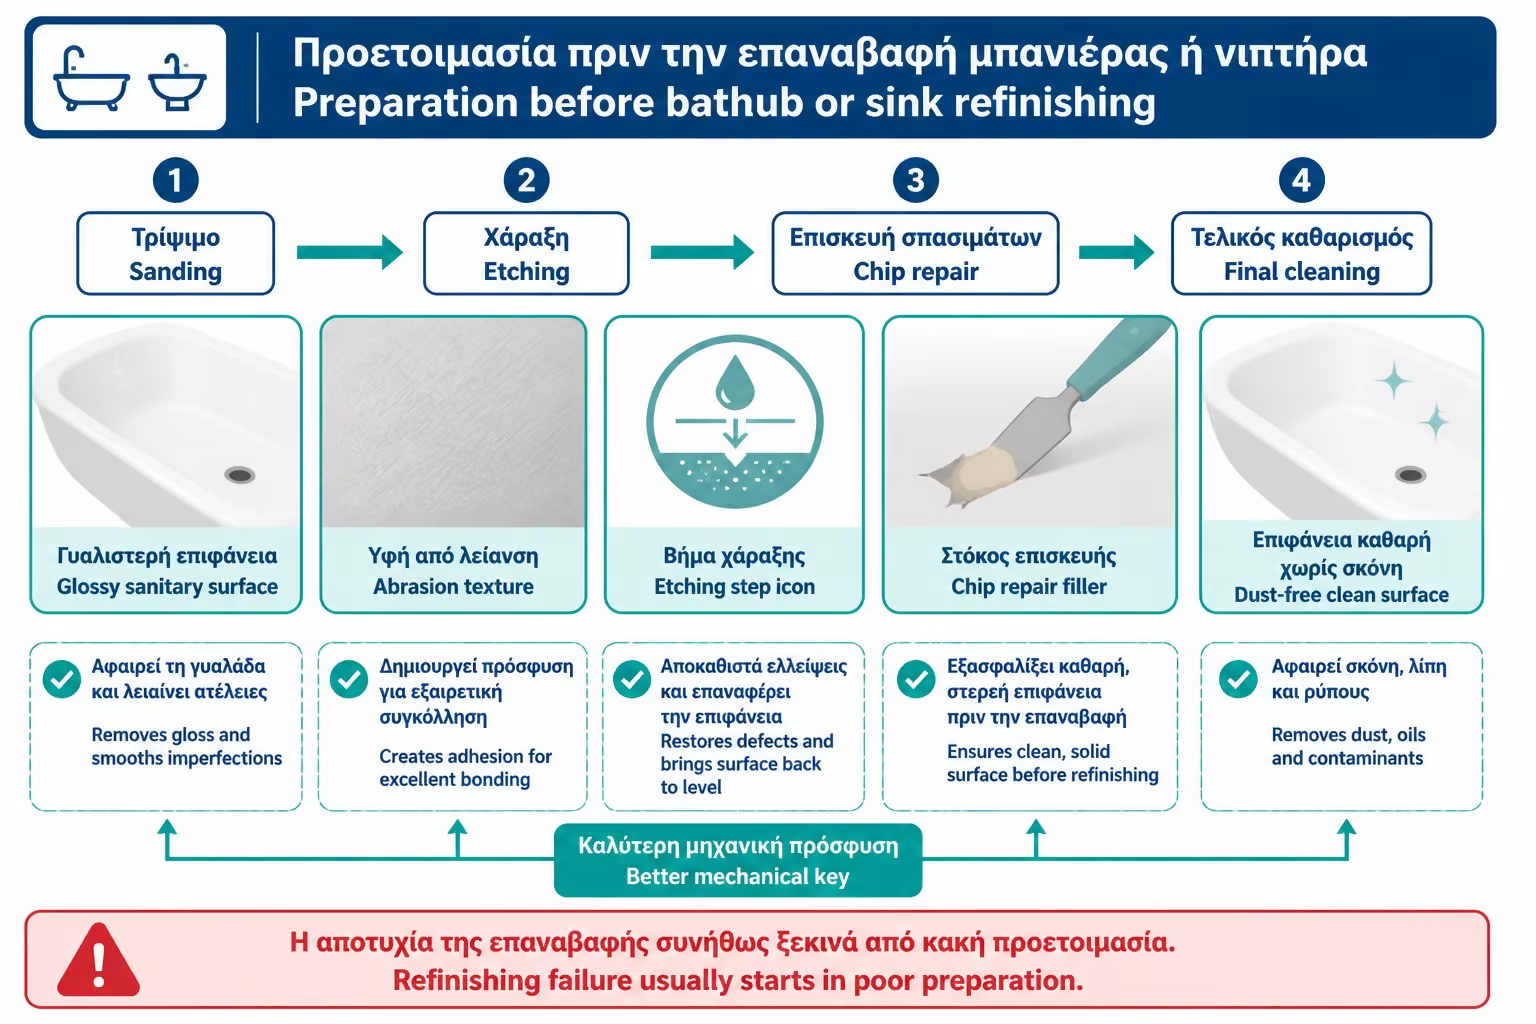
Success is judged before the coating is applied. The old bathtub has soaps, salts, body oils, cleaners, silicones and micro-pollutants on it. If these do not go away, the coating will not stick to the material. It will stick to dirt.
The cleaning must be deep. Soap scum, mineral deposits and body oils are removed. In professional processes this is done with special multi-stage cleaners. In DIY the kit must be strictly followed: cleaning, rinsing, drying, sanding or etching where required. The Miracle Method mentions specially formulated two-step cleaners for soap scum, salts and body oils as the first step.
The silicone around the tub must be removed before application. The coating does not reliably stick to silicone. New silicone is put in after the system matures.
After cleaning, the surface must be made suitable for adhesion. This may include sanding, using etching powder or a special primer/bonding agent, depending on the system. The goal is not to destroy the tub, but to dull and open the surface so the new coating can anchor.
In DIY kits, sanding is often done with a specific grit that is included or recommended. In professional application it can be done by mechanical means and better dust control. If this step is done sloppily, the paint can peel off. If done excessively or incorrectly, it can create nicks that will show under the final finish.
The surface after sanding must be completely cleaned of dust. Dust is the enemy of adhesion and a glossy finish.
Minor dings and scratches are repaired before enameling. Epoxy putties, fillers or special repairs are used depending on the material. If they are left empty, they will show under the new coating or become points of future failure.
In cast iron bathtubs, rust spots must be properly cleaned and fixed. If the rust is superficial, it can be treated. If it has progressed deeply, enameling is not always a sufficient solution. In fiberglass or acrylic, cracks in the tub floor are more serious, because they can mean structural weakness or movement.
The repair should not be visible afterwards. This is one of the points where the professional excels: he can fill, sand and bring the surface more evenly before the final coating.
DIY kits are often applied by roller and brush or aerosol. Spraying gives a more uniform, smooth and professional look, but requires equipment, experience and strict safety measures. A roller may leave slight marks, an orange texture or imperfections, especially on glossy surfaces.
Professional refinishers usually spray. This gives a more uniform film and a better gloss. Cost guides report that professionals usually use spray/airless equipment and achieve a smoother finish than DIY tools.
If you're DIYing, work slowly but without delays. Two-component products have a limited working time. Don't try to constantly fix the same area when it starts to pull. You will leave scars.
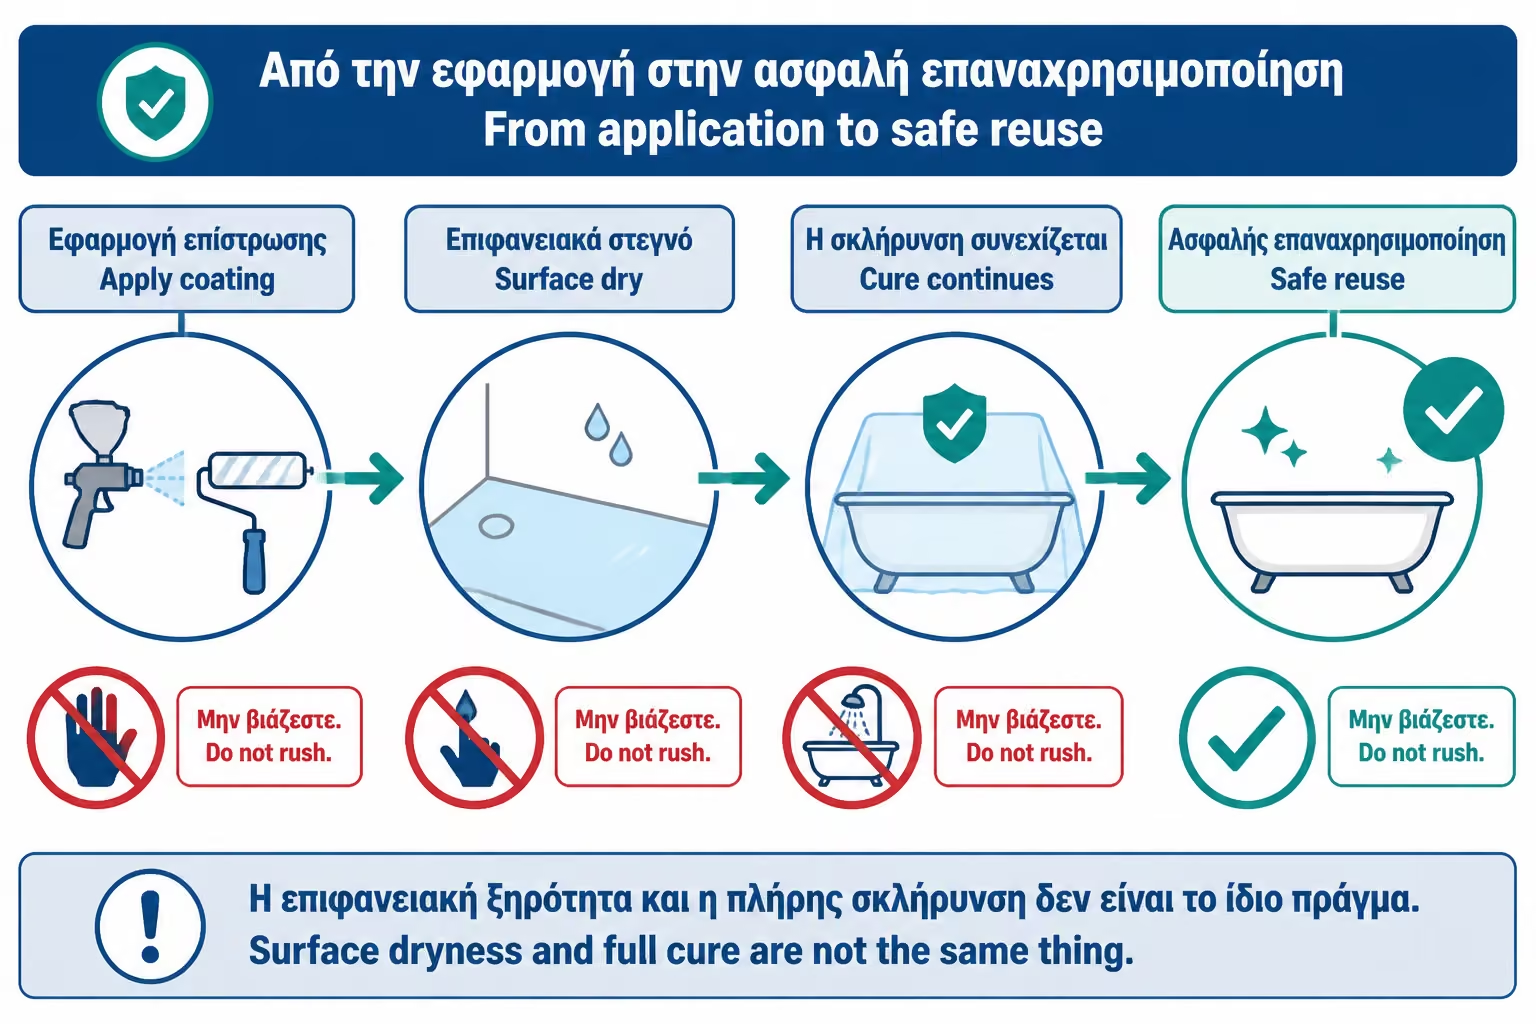
Refinishing doesn't end when it's dry to the touch. The coating needs curing, i.e. time to gain full strength. Rust-Oleum Tub & Tile TDS states to wait 3 days before exposure to water. Other DIY guides also stress at least 72 hours before use, depending on the product.
If you use the tub early, the coating may soften, dull, mark, or begin to peel. The same applies if you put silicone, mat or objects before their time. Patience in curing is key.
The professional may have products with different delivery times, but even there instructions must be followed. Miracle Method, for example, in the care instructions states to wait 24 hours before using the refinished surface. This indicates that times vary by system and must be observed.
Glazing uses chemical coatings, hardeners, solvents or products with strong odors. It is not simple painting with plastic paint. Requires ventilation, gloves, eye protection and appropriate mask/respirator per product. A simple dust mask is not enough when organic vapors are present.
Product safety instructions must be read. A Rust-Oleum Tub & Tile Safety Data Sheet lists warnings such as avoiding heat, sparks, flame and smoking, as well as actions in case of skin contact. Some professional DIY vs professional refinishing guides stress that at a minimum an organic vapor respirator, outside ventilation, chemical resistant gloves and eye protection are required.
If the bathroom does not have a window or strong ventilation, DIY refinishing becomes more dangerous and more difficult. There the craftsman with proper ventilation and equipment is a much more reasonable choice.
The new surface should be cleaned gently. We do not use abrasive powders, wire sponges, hard pads, strong acids or bleach without instruction. Miracle Method states in the care instructions: use only non-abrasive or liquid cleaners and avoid harsh acids or bleach.
We also avoid bath mats with suction cups that stay permanently on the tub, because they can trap moisture and pull the coating. We do not allow metal objects, hair dyes or chemicals to sit on the surface. We do not throw heavy objects into the bathtub, because the chips are the beginning of future peeling.
The enameled surface needs care similar to a delicate new finish. If you treat it like factory porcelain with a hard grind, you will shorten its life.
The sink is a smaller surface, but receives very frequent cleaning, soaps, toothpastes, cosmetics, hair dyes and hot water. The bathtub has a larger surface and accepts body, friction, water and possible impacts. Both are demanding.
DIY on a sink may seem easier because of the size, but the finish is very obvious because it is close to the eye. A small blemish on the sink is visible every day. In the bathtub, the large surface area makes it difficult to achieve a uniform result without marks.
If the sink is cheap and easily replaced, it may not be worth refinishing. In a built-in or vintage sink it might be worth it. For a bathtub, especially a built-in one, refinishing is often much better value for money.
| Case | DIY refinishing | Professional |
|---|---|---|
| Minor surface damage | Possible | Better result |
| Old cast iron master bath tub | At risk | Better |
| Rented / temporary refresh | Good choice | Perhaps an exaggeration |
| Bathtub with chips and rust | Difficult | Better |
| Poor bathroom ventilation | Not ideal | Better |
| Requirement for a very smooth glossy finish | Difficult | Better |
| Low cost wash basin | Maybe not financially sensible | Maybe a replacement |
| Vintage or special type of hygiene | With care | Better |
DIY is possible, but the craftsman is worth it when the surface is important, everyday or difficult.
| Situation | Better choice |
|---|---|
| Yellowing, dullness, small scratches | Refinishing |
| Small chips with no structural damage | Refinishing with repair |
| Old heavy cast iron bathtub | Often refinishing |
| Deep rust / hole / severe corrosion | Replacement |
| Cracks in acrylic/fiberglass base that moves | Technical check, frequent replacement |
| Plumbing or siphon leak | First repair, then evaluation |
| Complete bathroom layout change | Replacement |
| Just aim for a clean white image with no clutter | Refinishing |
Refinishing is a surface solution. It does not solve plumbing, structural or ergonomic problems.
In the Greek market of 2026, DIY refinishing has lower material costs, but takes time, attention and protective equipment. Estimate kit, sandpapers, cleaners, tapes, nylon, gloves, organic vapor mask, rollers/brushes and possible chip repairs. The real cost is not just the box.
Professional glazing costs more, but includes labor, preparation, repairs, materials, spraying and usually a better final finish. In relation to replacing a built-in bathtub, broken tiles, plumbing and rubble, it can be much more economical. American cost sources indicate professional bathtub refinishing at several hundred dollars and DIY kits much lower, while replacement can cost many times more.
In Greece the prices depend on the city, condition, type of hygiene, access, ventilation, if there are chips/rust and if it is done on site or in a laboratory. The key is to compare with the cost of a complete replacement, not just the cost of the kit.
A proper quote for glazing should not just say “painting a bathtub”. It must describe cleaning, degreasing, removal of old silicone, sanding/etching, chip repair, use of bonding agent or primer, coating type, application method, lead time and maintenance instructions.
It must also state if new silicone is included after curing, space protection, venting and warranty. If there is old failed enamel, it should be mentioned if it will be removed and how. If there are deep cracks, a technical evaluation must be done before a promise is made.
Also ask what is not covered: knocks from objects, use of abrasives, chemicals, suction cups, hair dyes, standing water or misuse. Proper maintenance is part of the lifespan.
The first mistake is insufficient cleaning. If soaps and salts remain, the coating will peel off.
The second mistake is insufficient sanding or poor adhesion preparation.
The third mistake is hasty use before curing. Rust-Oleum, for example, calls for 3 days before exposure to water.
The fourth mistake is insufficient ventilation and wrong protective means.
The fifth mistake is applying over deep rust, structural cracks or old peeling enamel without proper removal.
The sixth mistake is the use of harsh cleaners after enameling.
| Inquiry | Yes / No |
|---|---|
| Is the tub/sink structurally sound? | Yes / No |
| Is the wear mostly superficial? | Yes / No |
| Are there deep cracks or rust? | Yes / No |
| Is there a possibility of good ventilation? | Yes / No |
| Do you have time for the surface to be unused for as long as required? | Yes / No |
| Can the silicone be removed and reinserted properly? | Yes / No |
| Is the DIY kit suitable for the surface material? | Yes / No |
| Do you have an organic vapor mask and protective gear? | Yes / No |
| Do you want a temporary refresh or a long-term professional result? | Yes / No |
| Have you compared the cost of refinishing to replacement? | Yes / No |
If the answers show severe wear, poor ventilation, or high strength requirements, the craftsman is a safer choice.
> Enameling is worth it when the bathtub or sink is strong but ugly to look at. If the problem is yellowing, dullness or small bumps, it can give an impressive result without peeling. But if there are deep cracks, rust, leaks or movement in the material, don't see it as a magic solution. For DIY choose only special tub & tile kit, work with very good ventilation and respect the curing time. For an everyday master bath, an old cast-iron tub, or a requirement for a flawless finish, a professional craftsman is usually the right choice.
Bath and sink enameling is a smart solution when we want to renew old, worn or yellowed sanitary ware without crumbling, tiles and rubble. It can make an old tub look impressively clean and modern, especially when the substrate is quality and the wear is superficial.
But it is not simple painting. It needs deep cleaning, degreasing, sanding, chip repair, special coating, proper ventilation and strict curing. DIY can work in simple cases, but has a greater risk in uniformity, gloss and durability. Professional costs more, but usually gives better preparation, smoother finish and more reliability.
For the owner, the right question is not only "can I do it myself?". It is "what result do I expect, how much will the surface be used and what risk do I accept?". If you want a budget refresh, DIY can make sense. If you want daily durability and a flawless look, call an expert.
Return to category.
Go to categoryReturn to the central guide.
Go to guide