
Bathroom Surface Materials & Finishes
Return to category.
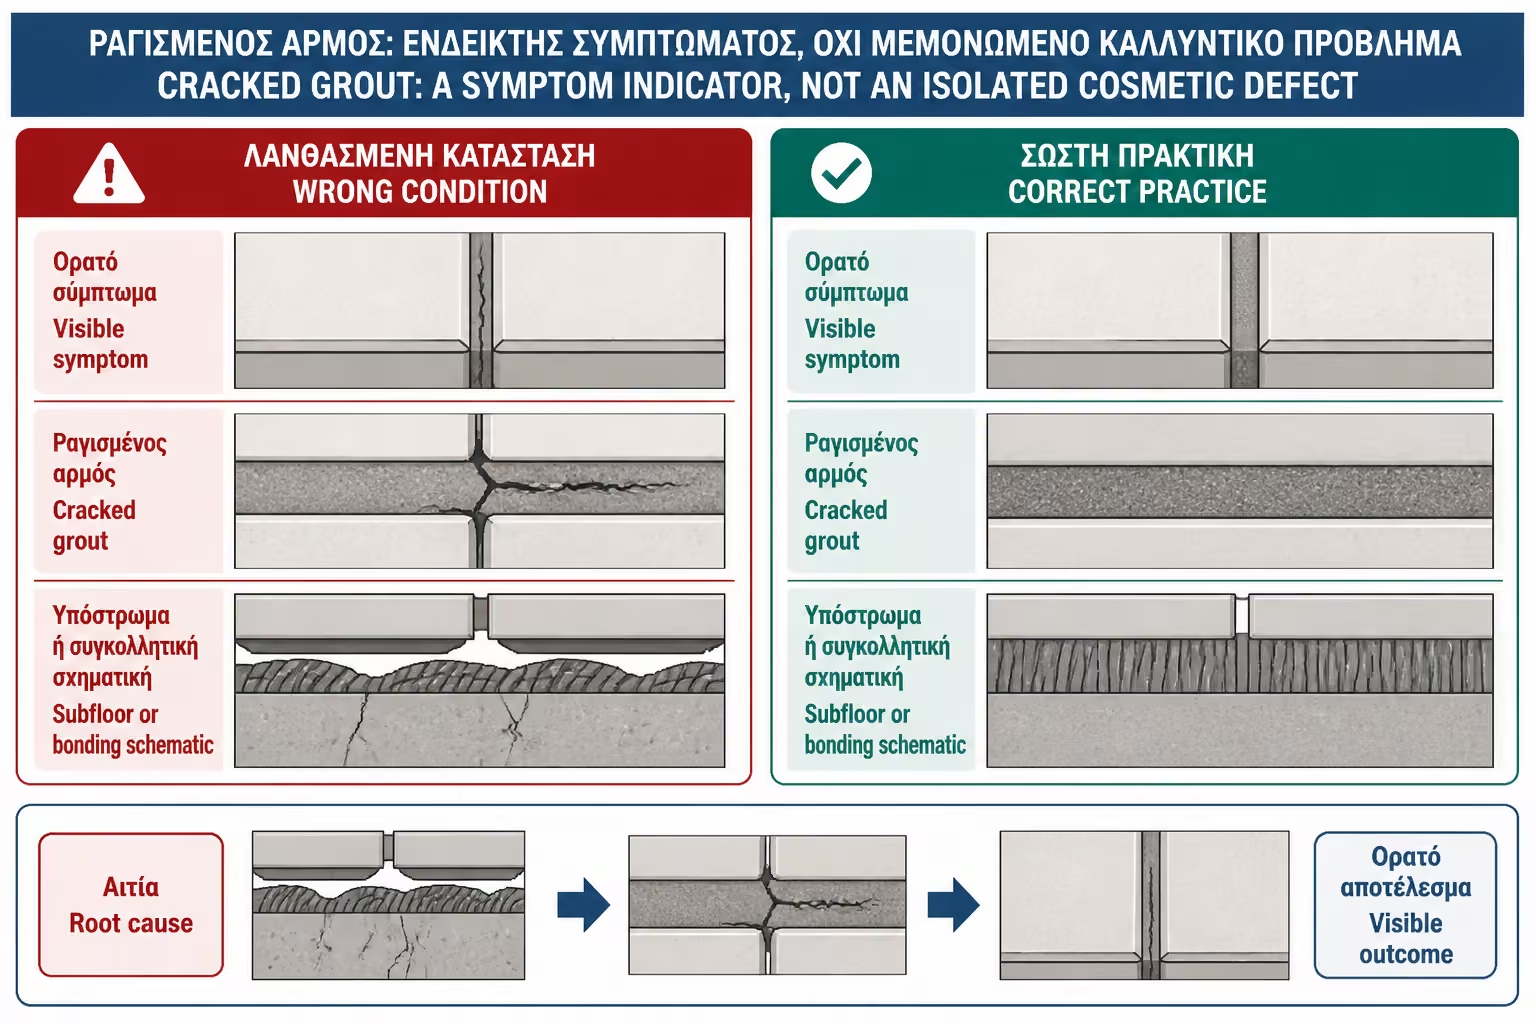
Go to categoryA cracked joint is rarely just a cosmetic problem. It may be a small surface crack caused by incorrect mixing, but it can also be the first visible sign that the floor is moving, that the tiles are hollow, that there is moisture under the lining, or that the corners were filled with the wrong material. The joint is weaker than the tile, so it often fails first and warns us that something in the system is not working properly.
The common mistake is to treat every cracked joint in the same way: "scratch it and go over it again". This might work if the problem was just bad implementation. But if there is movement of the substrate, hollow tiles or moisture underneath, the new joint will burst again. Maybe not in the first week, but in a few months. The correct approach is first diagnosis and then repair.
The main causes are known in the technical literature: excessive water in the mixture, insufficient filling of the joint, movement or bending of the substrate, building movement, humidity, thermal changes and the wrong use of hard grout in places that should have had an elastic sealant. TCNA cites excessive substrate deformation, insufficiently cured grout within the joint, and grout with excessive water or polymer additive as common causes of cracked/loose grout.
LATICRETE, in a troubleshooting guide for cementitious grouts, mentions excessive water in the mixture, bending/movement of the substrate and movement of the building as the main causes for cracking of grout joints. Mapei also links joint cracking to moisture, movement and incorrect application, stressing that joints in kitchens and bathrooms are particularly stressed by water and moisture.
The important thing for the owner is not to rush to a conclusion. Another means a joint that crumbles like dust. Another joint that has opened a straight line along an angle. Another bursting joint between two concrete tiles. Another floor that sounds hollow when we hit it. Each symptom points to a different cause.
The grout sits between the tiles and is usually weaker than the tile itself. This is not necessarily a bad thing. In a paving, the joint acts as a zone of filler and small tolerance. But if the system receives voltage, often the joint is the first point that will show the problem.
A joint may burst because it itself was weak. But it can pop because the tile is moving. And that's the big difference. In the first case, the solution is proper removal and reassembly. In the second case, the reassembly is a temporary "makeup". The problem will return, because the cause is under or around the joint.
In practice, when we see cracked joints, we have to ask: is the grout material breaking, or is the surface holding it moving? If we answer this question correctly, we have solved half the problem.
The first step is to look at the type of damage. If the joint has fine surface cracks, like "crackles", it can be caused by too much water, rapid drying, incorrect mixing or excessive sponging. If the joint is deeply opened and appears empty, the problem is more serious: it may not have been filled properly, it may have come off the edges of the tiles, or there may be movement.
If the joint crumbles when scraped with a screwdriver, it is probably weak in material. This often happens when too much water has been added to the mixture or when the craftsman overwashed it in the application. But if the joint is hard but has been cut cleanly in a line, there may be movement at the base.
In wall-to-floor or wall-to-wall corners, cracking is often not a “grout failure”. It's the wrong choice of material. Elastic silicone or a suitable sealant should have been put in there, not hard cement grout.
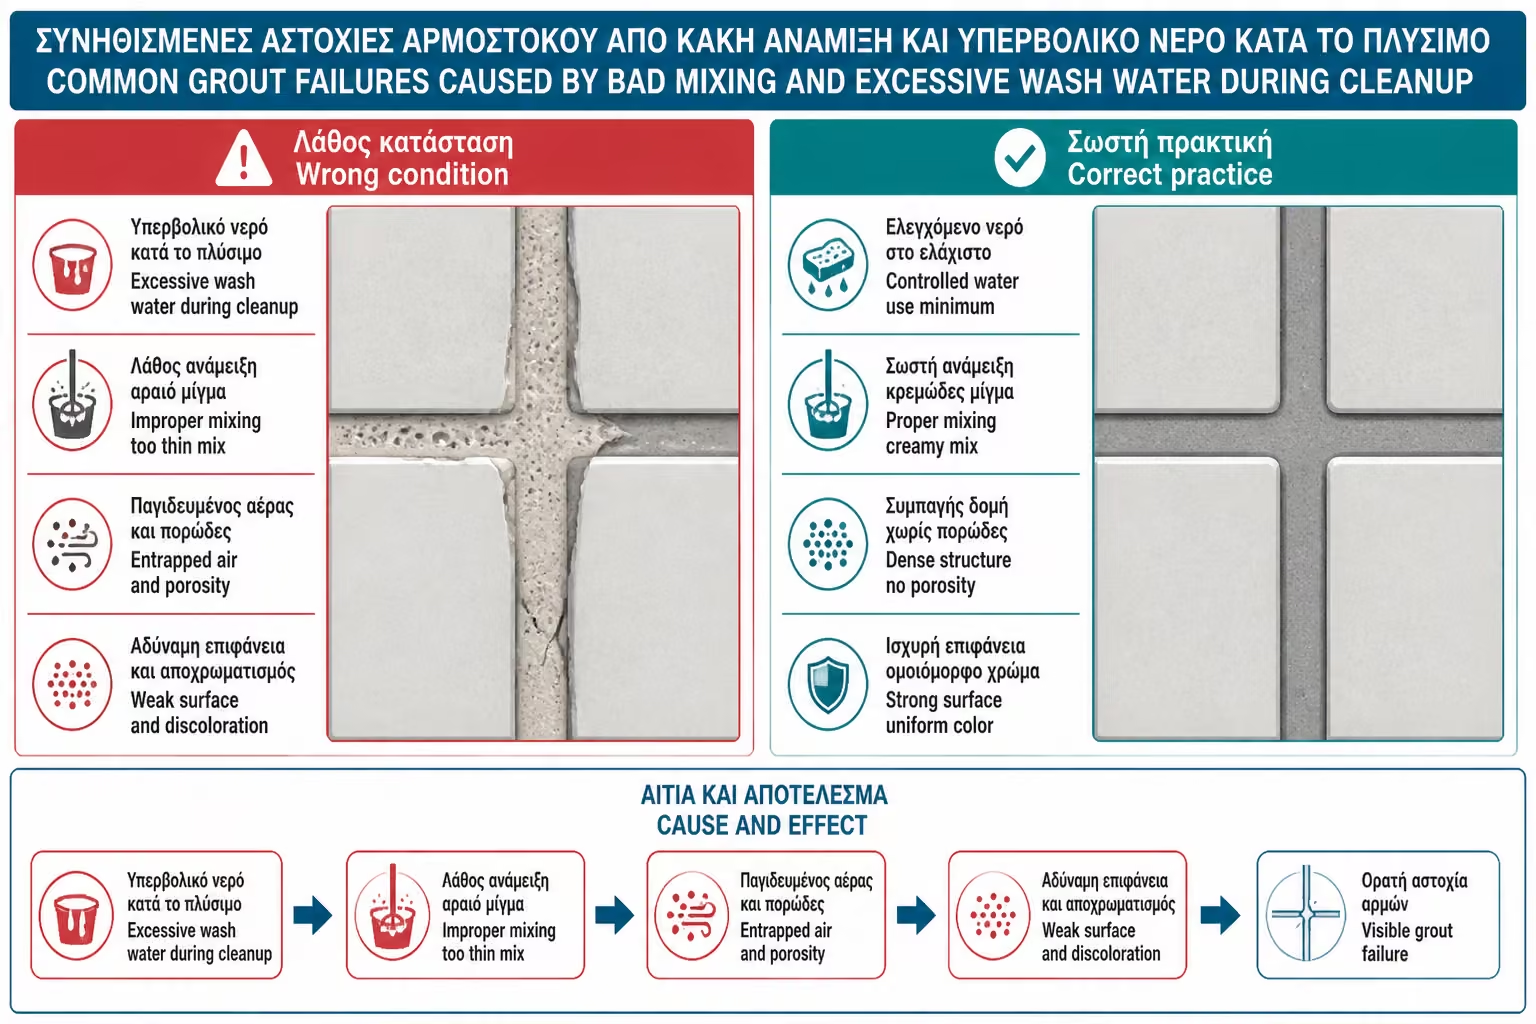
Cementitious grout needs a certain amount of water. If more water is added to make it easier to spread, the mixture becomes weaker and shrinks more as it dries. The result can be cracks, chipping, uneven color and white spots.
This is especially common when the craftsman wants to work quickly or when the grout starts to set and extra water is added "to liven it up". This practice is wrong. The grout has a pot life, i.e. workability time. When it starts to congeal, we don't save it with water.
If the cracking occurs in many areas, relatively evenly, without hollow tiles and without a definite line of movement, poor mixing is a likely cause. If accompanied by faded or uneven color, the possibility increases.
Even if the mixing is done correctly, the joint may weaken during cleaning. When the sponge is very wet and repeatedly passed over the fresh joint, it washes cement, pigments and fines from the surface. The joint looks clean on the first day, but its surface layer may be weak.
This leads to small cracks, dusting, color unevenness or rapid wear. On bathroom floors, where there is friction and cleaning, the problem appears more quickly. On walls it can be seen later.
Proper cleaning is done with a well-drained sponge and at the right time. We do not "wash" the joint. We clean the surface of the tile without diluting the joint in the joint.
A joint may appear full on the surface but be hollow on the inside. This happens when the grout was not pressed properly into the gap or when the tile adhesive had risen too high and did not leave enough depth. Then the joint is a thin surface layer, not a real filling.
TCNA cites insufficiently cured grout within the joint as one of the causes of cracked/loose grout. This is a very practical problem. If the joint has no "body", it has no strength. It will go to pieces or open at the first strain.
In repair, it is not enough to put new grout on top. The depth of the joint must be cleaned and properly filled. If the old joint remains as a thin weak layer underneath, the new layer may peel off.
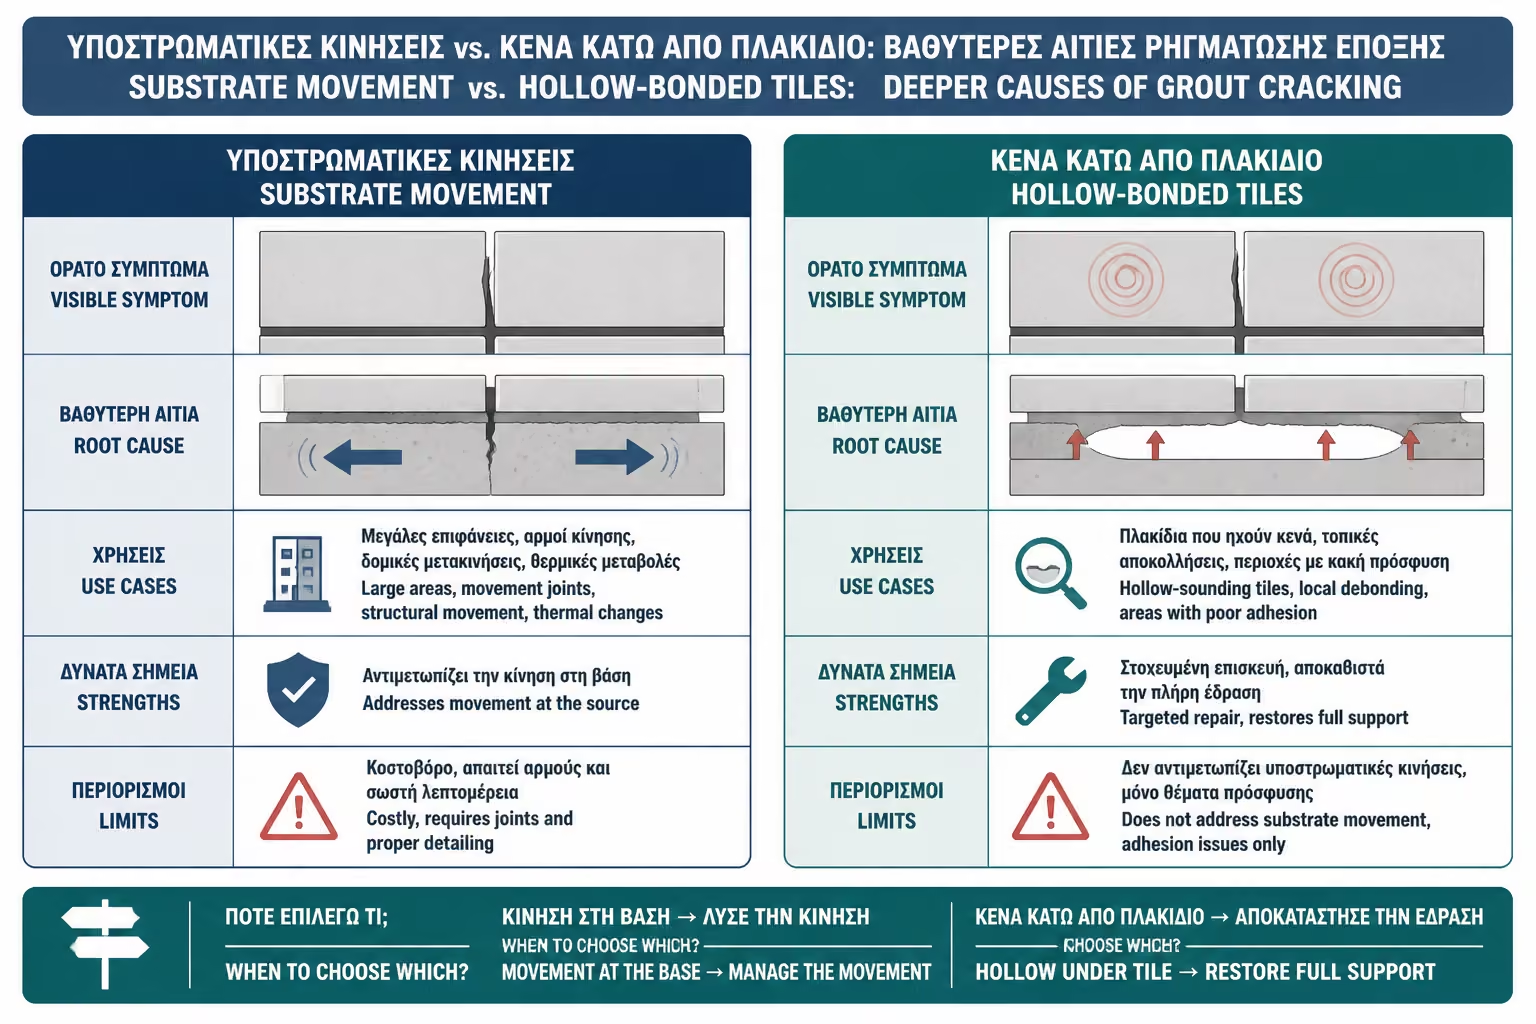
Substrate movement is one of the most common and most serious causes. If the floor bends, if the plasterboard moves, if the cement mortar is not stable, if the old tile underneath is hollow, or if there are thermal changes, the joint receives stresses. Because it is weaker than the tile, it pops first.
This is often seen in floors over a wooden base, in old houses, in upstairs bathrooms, in sub-floors that have not been reinforced properly, or in large tiles with few joints. LATICRETE cites the flexural movement of substrate as the cause of cracking, i.e. the bending of the substrate.
The typical symptom is that the joint pops again in the same place after a repair. This is an indication that the cause was not the grout. It was the movement.
If a tile is hollow, it moves even slightly when tapped or charged. This tiny movement is enough to break the joint around it. The owner sees the joint cracking, but the cause is insufficient adhesion of the tile.
The test is simple: tap the tiles around the cracked joint. If they sound hollow, regrouting will not solve the problem. The tile itself has to be addressed. If it is an isolated case, that tile may be removed and reset. If the problem extends further, there is a more general installation issue.
In large tiles, the gaps under the slab are particularly dangerous. If not properly covered with glue, the corners and edges are charged unevenly. The joint then opens or breaks around the weakest points.
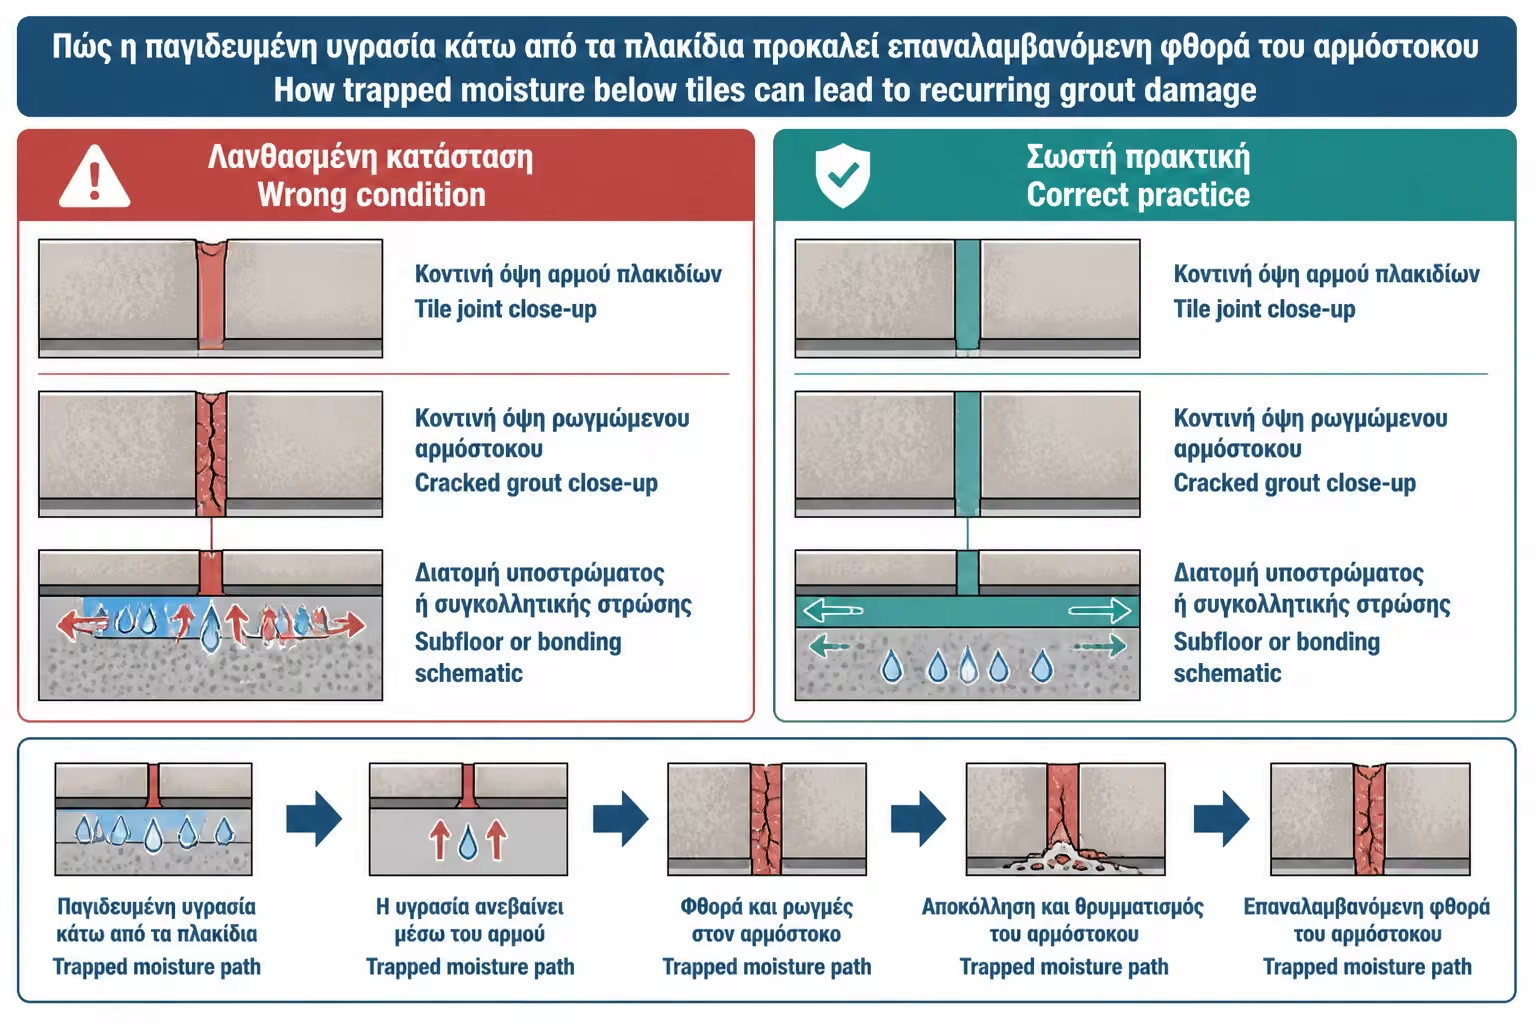
Moisture under tiles can cause many problems: weakening of cementitious materials, rashes, mold, peeling, spalling and cracking. In a bathroom, moisture can come from poor sealing, a leaking pipe, a siphon, bad silicone, cracks in corners, or water seeping through joints and staying under the lining.
Mapei reports that excess moisture can weaken conventional joints, especially in areas such as kitchens and bathrooms. If the joint often darkens, if salts appear, if there is a smell of dampness or if there is swelling on an adjacent wall, the matter should be examined more deeply.
Joint sealer can reduce absorption, but does not dissolve moisture under tiles. If there is an active water source, the solution is detection and repair, not just new grout.
In floors with underfloor heating, the joints receive repeated thermal changes. Substrate, adhesive, tile and grout expand and contract. If the correct adhesive, correct expansion joints and suitable grout have not been used, the stresses can manifest as cracks in the joints.
The problem becomes more pronounced with large tiles because there are fewer joints per surface. Also, if the joint is too narrow or if there are no circumferential gaps, the movements have nowhere to expand.
In such applications, the solution is not simply “stronger grout”. A correct system is needed: S1/S2 glue where required, correct expansion joints, adherence to curing times and gradual start of heating.
Internal corners, wall-floor junctions, areas around bathtubs, showers and counters should not always be filled with hard cementitious grout. There surfaces may move differently. If a hard joint gets in, it will often crack.
The correct material in many such joints is sanitary silicone rubber or a suitable sealant. If you see a straight crack right in the corner, that often doesn't mean the grout was bad. It means that the wrong material was used where elasticity was needed.
The repair here is different. The hard joint is removed from the corner, thoroughly cleaned, dried and the correct silicone or sealant is applied. If cement grout is put back in, it will probably crack again.
When the joint is too tight, it doesn't have enough room to properly fill and function. In rectified tiles we can go to a thin joint, but not to zero. If the joint is close to 1 mm or the tiles are touching each other, the grout can only stay on the surface.
This leads to peeling, pitting and small gaps that collect dirt. Also, the edges of the tiles are pressed together more in expansions and contractions. The result can be broken edges or open random lines.
A thin joint requires a good tile, the right substrate, the right grout and the right fit. It's not just an aesthetic choice.
Not all grouts are suitable for all backs, all tiles and all uses. A grout for very thin joints should not be used in a wide width unless permitted by the manufacturer. A simple cement grout on a heavily used shower floor can wear out quickly. An unsuitable outdoor grout may not withstand moisture and thermal changes.
In floors, showers and heavy use, enhanced CG2 WA or RG epoxy is often preferred where there is increased demand. In very wide joints we want a product that allows the specific width. On glass mosaics or sensitive surfaces we want a product that does not scratch.
If the grout doesn't fit the application, it may crack not because it was applied poorly, but because it was the wrong product for the job.
If the joint is placed before the adhesive has sufficiently dried or cured, the moisture underneath can affect the setting, color and stability of the grout. This is especially likely with large granite tiles, where the adhesive dries more slowly because the tile has very low absorbency.
The result can be uneven color, white spots, a weak joint or future cracking. In a bathroom, the rush is frequent because space must be delivered quickly. But the times of the materials must not be violated.
If fast delivery is needed, suitable rapid setting systems are selected from the start. We do not arbitrarily rush the process.
Use the table below as a quick reference for the key points of this section.
| Symptom | Possible cause | What do we control? |
|---|---|---|
| Fine surface cracks | Too much water, quick drying, too much washing | Joint color, chipping, uniformity |
| The joint turns to dust | Weak mixture, too much water, poor ripening | If it scratches easily in depth |
| Right angle crack | Wrong use of hard grout instead of silicone | If it is a level/angle change |
| Cracking around a specific tile | Hollow or moving tile | Hitting tiles for a hollow sound |
| Repetitive popping in the same spot | Substrate movement or expansion joint | Substrate, thermal movements, structural joint |
| A joint that darkens and releases salts | Moisture under tiles | Leaks, siphon, sealing |
| Cracks in large floor | Lack of expansion joints, thermal movements | Perimeter gaps, subfloors, surface |
| Cracking in a very thin joint | Insufficient padding or zero tolerances | Joint width, depth, grout type |
The table is not a substitute for a technical check, but it helps to prevent all problems from being treated in the same way.
The inspection begins visually. We look at where the crack appears: throughout the bathroom or only along one line? On the floor or on the wall? In a corner or in the middle? Around a tap, basin, shower enclosure or tub? The location says a lot.
Then we check mechanically. We tap the tiles around the problem for a hollow sound. We press lightly to see whether there is movement. We carefully scrape the joint to see whether it crumbles or remains hard. We also check for moisture, salts and odor.
If the problem is extensive or moisture is suspected, a technician is needed. A hygrometer, thermal camera, siphon check, point opening or tile removal may be needed. Not all damage is visible on the surface.
Simple re-grouting may be sufficient when the cause was purely application: poor mixing, too much water, insufficient filling or surface wear, but the tiles are stable, the substrate does not move and there is no moisture. In this case, the old joint is removed to a sufficient depth, the joint is cleaned, dried and refilled with a suitable grout.
It is not enough to pass a thin layer over the old joint. New grout needs depth to set. If it enters superficially, it will leave. Ideally, enough material is removed so that the new joint has real body.
The choice of grout must suit the use. In a shower or floor, a good CG2 WA or epoxy may be a better choice than a simple grout.
It is not enough when there are hollow tiles, substrate movement, moisture, cracks in the cement mortar, delamination, poor sealing or lack of expansion joints. In these cases, the joint is the symptom. If we replace it without correcting the cause, it will blow again.
If the tile is hollow, it must be removed and re-glued or the overall placement must be examined. If there is moisture, the source must be found. If silicone is missing in the corner, rubber sealant is inserted. If there is substrate movement, reinforcement, decoupling or new construction may be required.
The most expensive repair is the one that is done twice. That is why the diagnosis comes first.
In the Greek market of 2026, simple local reassembly is a relatively small cost, especially if it concerns a few square meters or a zone. Costs go up when deep grout removal, cleaning, special grout, epoxy grout or work on small tiles/chips is required.
But if the cause is hollow tiles or moisture, the cost changes. It may require tile removal, subfloor repair, new adhesive, new caulking, silicone replacement, or a plumbing check. In such cases, a cheap "we'll do it again" offer can be misleading.
The owner must ask for a quote with a diagnosis: what is removed, to what depth, what grout is put in, if hollow tiles are checked, if there are corners to be made with silicone and if there is a suspicion of moisture.
Use the table below as a quick reference for the key points of this section.
| Cause | Correct solution |
|---|---|
| Too much water in the mix | Remove weak joint and rejoin with correct ratio |
| Excessive washing | Removal of superficially weak joint, proper application |
| Incomplete filling | Deep cleaning and complete reassembly |
| Hollow tile | Remove/reattach tile, then grout |
| Substrate movement | Base reinforcement/repair, not just a new joint |
| Corner with hard grout | Removal and application of sanitary silicone or suitable sealant |
| Moisture under tiles | Locate source, seal/plumbing repair |
| Lack of expansion joints | Creation/rehabilitation of elastic joints where applicable |
The right solution is not always the fastest one. It is the one that deals with the actual cause.
Prevention starts from the substrate. It must be firm, clean, dry and suitable for tiling. The adhesive must be right for the tile and space. Large tiles need proper coverage. Joints must be of sufficient width and depth. Corners should be made with elastic material where necessary.
The grout must be mixed according to the instructions. We do not add water arbitrarily. We don't wash excessively. We do not grout before the glue dries. We are not using the wrong type of grout for the width or use.
In damp areas, waterproofing should be done under the tiles. Grout and sealer are final protection and maintenance, not a substitute for waterproofing.
Use the table below as a quick reference for the key points of this section.
| Question | Yes / No |
|---|---|
| Is the crack superficial or deep? | Yes / No |
| Does the joint crumble when you lightly scrape it? | Yes / No |
| Do the tiles around the joint sound hollow? | Yes / No |
| Does the popping occur at a corner or level change? | Yes / No |
| Are there salts, dark joints or a damp smell? | Yes / No |
| Is there underfloor heating or heat stress? | Yes / No |
| Is the joint too tight or almost non-existent? | Yes / No |
| Was the glue sufficiently dry before grouting? | Yes / No |
| Has the same spot been repaired again and it popped again? | Yes / No |
| Do the corners have silicone or hard grout? | Yes / No |
If there are many yes answers to hollow tiles, moisture or repeated cracking, simple re-grouting is not enough.
If a joint pops once, the application may be to blame. If it pops again in the same spot, there's almost always a deeper cause: movement, hollow tile, moisture, or incorrect corner sealing. Before paying for new grouting, tap the tiles for a hollow sound, check if the crack is at an angle, look for dark-colored moisture or salts, and have the old grout removed at depth. Grout is not a substrate repair material. It is final filling on a proper base.
Joints "pop" for three large families of reasons: incorrect application, movement and moisture. Improper application includes excessive water, poor backfill, excessive washing, and premature grouting. Movement includes hollow tiles, substrate bending, thermal changes, underfloor heating and lack of expansion joints. Damp includes leaks, poor sealing, siphons, cracked silicones and water under tiles.
The solution depends on the diagnosis. If the joint was merely weak, it is removed and remade properly. But if there is a hollow tile or movement, the base must be fixed. If there is moisture, the source must be found. If the crack is at an angle, it probably needs elastic silicone, not new hard joint.
For the owner, the practical conclusion is simple: don't repair the joint before you understand why it popped. A properly diagnosed joint can be permanently repaired. A joint that is simply re-passed without checking will usually remind you in a few months that the real problem was under the surface.
Return to category.
Go to categoryReturn to the central guide.
Go to guide