
Bathroom Surface Materials & Finishes
Return to category.
Go to categoryThe idea is enticing: instead of ripping out the old tiles, letting in debris, dust, noise, and the unexpected, we keep the existing floor and cover it with new material. It can be new tiles, LVT or SPC vinyl flooring, pressed cement mortar / microcement, even some special resin coating. In practice, this method can save time, money and hassle. But it can also create problems if done without control.
Renovating "on top of the old" is not a technical solution. It is a family of solutions. The installation of a new tile on top of an old tile has different requirements, others the installation of LVT/SPC, others the microcement. The common point is that the old floor now becomes a substrate. If this substrate is firm, clean, flat and free of moisture, it can work. If it is hollow, loose, dirty, shiny without preparation or with active moisture, then whatever you put on top will "inherit" the problem.
This is the first thing the owner needs to understand. We don't put new material over old tile because we just want to avoid stripping. We only do this when the old tile can technically remain. Mapei, in a system of laying ceramic tiles over existing ceramic floors, states as a first step that the old tiles must be clean and well adhered to their base. If there are delaminations, cracks or “hollow” spots, these must be addressed before considering new material.
The second big issue is height. Each new material adds millimeters: glue, primer, self-leveling, new tile, LVT, SPC, microcement, profiles, thresholds. These millimeters may seem small on paper, but in practice they affect the door, threshold, siphon, basin, furniture, patio doors and transitions to other rooms. A floor raised 12–15 mm can cause the door to find, create a step at the entrance to the bathroom or “bury” an old floor drain.
The third issue is traction. Old tiles are often smooth, shiny and non-absorbent. It is not like cement mortar or plaster that "pulls" the material. This requires special adhesion primers, suitable adhesives or mechanical preparation, depending on the new system. Bostik, for example, in an instruction for tiling over tiles, mentions applying a tile-on-tile primer before laying new tiles with a suitable adhesive. Preparation isn't an optional detail; it's the difference between a successful renovation and flaking.
In this guide we will look at the general methodology: when the old tile can be left, when it should be stripped, what to watch out for with the door and heights, what about siphons and drains, how the method differs for tile, LVT/SPC and microcement, and what to ask the handyman before the work begins.
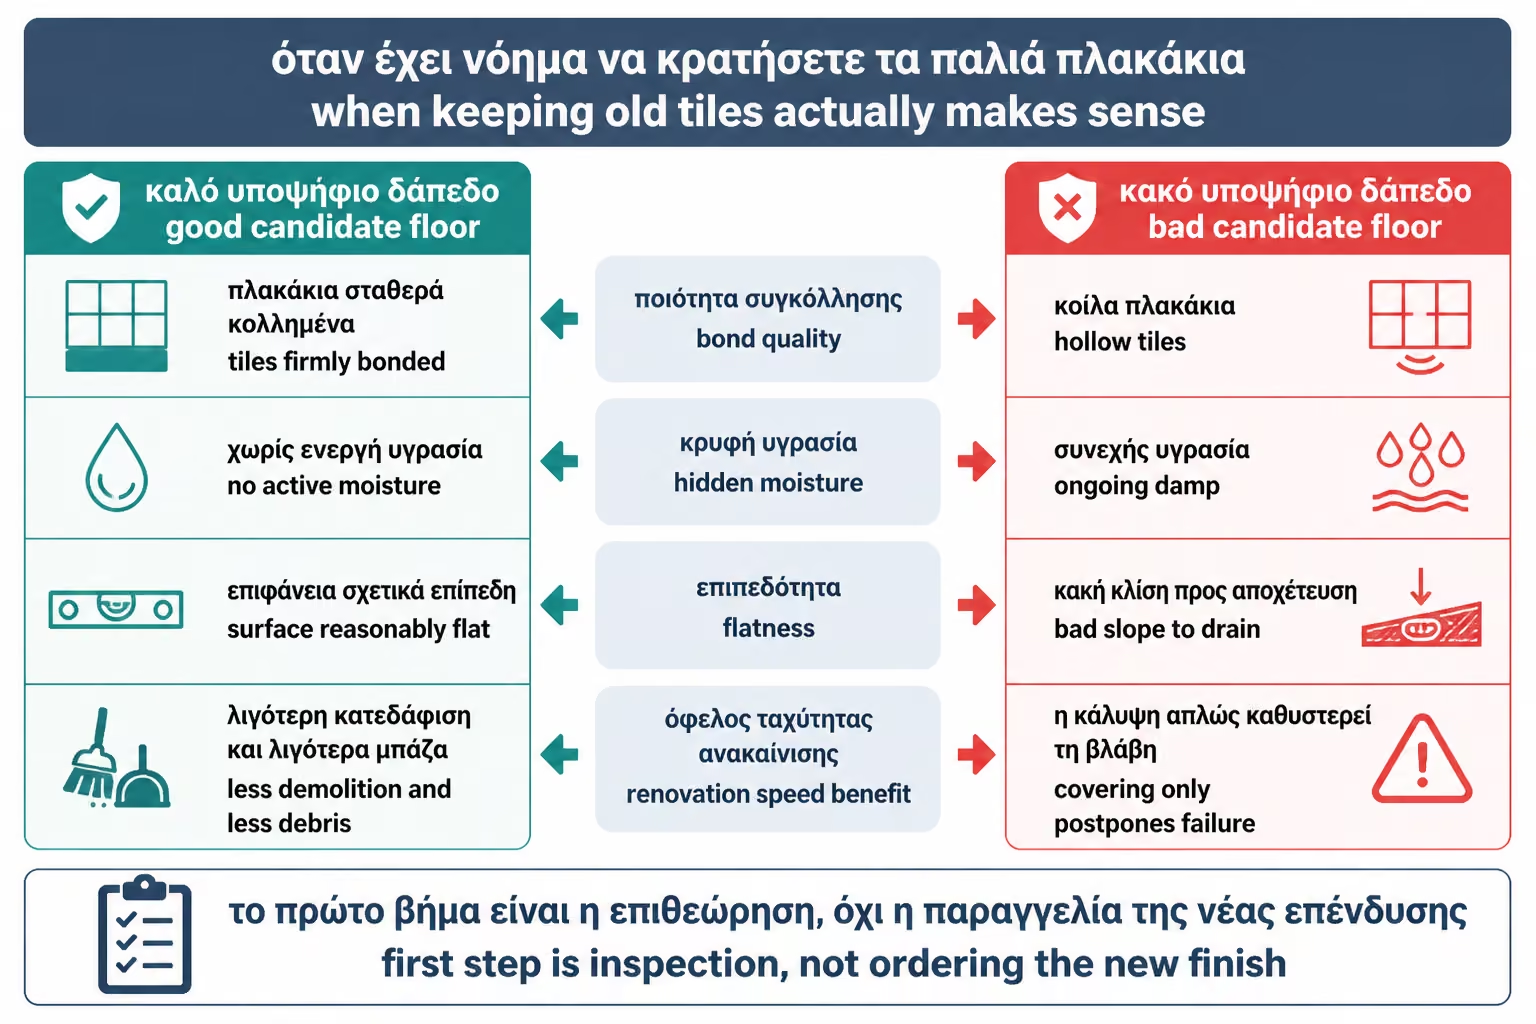
The "on top of the old" method makes sense when the existing floor is stable and sound. If the tiles are well glued, there are no hollow spots, no active moisture and the surface is relatively flat, then it can be a base for new material. In this case, you save time, avoid debris and limit the surprises that often occur when an old floor is stripped.
In residential homes, this is of great value. A bathroom that works every day, an apartment in an apartment building, an Airbnb that needs to be quickly returned to use or a small WC that needs an aesthetic renewal can benefit greatly from this logic. Instead of stripping, transporting bases, restoring the substrate and re-laying, the work is limited to preparation and coating.
But we must not be carried away by speed. If the old floor has a problem, covering is not a solution. It's postponing the problem. A hollow tile under a new tile remains hollow. An old joint that gets wet continues to be a weak point. A bad slope to the siphon is not corrected because we changed the finish surface. The first stage is always an inspection, not a hardware purchase.
There are cases where stripping is the right decision, even if it costs more. If many tiles sound hollow, if there are cracks that continue, if the floor has moisture underneath, if there is salt coming out of the joints, if the siphon is not working properly, or if the final height will create a serious problem, then "tile on top of tile" is not a wise solution.
A classic example is the old bathroom where the owner wants to put new tile over the old to save costs. But when the craftsman taps the tiles and half of them sound hollow, the base is not reliable. If a new tile is stuck on top, the new system will depend on the old failure. The weight increases, the stresses increase and the possibility of detachment increases.
Another example is the bathroom with an old floor drain that is already low or has poor flow. If you add new flooring on top, the downspout may be much lower than the finished surface or a rough extension may be needed. There maybe the right solution is stripping and new floor configuration, not overlay.
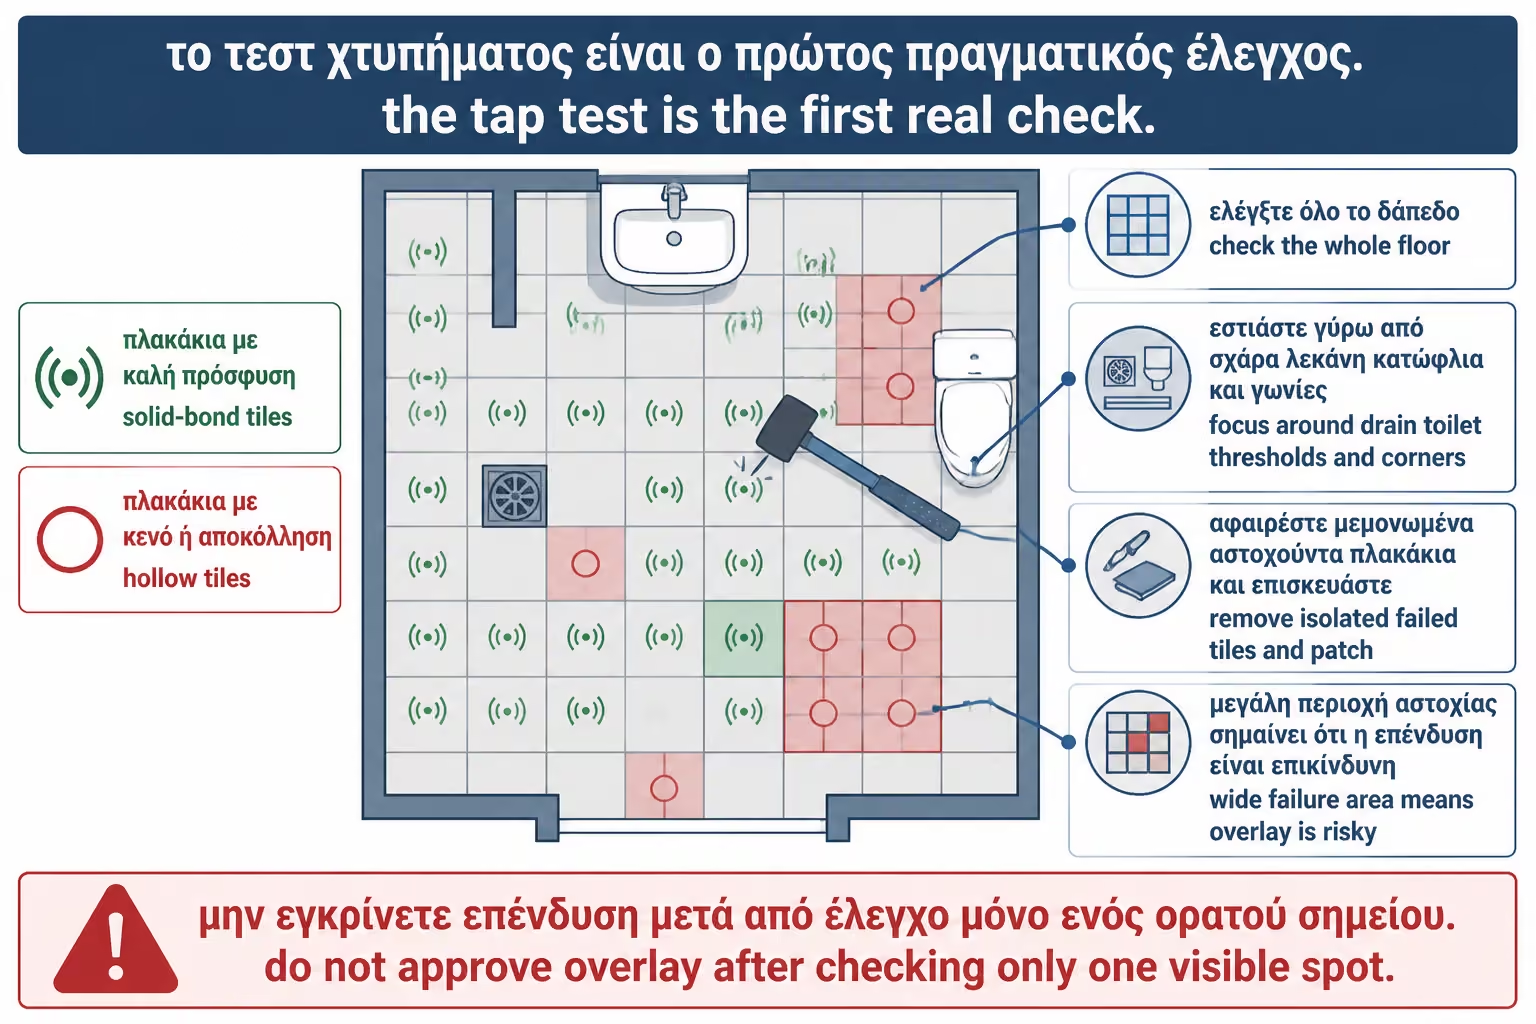
Before deciding on any method, the craftsman should check the old tiles. The simplest control is striking with a hard object or tool handle. Well-glued tiles have solid sound. Hollow tiles sound different, more "empty". Mr. Handyman, in instructions for tile-over-tile, says to inspect the adhesion of existing tiles by tapping them; any that sound hollow need to be removed because the old adhesive is no longer adequate.
If there are a few individual hollow tiles, they can be removed and the voids filled with a suitable repair mortar. But if the problem is extensive, the overlap becomes a risk. There is no reason to build a new floor over a base that is already peeling.
The check should be done over the entire surface, not just in two obvious spots. Particular attention is needed around siphons, basins, thresholds, corners, showers and places where there used to be moisture. That's usually where the problems start.
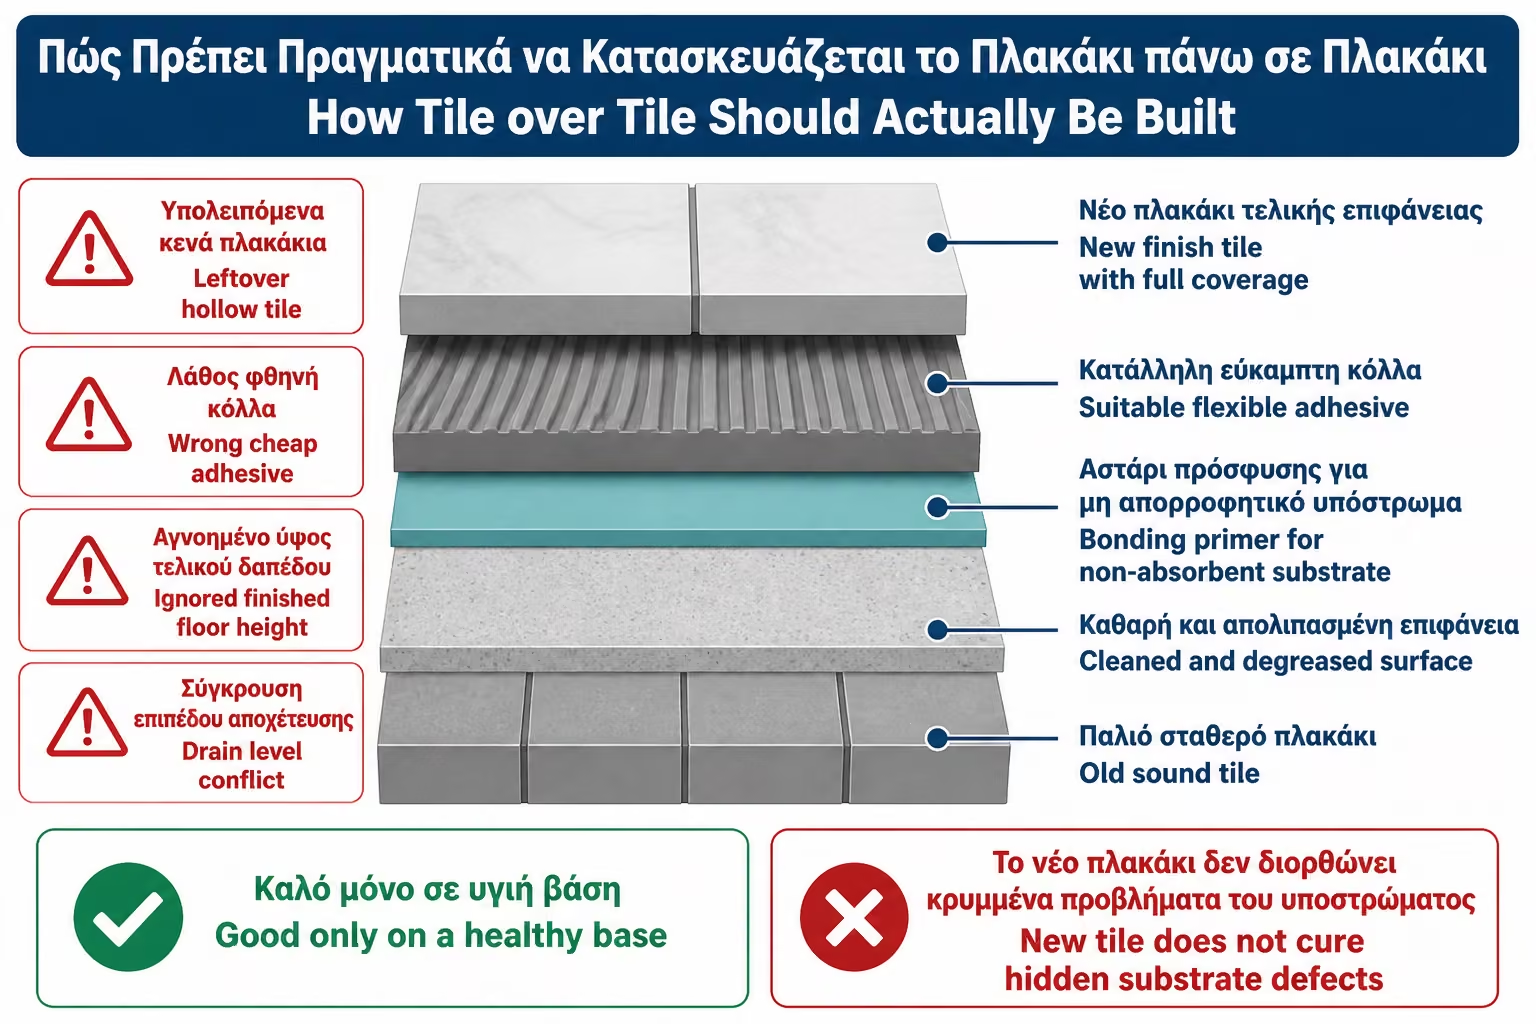
Old tiles in bathrooms and kitchens have years of soaps, salts, cleaners, greases, polishes, silicones and dust on them. If the new material sticks to them, it doesn't really stick to the tile. It sticks to a layer of dirt. That is why cleaning is a technical stage, not aesthetic preparation.
The surface must be cleaned with a suitable cleaner, degreased and dried. Ardex, in a guide to tile installation on existing tiles, mentions cleaning old tiles with detergent and water to remove dirt, sealers and waxes, rinsing with clean water and drying completely before applying adhesive.
In places with old silicones, these must be removed. Silicone is not a good substrate for glue, primer or microcement. If left, it can create a delamination zone. In bathrooms, this is a common mistake: the tiles are cleaned but silicone remains in the corners and around the basin.
Most old tiles are non-absorbent surfaces. This means that common glues or cement-like materials do not "catch" as they would in cement mortar. It needs an adhesion primer or a suitable system that creates a bridge between the smooth old tile and the new material.
These primers often have quartz sand or special polymers that create a rough adhesion surface. Another primer may be needed for new tile, another for microcement, another for self-leveling or resin. We do not use "whatever is available". We follow the manufacturer's system.
In tile-over-tile applications, Bostik recommends using a special GRIP A936 XPRESS primer before installing new tiles with a suitable adhesive. Accordingly, other manufacturers recommend slurry primers or special bonding primers for glossy ceramic surfaces. The key is that traction is not left to chance.
Placing a new tile on top of an old tile is possible when the base is good and the right materials are chosen. Usually the process includes inspection, removal of hollow pieces, gap repair, cleaning, adhesion primer, suitable elastic adhesive and proper installation with full coverage.
The adhesive must be suitable for a non-absorbent substrate and for the new tile. If the new tile is porcelain, large format or rectified, the requirements increase. A simple wall glue or cheap tile glue is not enough. In large dimensions, better adhesion is needed, a proper spatula and often double application.
Weight must also be calculated. On floors, weight is usually less of an issue than on walls, but on old structures, balconies or dubious substrates, care is needed. In bathroom walls, "tile on top of tile" adds weight and thickness, and is not always a good solution, especially if there are many old hollow tiles.
LVT and SPC are often thinner solutions than new tiles. This makes them attractive when we don't want to raise the floor height too much. A 4–6 mm SPC can change the look of the bathroom without adding the thickness of a tile with glue. But the base must be suitable.
SPC, because of its rigid core, can forgive small imperfections better than a thin glued LVT. However, it should not be placed on a floor with strong irregularities, deep joints or hollow tiles. LVT, especially glued, needs a much smoother base, because imperfections can "show" on the surface. Sources for installing vinyl over existing flooring stress that the substrate must be firm, smooth, and moisture-free because voids, holes, and bumps can show through the vinyl.
In a bathroom, LVT/SPC also needs perimeter sealing, especially near basins, sinks, tubs and cabinets. The fact that the product is waterproof as a material does not mean that water cannot pass under it. So here too, the issue is not only thickness and aesthetics. It's the details.
Microcement is one of the most popular solutions for covering old tiles without stripping, because it creates a uniform surface without tile joints. It can be applied on old tiles with proper preparation, but it is not a simple "pass". Needs substrate inspection, cleaning, primer, joint filling, reinforcing layer where needed, microcement layers, sanding and final sealer.
Topcret, in a guide to applying microcement on tiles, starts by assessing the condition of the existing tiles, cleaning and preparing, and filling the joints before the next coats. If the joints are not properly filled, they may appear as a grid on the finished surface. If the tiles are hollow, the microcement can crack or peel off.
In bathrooms and especially in showers, microcement must be combined with proper waterproofing. It is not enough to cover the old tiles. If there are old dampness underneath or bad slopes, they must be solved. Microcement gives a very beautiful uniform image, but its success depends on the substrate and sealer.
One of the most common practical mistakes is not calculating the final height. If you install a new tile over an old one, you may add 8–12 mm of the tile and another 3–6 mm of the adhesive, depending on the dimension and system. That is, the floor can rise 12–18 mm or more. This is enough to keep the door from closing.
In LVT/SPC, the height is less, but not zero. A 5mm SPC with underlay and possibly self-levelling can raise the floor 6–10mm. Microcement has a small thickness, usually a few millimeters, but if it is preceded by smoothing, waterproofing or other layers, the height increases.
Before you decide, measure the space under the door. If the door is wooden, it can be cut from the bottom in several cases. If it is an aluminum door, armored, special internal door or has a mechanism, things are more difficult. Also, the bathroom door should have adequate ventilation or a gap, especially if there is no window. If you raise the floor and close the bottom gap, ventilation may be affected.
When the height of the bathroom or kitchen rises, a difference is created with the adjacent space. This can become a small step, interfere with walking or hold water on the doorstep. A proper transition profile or threshold is needed.
In a bathroom renovation, the threshold also has a functional role. It may prevent water from escaping to the corridor, but it should not become a dangerous step. If the new floor rises a lot, a special profile, marble threshold or metal transition may be needed. Resources for floor transitions explain that when two floors are at different heights, transition strips act as small ramps or finials that protect the difference and reduce the risk of tripping.
The threshold must be designed before installation. If you remember this at the end, you might be forced into a sketchy profile that spoils the image or doesn't work properly.
Siphons are one of the most critical points when we raise the floor. If the old siphon remains lower than the new surface, a "puddle" can be created around it or a rough extension. If the new hardware covers it incorrectly, it may lose its function. If proper slope is not maintained, water will pool.
In bathrooms with a floor drain, it must be decided from the beginning what will be done. Will it stay? Will it be extended? Will it be replaced? Will it be covered because it is no longer needed? Will the grill change? Will new slopes be formed? These decisions are not solved with a cut at the end.
In LVT/SPC, the presence of a floor drain is particularly problematic if the floor gets wet. Floating systems do not like holes, siphons and water that can pass underneath. For tiles, the solution is more classic but requires proper extension and glue. In microcement, the siphon must be integrated into the sealing and sealer system. In any case, the siphon must not be "buried".
When the floor goes up, the relationship with sanitary ware also changes. The pelvis may need to be removed and repositioned. If the new material is simply cut around it, the result can look sketchy and create a difficult spot to clean. In many cases it is better to remove the basin, run the new floor properly and re-install it with new waterproofing.
Bathroom furniture is also affected. If it's floor-standing, the new height can change how it steps. If it is suspended, the floor can be seen from below and the cuts must be clean. If there are feet, they must be adjusted. If there is a shower with a low floor or cubicle, the new level may affect the cubicle door or profile.
In a kitchen, if we are talking about tile on tile, doors, skirting boards, dishwasher, refrigerator and furniture are affected. A washing machine may not come out if the floor rises in front of it. So the height change needs to be assessed across the space, not just in the center of the floor.
Old joints are lower than the surface of the tiles. If the new material is thin, such as LVT, vinyl, microcement or resin, these joints may show. This is called telegraphing or ghosting: the old mesh appears through the new surface.
To avoid this, the joints must be filled and smoothed. In LVT, a self-leveling or skim coat is often required. In microcement, the joints are filled and reinforcing layers are applied. In tile on tile, joints are less of a problem if the correct adhesive is used, but in large dimensions and thin layer care must be taken.
A practical example: old bathroom with small 20x20 tiles and deep joints. If thin LVT is glued over them without smoothing, after a while the square grid of the old tiles can be seen. The owner will think it's the LVT's fault, but it's actually the preparation.
Use the table below as a quick reference for the key points of this section.
| New material | Advantage | What to watch out for |
|---|---|---|
| New tile | Durable, proven solution | Door height, weight, adhesion primer, correct glue |
| LVT glued | Thin, warm touch, firm feel | It needs a perfectly smooth substrate and the right glue |
| SPC click | Fast, small thickness, DIY-friendly | It wants a flat base, perimeter sealing in a bathroom |
| Microcement | Single surface without joints | Needs joint filler, primers, sealer, good applicator |
| Resin / epoxy | Durable single surface | It needs mechanical conditioning and moisture control |
| Floor panels / special systems | Fast coverage | It depends on the system and compounds |
The table shows that each solution has its own logic. It is not enough to say "over tiles". We need to know what goes in from above and what is needed from below.
Cost depends on material, preparation and details. The stripping-free method can save costs in rubble, stripping labor and substrate restoration. But it adds cost to primers, smoothing, special adhesives, profiles and seals.
For new tile over old, tile, tile-over-tile adhesive, primer and labor must be calculated. Labor costs for simple installation can realistically be around €10–15/sq.m., but for a bathroom, large tiles, lots of cutting and preparation, the price goes up. For SPC/LVT, the material can range from around €18–45/sq.m. in good series, while placement may be more economical, but smoothing and trims add up. For microcement, the cost is usually higher as a complete system, especially in a bathroom, because it involves many stages.
The right comparison is not just "how much does the material do". It is "how much it makes the complete project ready, with correct base, correct heights, siphons, doors, profiles and sealings". An inexpensive solution that does not involve preparation can become expensive if it fails.
The first mistake is to start the selection from the new material and not from checking the old floor. If the base is not good, it doesn't matter how good the new material is.
The second mistake is not measuring the final height. The door, threshold, siphon and basin are affected.
The third mistake is the omission of a special adhesion primer on smooth old tiles. Adhesion is not a given.
The fourth mistake is covering the siphon or extending it casually. The siphon is a technical point, not an aesthetic detail.
The fifth mistake is the use of LVT/SPC in areas where the floor acts as a wet room. Not all solutions are suitable for continuous water.
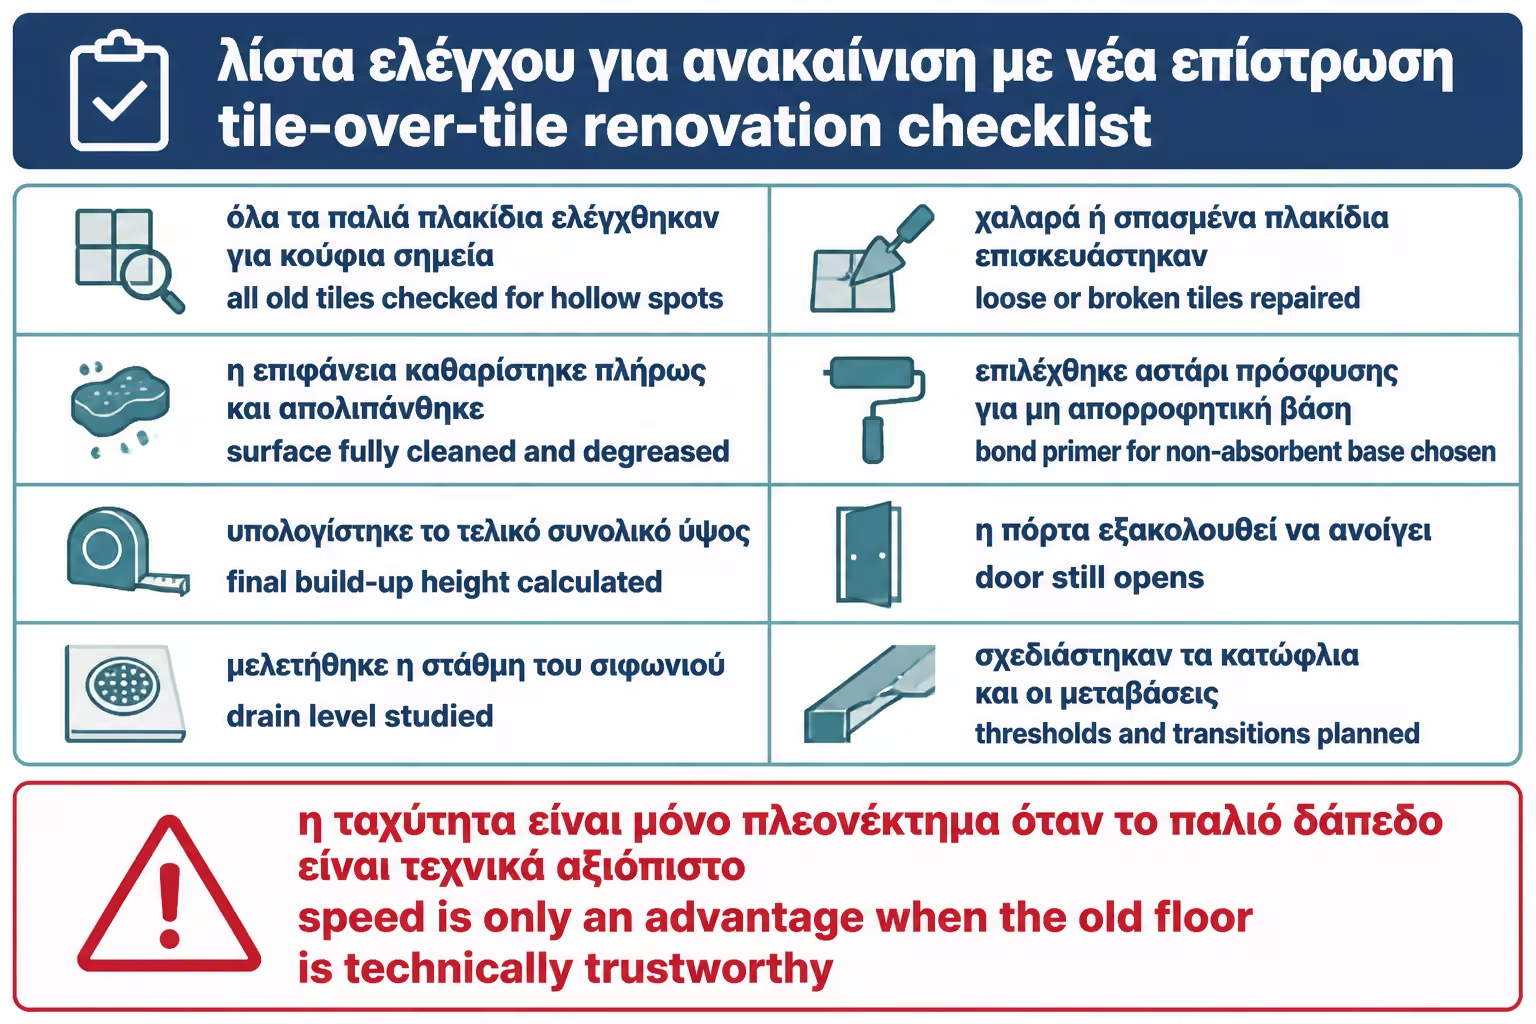
Use the table below as a quick reference for the key points of this section.
| Question | Yes / No |
|---|---|
| Have all the old tiles been checked for hollow spots? | Yes / No |
| Have detached/broken tiles been removed or repaired? | Yes / No |
| Has the surface been completely cleaned and degreased? | Yes / No |
| Has a special adhesion primer been selected for a non-absorbent substrate? | Yes / No |
| Has the final height been calculated together with glues, materials and profiles? | Yes / No |
| Does the door open after raising the floor? | Yes / No |
| Has the siphon and its final level been studied? | Yes / No |
| Are thresholds and transitions to other rooms provided? | Yes / No |
| If LVT/SPC is going in, has the old joint mesh been smoothed out? | Yes / No |
| If microcement is used, is joint filling, sealer and waterproofing provided where necessary? | Yes / No |
If there are many “no” answers, the renovation is not yet ready to begin. The method can be fast, but only when the preparation is done correctly.
If you want to put new material over an old tile, don't ask first "what material should I put?". First ask "can the old floor be used as a substrate?". Tap the tiles, check for moisture, measure doors and siphons, calculate the final height and request the correct adhesion primer for the system you choose. "No excision" is an excellent solution when the base is healthy. When the base is problematic, it simply hides the problem under a new material.
Tile-on-tile renovation can be very practical. Reduces debris, dust, noise and work time. Allows quick refresh with new tiles, LVT/SPC, microcement or other thin systems. It is ideal for residential houses, small bathrooms, WCs, kitchens and areas where stripping would create a big disturbance.
But success is judged before the new material comes in. It is judged by whether the old tile is stable, by whether the surface has been properly cleaned, by whether a suitable adhesion primer has been used, by whether the final height has been calculated, and by whether the siphons, doors and thresholds work after the change. The old floor does not disappear. It becomes the basis of the new project.
For the owner, the right attitude is neither fear nor haste. The method can be great when done technically right. But if there are hollow tiles, dampness, bad slopes or a big problem with height, stripping may ultimately be the safest and most economical solution in the long run. In renovation, the fastest is not always the right; the right is what will not need to be done again.
Return to category.
Go to categoryReturn to the central guide.
Go to guide