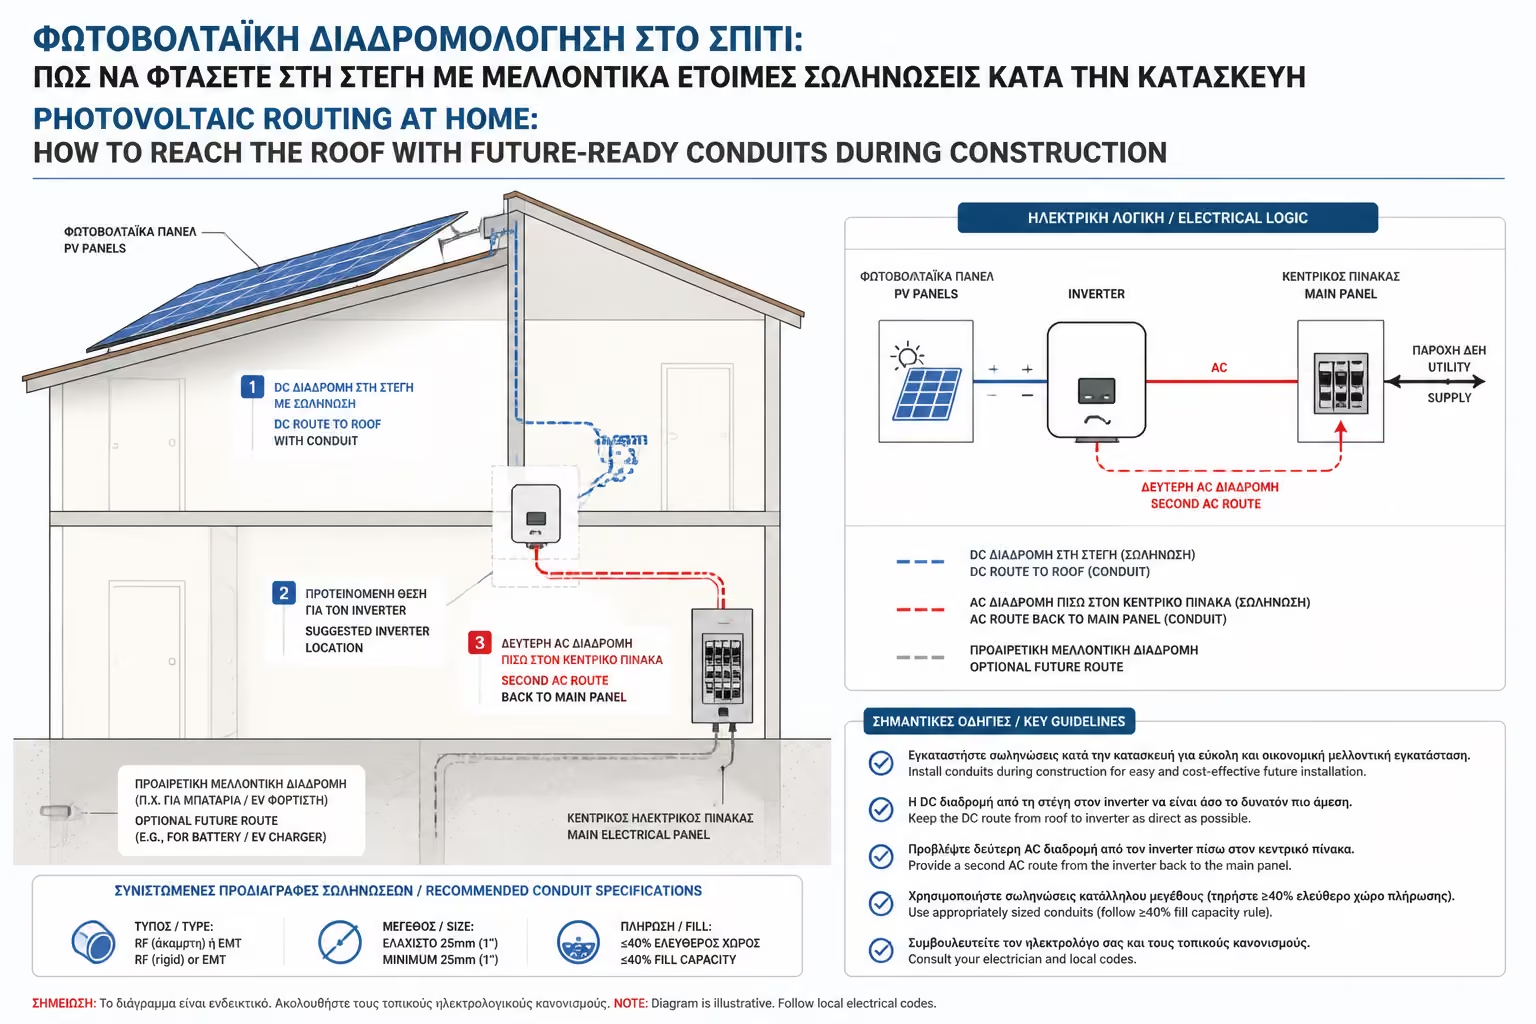
Empty conduit, not random pre-installed cables
Photovoltaic systems require their own dedicated continuous cables and should not be trapped in improvised old routes.
The decision to install photovoltaics often comes years after the house is finished. If no hidden route has been prepared from the roof down to the inverter area and the main board, the installer will almost inevitably resort to exposed plastic trunking.
The cost of making the right provision today is negligible compared with the later aesthetic damage and the need for drilling, chasing and patch repairs. In practice, you need the right empty conduits, a pull cord, a sensible inverter location and basic data infrastructure.
The goal is not to buy the entire PV system today. The goal is to create a clean and functional corridor so the future installation can happen without improvisation on the completed architecture of the house.
The most difficult and important route is the vertical path that starts at the roof or terrace and reaches the place where the inverter will eventually be installed. The dedicated DC solar cables will pass through this route, so the conduit must remain empty, clean and shaped with generous bends.
In practice, you do not want a narrow or highly twisted flexible conduit. You want a 40 mm or 50 mm route, as straight as possible, with controlled curves and a pull cord tied at both ends. The more generous the section, the easier the future cable pull will be.
The best moment to create this path is while the building is still in the structural phase or during a heavy renovation. At that stage, you can integrate it into columns, shafts or external insulation layers without damaging the finished architecture later.
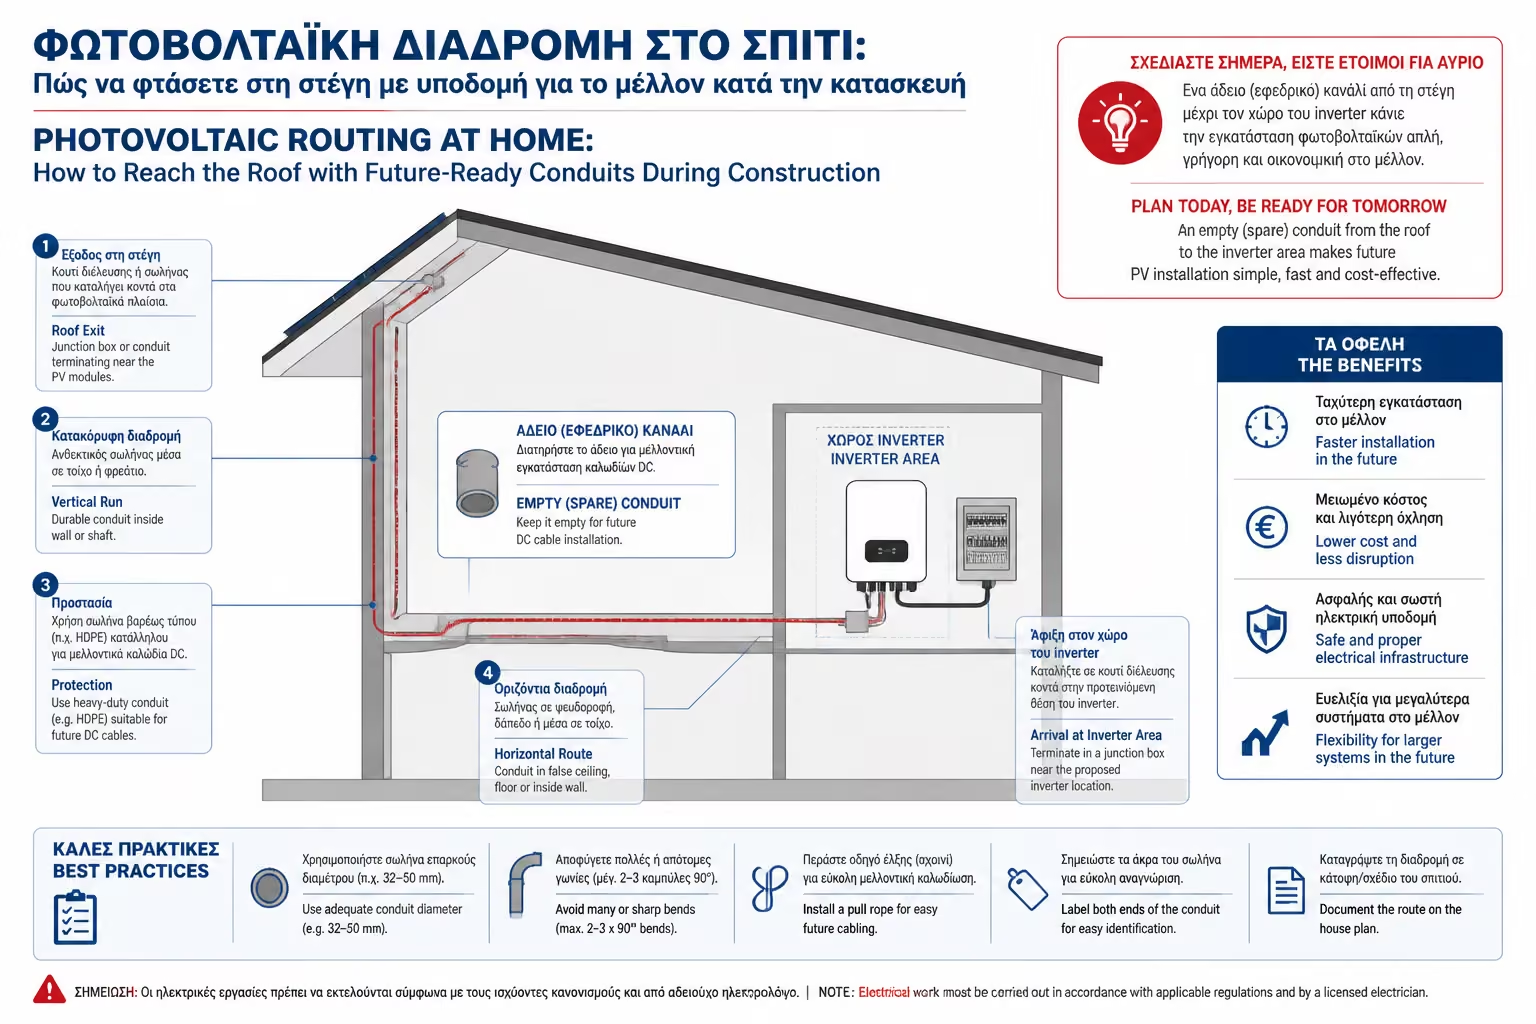
Photovoltaic systems require their own dedicated continuous cables and should not be trapped in improvised old routes.
A larger diameter creates genuine margin for safe pulling and future changes.
A simple cord can turn a difficult later task into a five-minute operation.
Too many hard corners destroy the route before it is ever used.
Once the DC line comes down from the roof, the inverter has to convert it to AC and send that power toward the main panel. That means the provision does not stop with the first conduit. You also need a second route from the future inverter position back to the main electrical board.
The inverter location should not be chosen casually. You want a space with ventilation, reasonable protection from excessive heat, easy service access and sensible distance both from the roof route and from the panel. Storage rooms, garages and utility areas are usually much better choices than bedrooms or sealed cupboards.
For the AC side, an empty 25 mm or 32 mm conduit is often sufficient, but the exact size depends on future power and on whether the final supply will be single-phase or three-phase. The provision must let the final installer pull the correct cable without re-opening the house.
It needs ventilation, access and rational proximity to both roof and panel.
The system needs a clean AC connection to integrate properly with the house installation.
That is often enough, but the final choice depends on power and building layout.
A poor location complicates every future maintenance or upgrade task.
Modern photovoltaics are not only about producing power; they are also monitoring systems. Owners expect to see generation, consumption, alerts and historical data in an app or portal. To support that properly, the inverter needs reliable communication infrastructure.
Wi-Fi is not always enough, especially when the inverter sits in a basement or peripheral utility area. That is why it is worth routing a Cat 6 UTP cable today from the inverter position back to the router or central telecom point of the house.
Many system layouts also require communication with a smart meter or sub-meter near the panel. When the data logic is planned early, monitoring, control and the possibility of a future battery become much cleaner and easier.
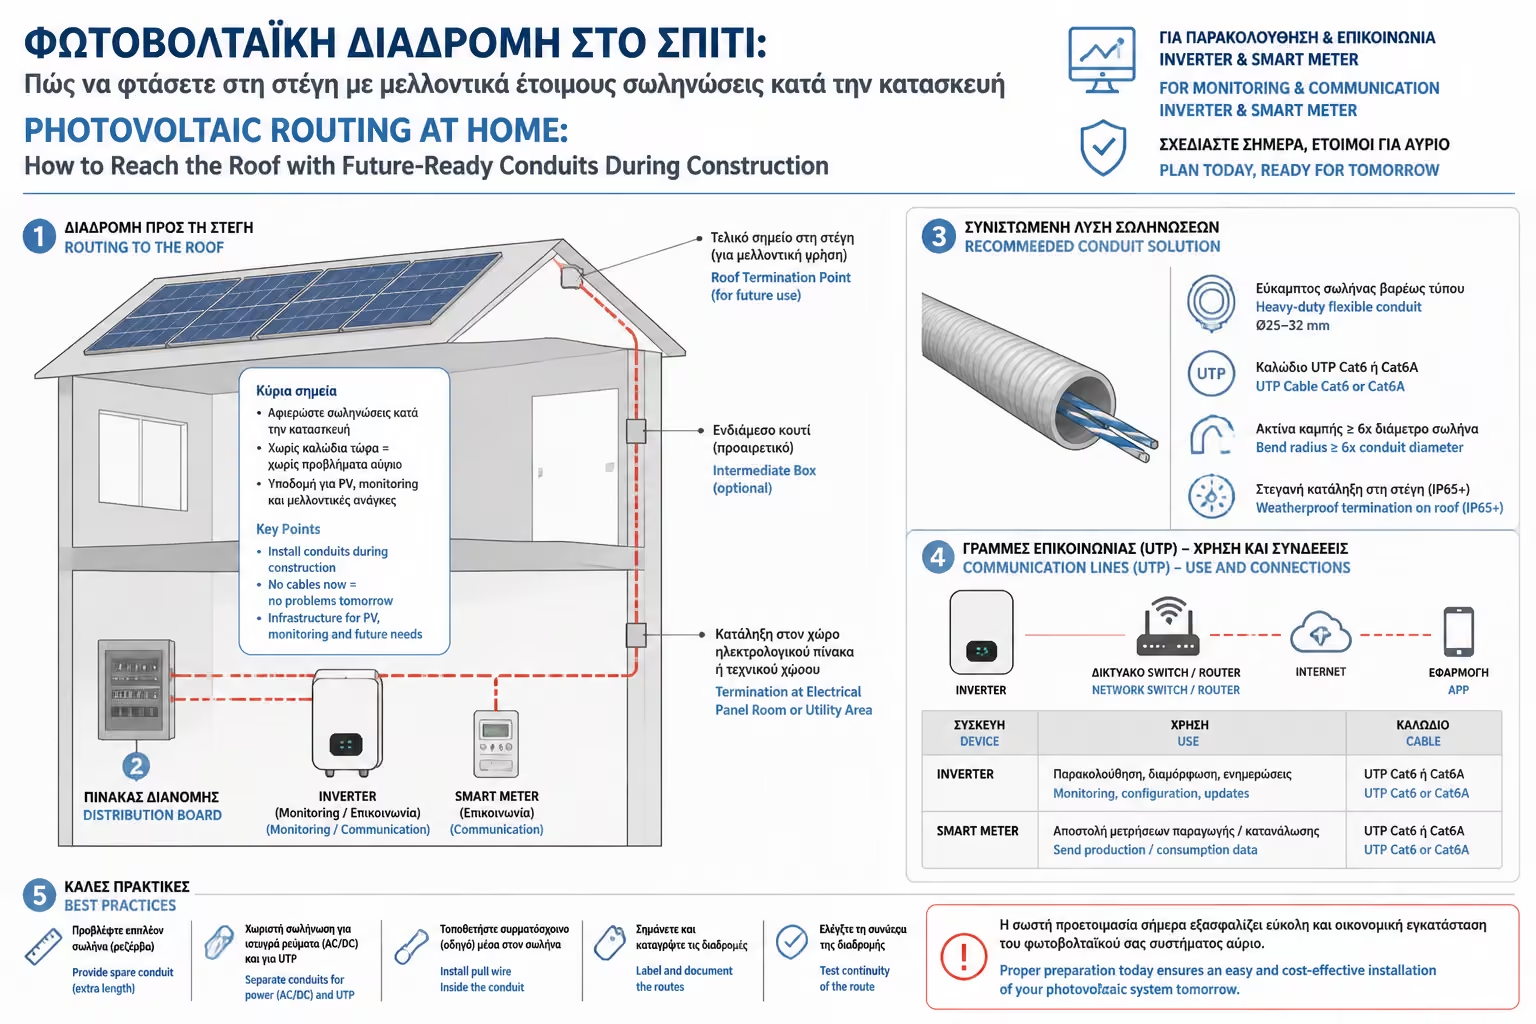
Today’s user expects to know what the array produces and what the home consumes in real time.
A wired link is far more dependable in garages, basements and service rooms.
Communication between inverter and panel often becomes a structural part of the final design.
The cleaner the communication backbone, the easier the system is to extend.
The metal frames and mounting structure of the panels need correct grounding and proper integration with the building’s earthing system. It is not enough to think only about the energy cables. You also need a clean route for the earthing conductor from the roof down to the appropriate connection point.
In many cases the correct answer is to reserve a dedicated path for a 10 mm² or 16 mm² green-yellow conductor, depending on the final study and arrangement. That prevents the installer from improvising later with exposed runs or questionable earthing shortcuts.
Careful photographic documentation of all conduits before the walls and finishes are closed is equally valuable. When the real PV installation happens, the technician should know exactly where the routes are and how to work quickly and safely.
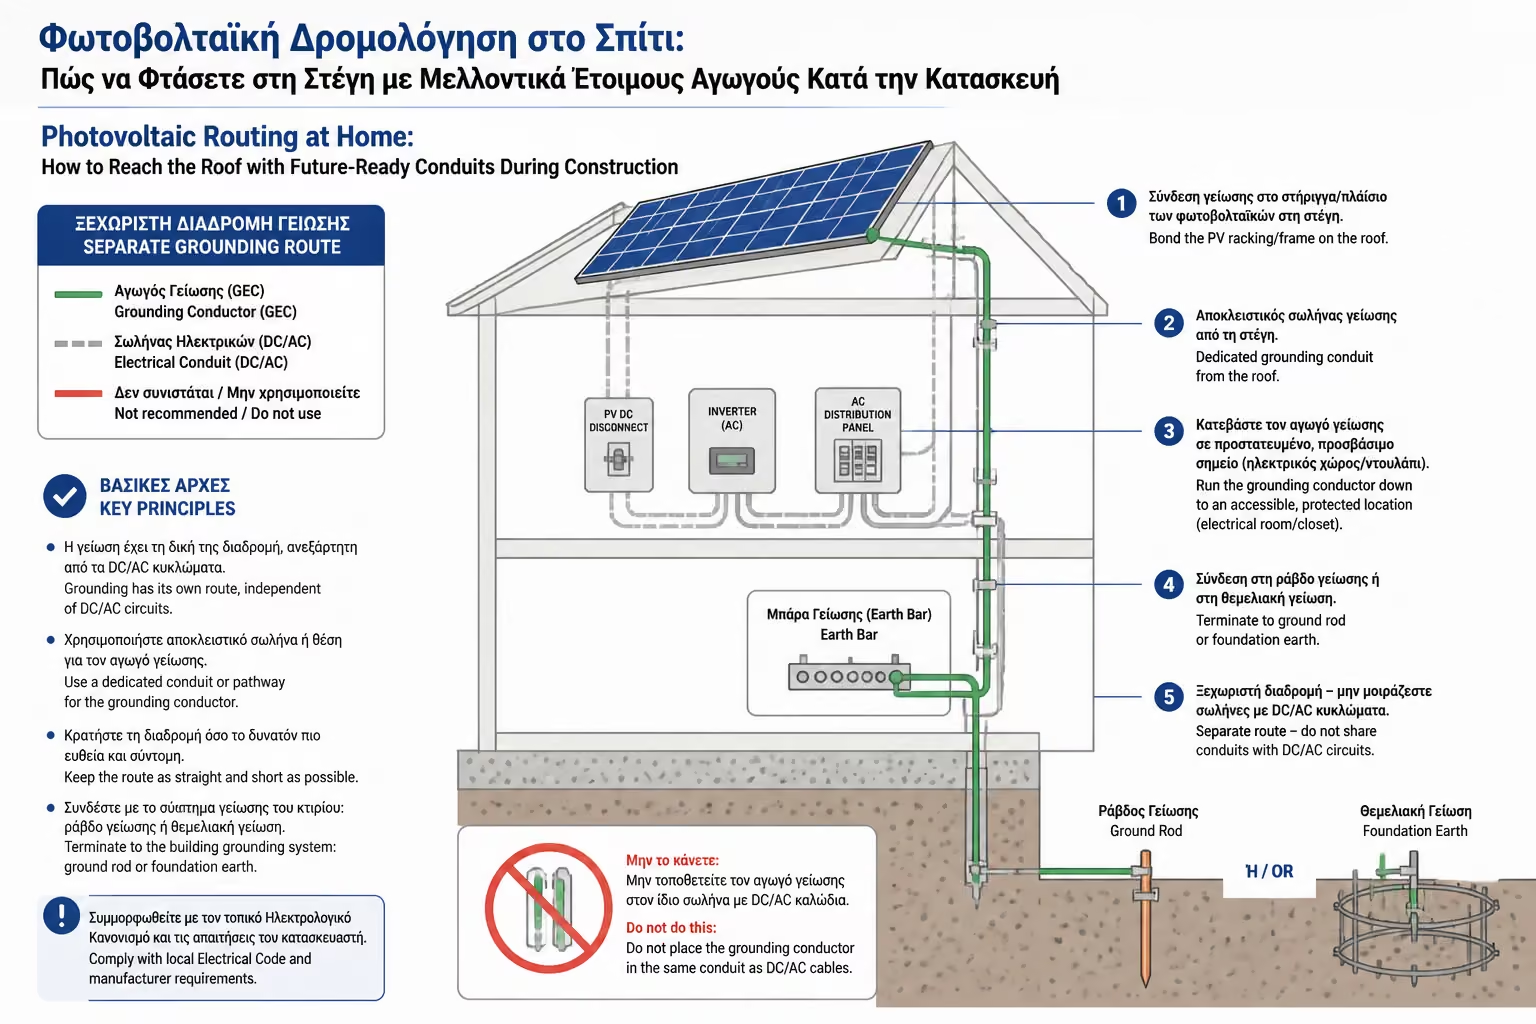
System protection should never rely on guesswork or on a late improvised connection.
The final size comes from the design, but the route should already exist.
Every provision must terminate at a correct and genuinely accessible point.
Documentation turns the future installation from guesswork into planned execution.
Preparing for photovoltaics is not about buying equipment today. It is about building invisible routes that preserve the architecture of the house later.
Return to category.
Go to categoryReturn to the central guide.
Go to guide