Deep boxes at 50-60 mm
They support both today's cable arrangement and tomorrow's smart-device additions.
Many of the visual defects in an electrical installation do not come from the switch or socket itself, but from the box hidden behind it. If the recessed box is crooked, too shallow or poorly fixed, the problem remains visible for years.
The process only looks simple to people who have never had to pay for the mistake later. A box buried behind the plaster or a visibly crooked multi-gang frame is difficult to correct once the house is finished.
That is why box depth, plaster allowance, accurate levelling and reliable fixing are all essential parts of a quality installation.
The paradox is that this is a cheap operation with huge visual importance. If precision is lost here, even the most expensive switchgear cannot hide the mistake later.
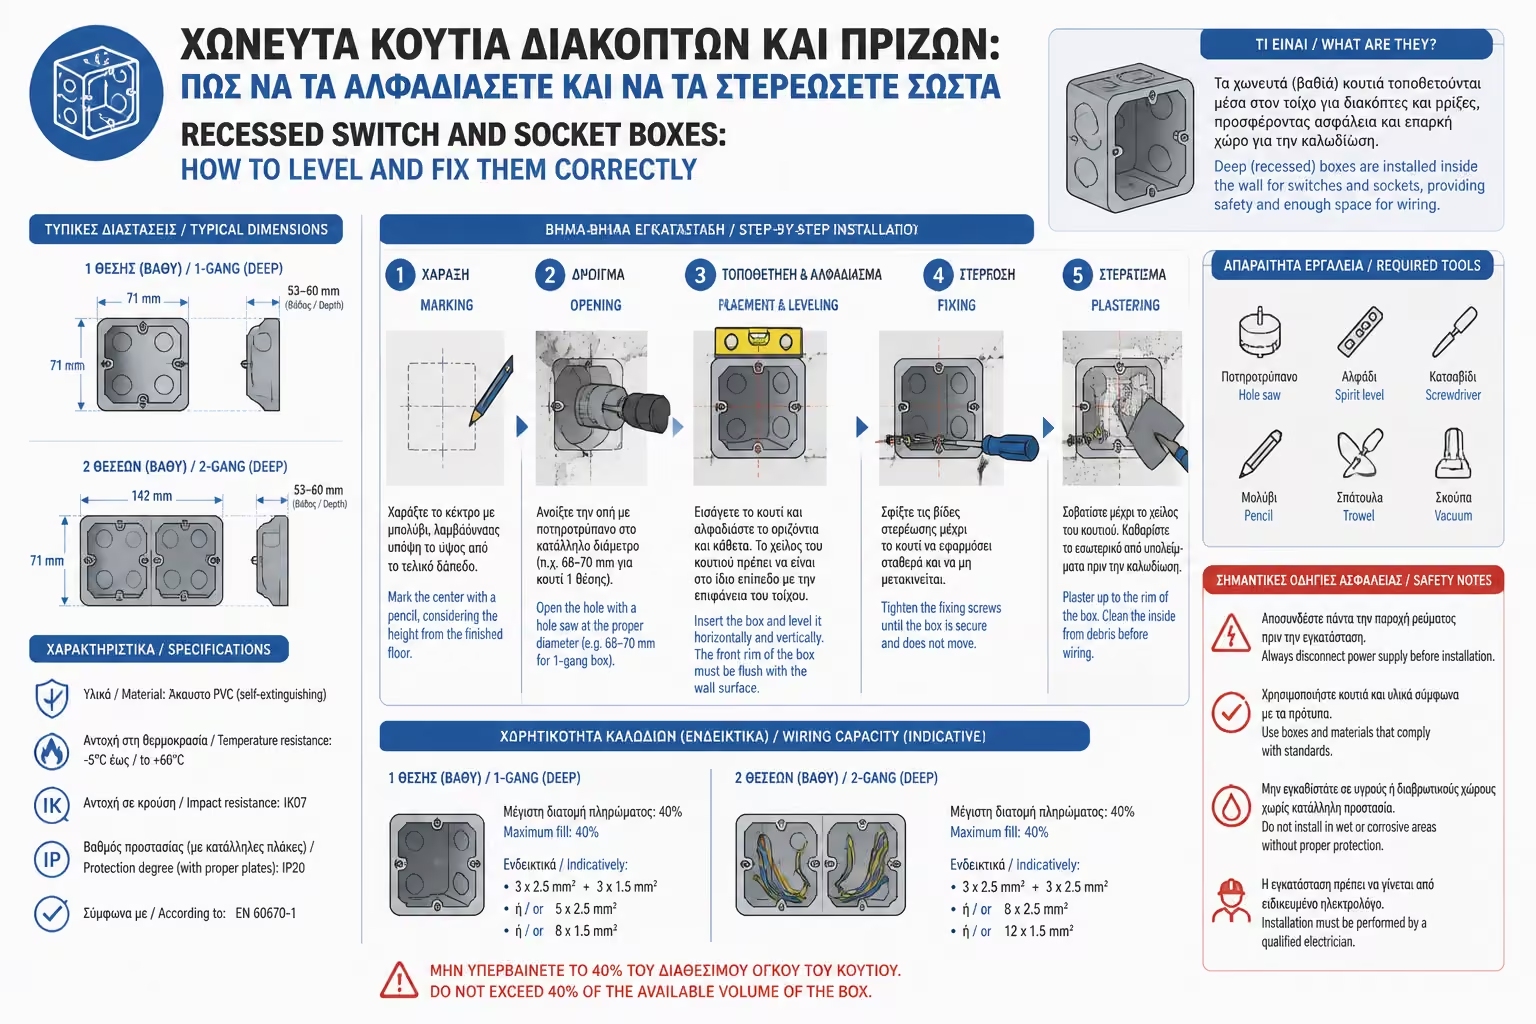
Shallow legacy boxes may have been acceptable in simple installations, but today they create limitations almost everywhere. Extra conductors, dimmers, smart relays and multi-gang devices all need space.
That is why deep 50 or 60 mm boxes are not a luxury but a serious technical choice. They leave room for folding conductors comfortably and for later upgrades without reopening the wall.
The same applies to grouped installations. If multiple boxes are not factory-linked or correctly spaced, the final frames often sit awkwardly or refuse to line up cleanly.
They support both today's cable arrangement and tomorrow's smart-device additions.
The cost difference is tiny compared with the functional advantage.
They lock the spacing between devices at the correct factory dimension.
The box should support future requirements, not only today's basic switch or socket.
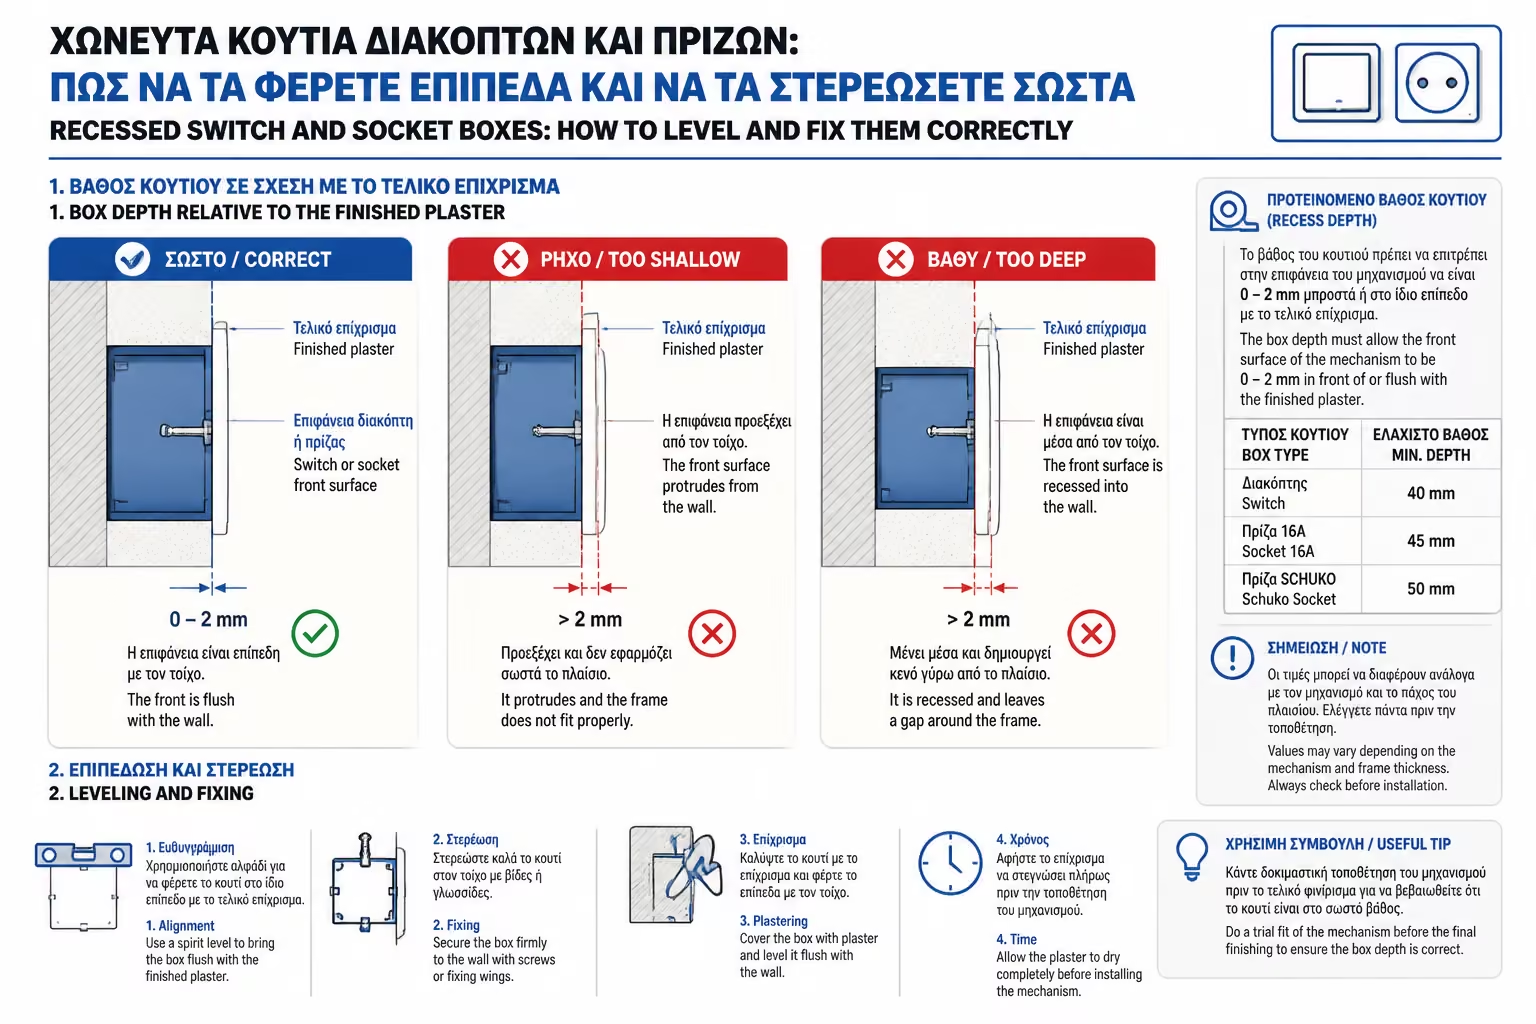
A classic mistake is setting the box flush with the bare masonry. Once the plasterer adds the final build-up, the box disappears into the wall and the device can no longer fix or support itself properly.
A competent installer thinks in terms of the finished surface. The rim of the box has to align with the final plaster plane, not with the rough blockwork visible on site today.
That means coordinating with the plastering team rather than guessing. Otherwise even a premium switch looks wrong because the substrate behind it was set badly.
On walls that will also receive tiles or another lining layer, the calculation becomes even stricter. The box depth has to account for the entire final build-up, not only the base plaster.
The unfinished wall is not the correct technical datum.
That is what lets the mechanism and frame sit cleanly and securely.
Guide thicknesses and final finish build-up must be known in advance.
Minimal premium frames expose depth mistakes immediately.
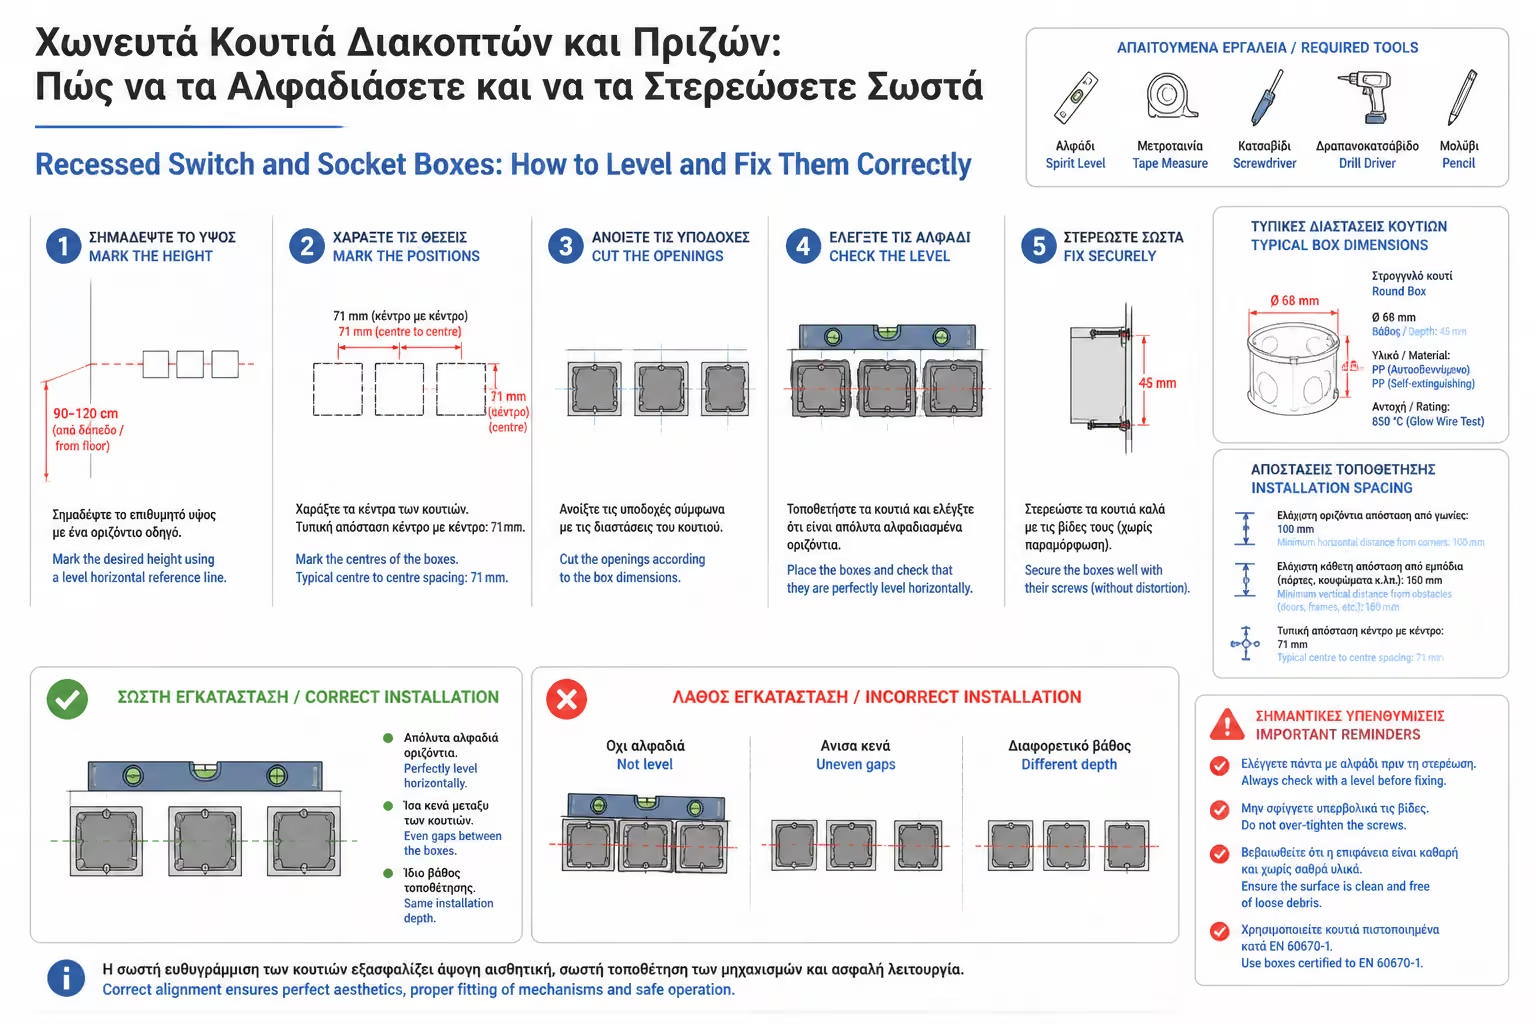
If the boxes go in crooked, the final switch or socket remains crooked forever. The error may look minor on a single device, but it becomes obvious on double, triple or quadruple frames.
Fixing points and box axes should be checked with a level or laser before the plaster or fixing material sets. Precision at this stage is far cheaper than any later correction.
Alignment is not only visual. Correct geometry helps mechanisms sit properly, reduces stress and improves the feel and durability of the finished installation.
Once hardened, corrections become dirty, slow and expensive.
The visual deviation grows dramatically across multiple devices.
The final mechanism depends on those fixing axes, not only on the outline of the plastic box.
A correct base reduces distortion and strain in the visible frame.
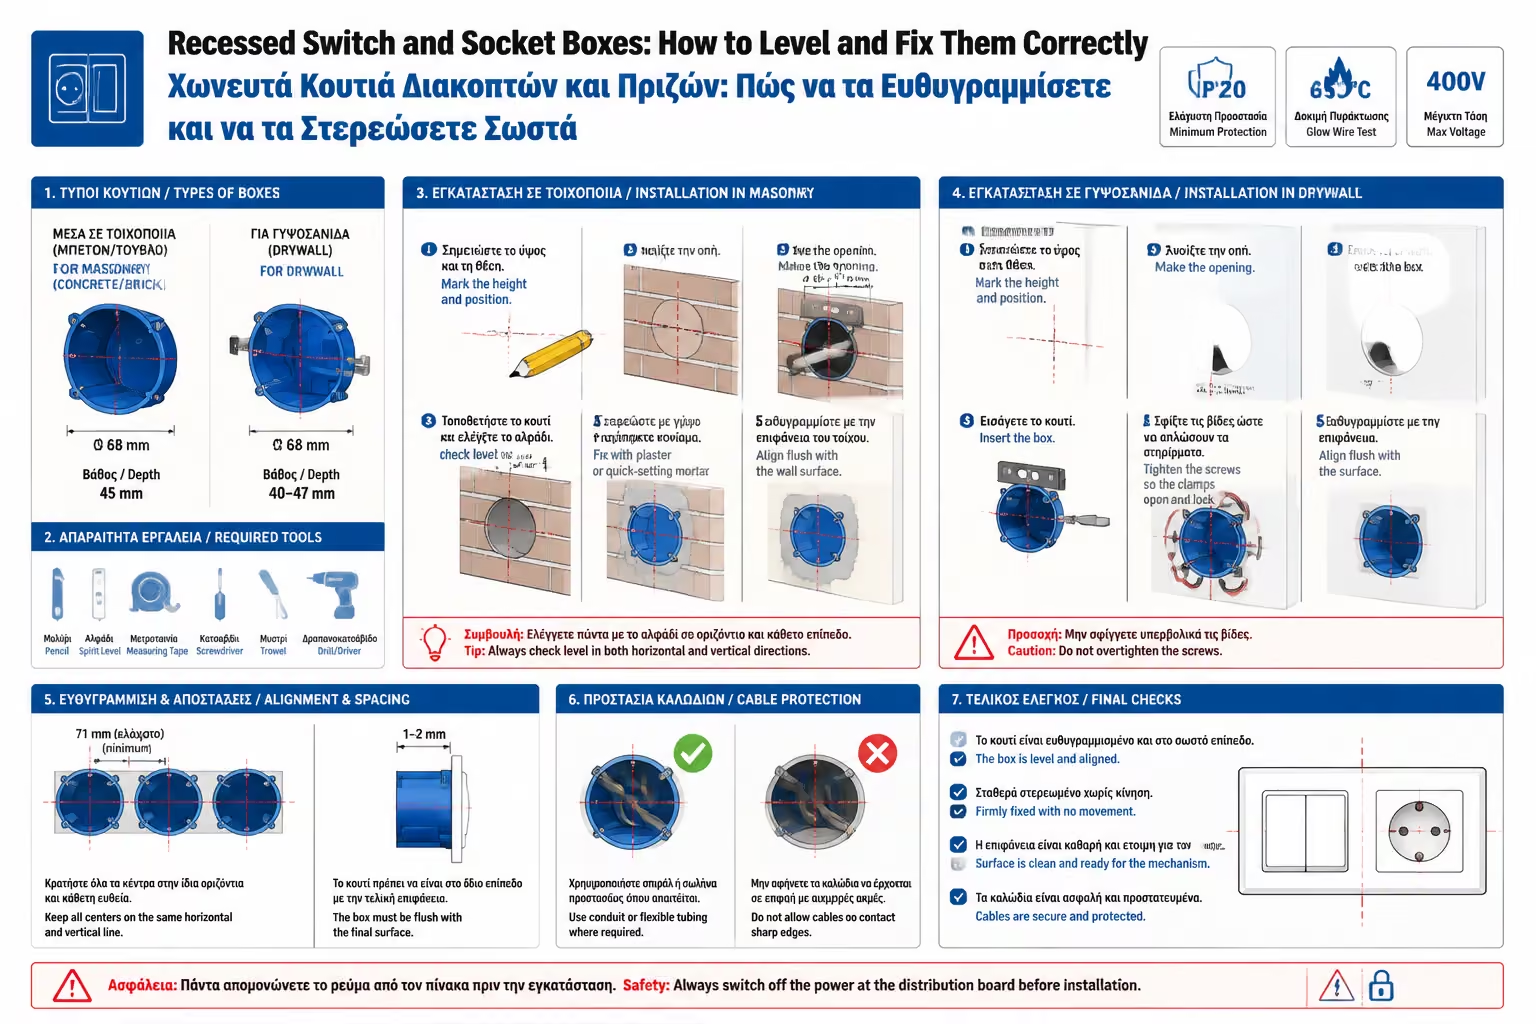
In masonry, correct fixing requires a clean and slightly damp opening, suitable plaster or setting material and care so the box interior and conduits do not fill with residue. If the brick stays dusty and dry, the fixing bond is weakened and the outlet may loosen later.
In drywall the method is completely different. No plaster is used. You need dedicated hollow-wall boxes with fixing tabs and an accurately cut opening, because if the hole is too large the box has nothing to grip.
The techniques differ, but the objective is the same: a stable box, a clean interior, the correct depth and readiness for final device installation only after decorating is complete.
The final test is double: the box must not move, and it must remain clean and usable internally. If plaster, debris or blocked conduit entries remain inside, the problem is simply pushed onto the next technician.
Without preparation, setting plaster will not bond and cure as intended.
Residue inside the box causes needless pain during final device fitting.
Fixing tabs and a precise hole are what make the support reliable.
The box goes in early, while the finished switches and sockets belong in a clean final stage.
Return to category.
Go to categoryReturn to the central guide.
Go to guide