Concealed Lighting and Architectural Routing: What Must Be Planned at the Concrete Stage

Concealed lighting is one of those features everybody loves in a finished home, yet it is usually remembered too late. Owners get inspired by photos of LED strips washing walls, illuminated steps and minimalist recessed fittings in exposed concrete, but these effects are not decorative add-ons that can simply be installed at the end.

In reality they belong to the building infrastructure. If conduits, boxes and routes are not planned before the concrete pour, the later solution usually means lowered ceilings, drilling in structural members, visible trunking or very expensive remedial work. Great architectural lighting starts much earlier than the lighting fixtures themselves: it starts when the structure is still steel and formwork.

1. The "We will decide later" mistake and structural safety

In Greek construction, most houses rely on a reinforced concrete frame. Columns, beams and slabs are full of steel reinforcement, which is exactly why you cannot casually damage them later just to pass a forgotten cable.

When an electrician is asked to create a new concealed route after the concrete has already been poured, there are usually only two bad options: expensive specialist drilling or rough chasing with the risk of cutting reinforcing steel. In both cases the cost rises sharply and the safety discussion starts for no good reason.

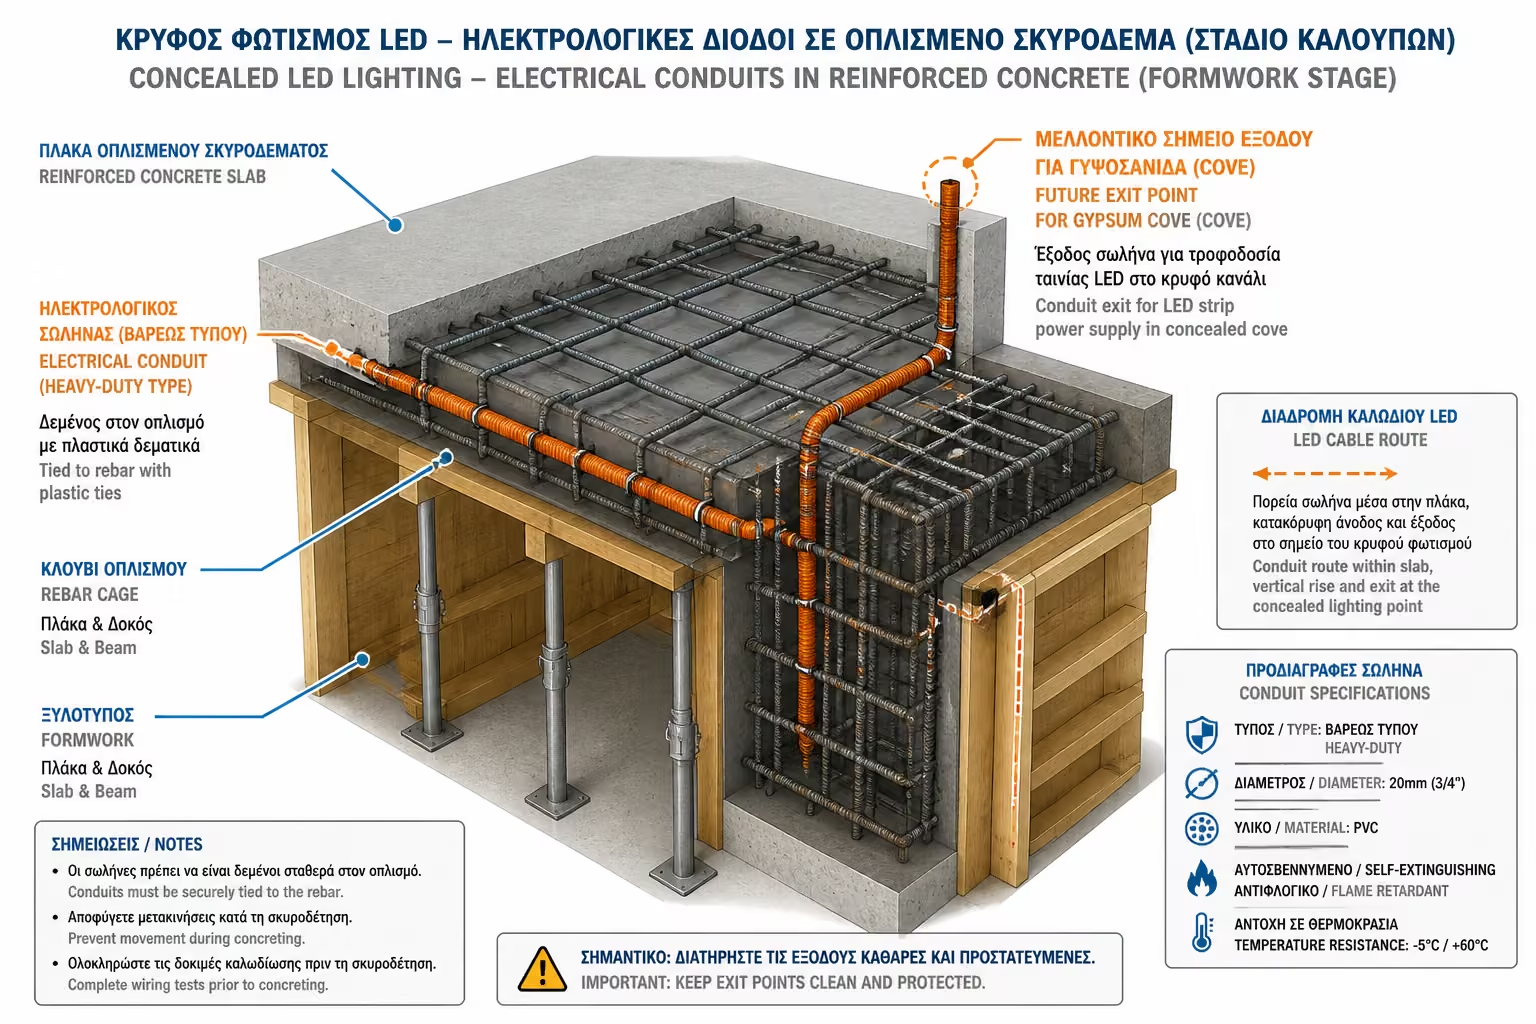
Concealed lighting provisions on formwork before the concrete pour

🛡️ The structure is not a place for improvisation

Beams and slabs should not be hacked open just to feed an LED line. Any later intervention in the concrete is both technically and structurally sensitive, especially in a seismic country such as Greece.

💸 Late design decisions cost several times more

Providing a conduit before the concrete truck arrives is cheap. Creating the same route after stripping the formwork may require specialist coring, repair work and redesign of suspended ceilings.

📐 The correct solution happens on the formwork

Heavy-duty conduits and concrete boxes must be tied to the reinforcement and fixed to the formwork before the pour. That way they become part of the structure without any later damage.

2. The three locations that absolutely need advance provision

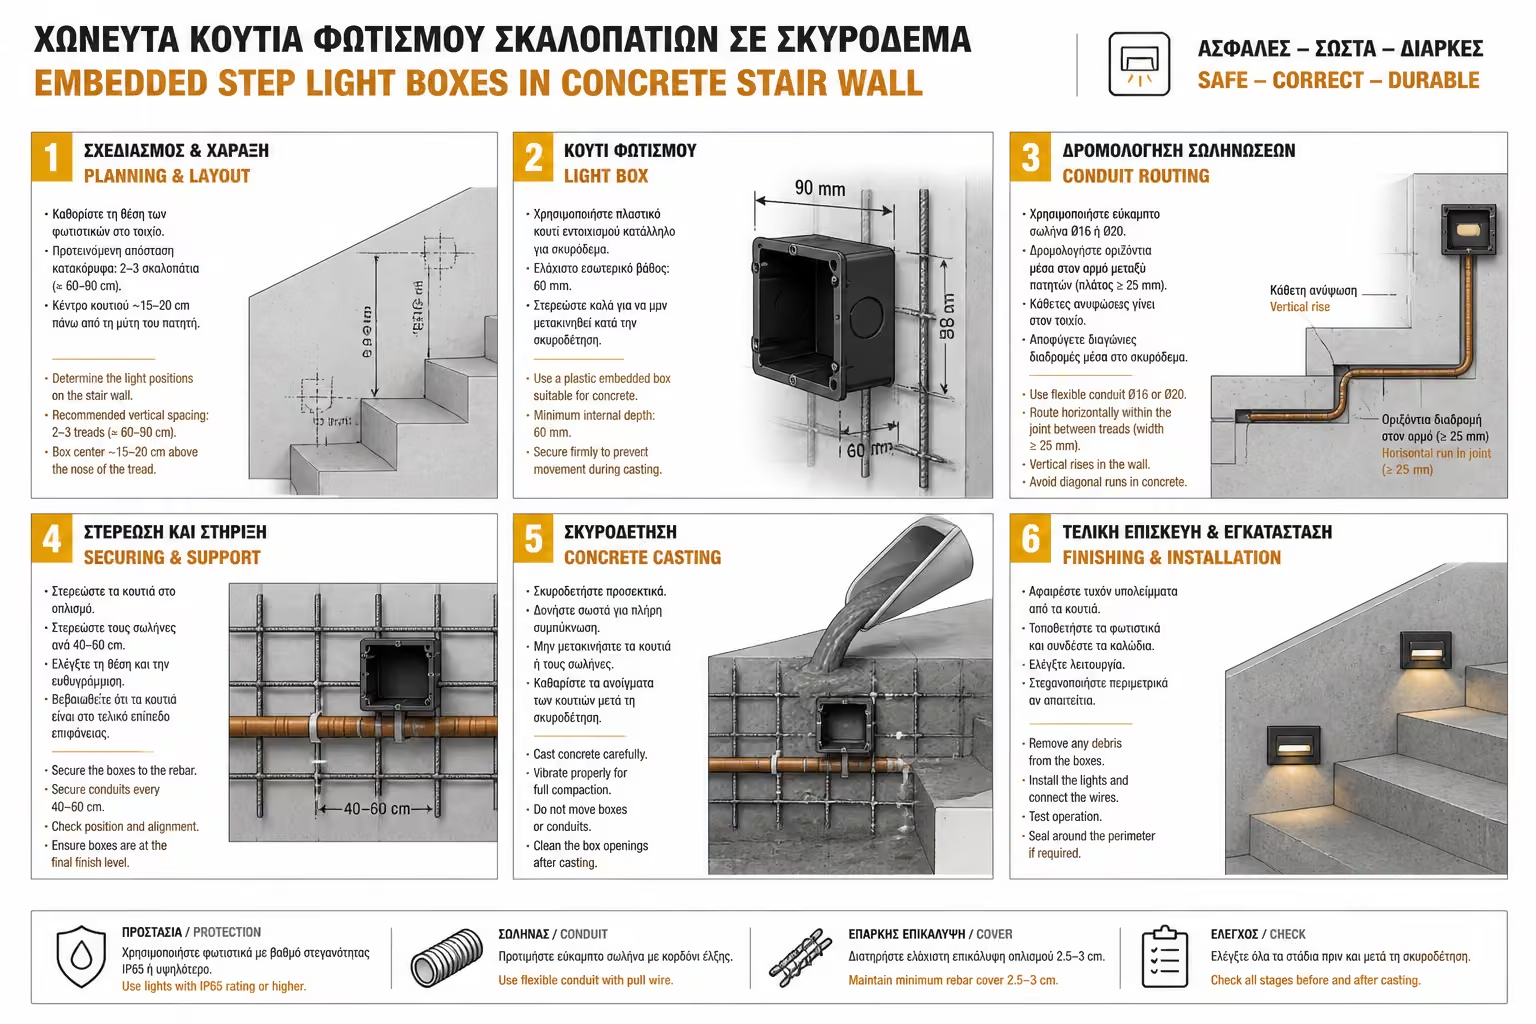
Concrete boxes and conduits for stair lighting

If you want a premium result, the discussion with the engineer and the electrician must happen before the concrete stage. It is not enough to say vaguely that you may want nice lighting later. You need to know which architectural elements will be lit and how power will reach them.

1️⃣ Concealed ceiling lighting

Perimeter plasterboard coves and LED recesses need conduits emerging exactly at the start of the strip. If the cable comes out in the wrong place, the drylining contractor will have to hide improvised extensions or alter the whole geometry.

2️⃣ Stair lighting

Step lights require dedicated concrete boxes and conduits embedded in the stair wall. Because stair cores are usually solid concrete, adding routes later is either impossible or highly invasive.

3️⃣ Facade and soffit lighting

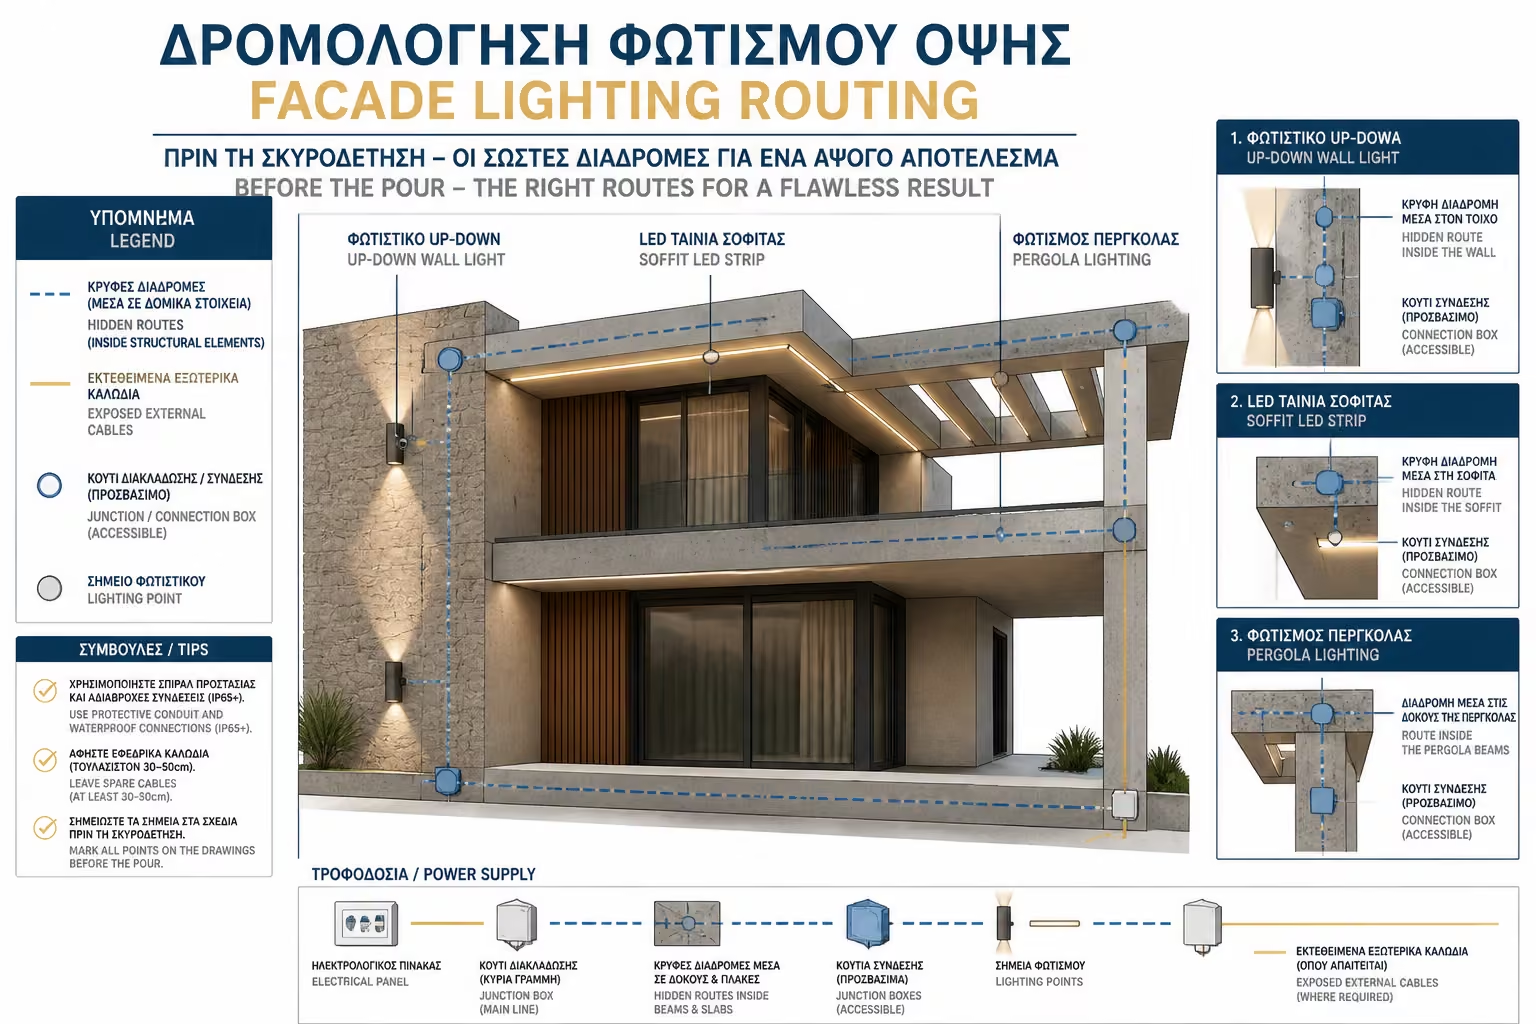
Up/down wall lights, pergola lighting and concealed strips below roof edges all require routes through beams and slabs from the start. If forgotten, the fallback is visible external wiring that ruins the facade.

3. The hidden LED trap: where the drivers will go

This is where even experienced crews often fail. Most LED strips and many architectural fittings do not run directly on 230V. They need 12V or 24V drivers or power supplies.

If the design stops at “leave me one cable in the ceiling,” the problem appears during procurement: you suddenly have a metal power supply the size of a brick that must be hidden somewhere, ventilated and still remain accessible for replacement.

Facade lighting routes inside beams and slabs

⚠️ The single loose cable mistake

A simple 230V outlet point without a driver location does not solve anything. Later you end up trying to hide the power supply in a tiny plasterboard void or behind an inadequate access hatch.

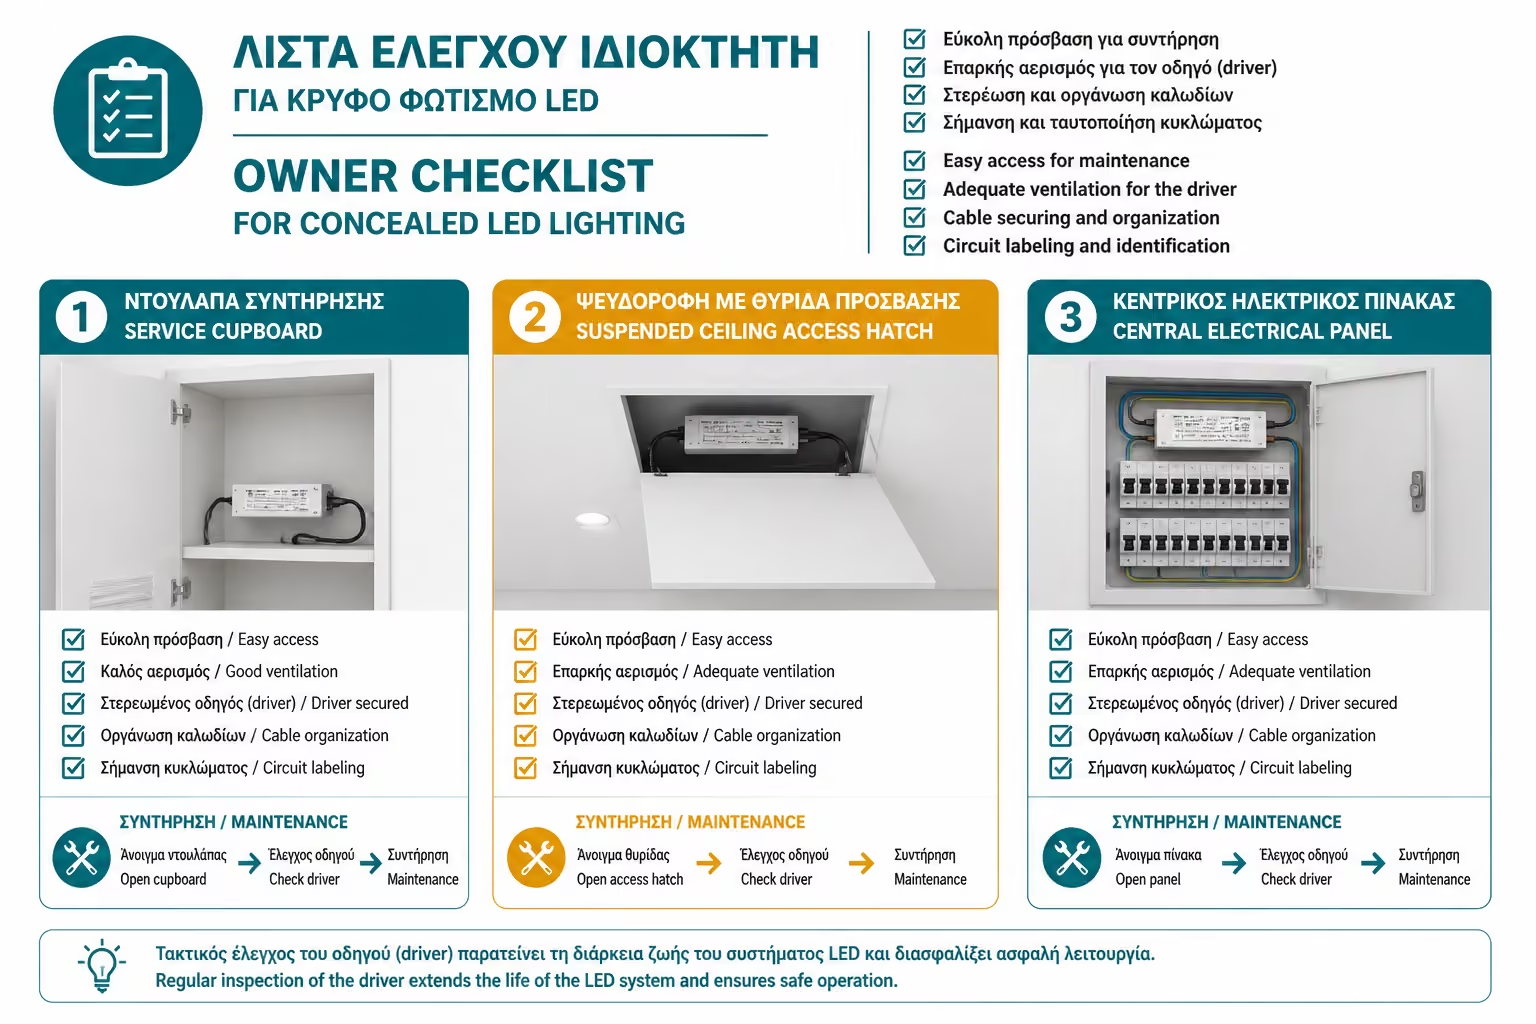
🧰 The practical solution inside cupboards or ceilings

For smaller applications you can provide a larger junction space or an accessible compartment inside joinery or suspended ceilings. The key requirement is maintenance access without demolition.

🎯 The best solution is routing back to the panel

The most professional approach is to provide separate conduits all the way back to the main electrical panel or another organised technical zone. Then every driver stays accessible, ventilated and tidy.

4. The owner's checklist before the concrete pour

A few hours before the concrete truck arrives, it is worth doing one final walk-through with the supervising engineer and the electrician. At this stage almost everything can still be corrected easily. After the pour, mistakes become embedded in the structure.

LED driver locations and the owner's final site check

📋 Check the ceiling and stair boxes

If you requested recessed fittings in exposed concrete or lighting in the stair core, make sure the dedicated concrete boxes are really fixed into the formwork and the conduits actually reach them.

🌿 Do not forget the external lighting

Supplies for gate lighting, pergolas, garden routes and future wall lights must be provided now. Remembering a facade lighting point later is usually too late.

📸 Photograph everything

Before the pour, take detailed photos and video of every conduit laid over the reinforcement. That record can save you years later when you want to drill, hang or extend something safely.

💡 The rule is simple: every light fitting that should disappear in the final design needs very visible planning on site.

Related Articles

Preview